
RAF: Lion – A Prelude to Eagle Day
Overview
At long last, I finally sat down to play RAF: The Battle of Britain 1940. I’ve had it for a few years now but it’s never seen table time. I’ll give my first impressions of the game as we go.
Components
RAF: The Battle of Britain 1940 is actually 3 games:
- RAF: Lion – Solitaire command of the British
- RAF: Eagle – Solitaire command of the Germans
- RAF: Lion vs Eagle – 2-player British vs Germans
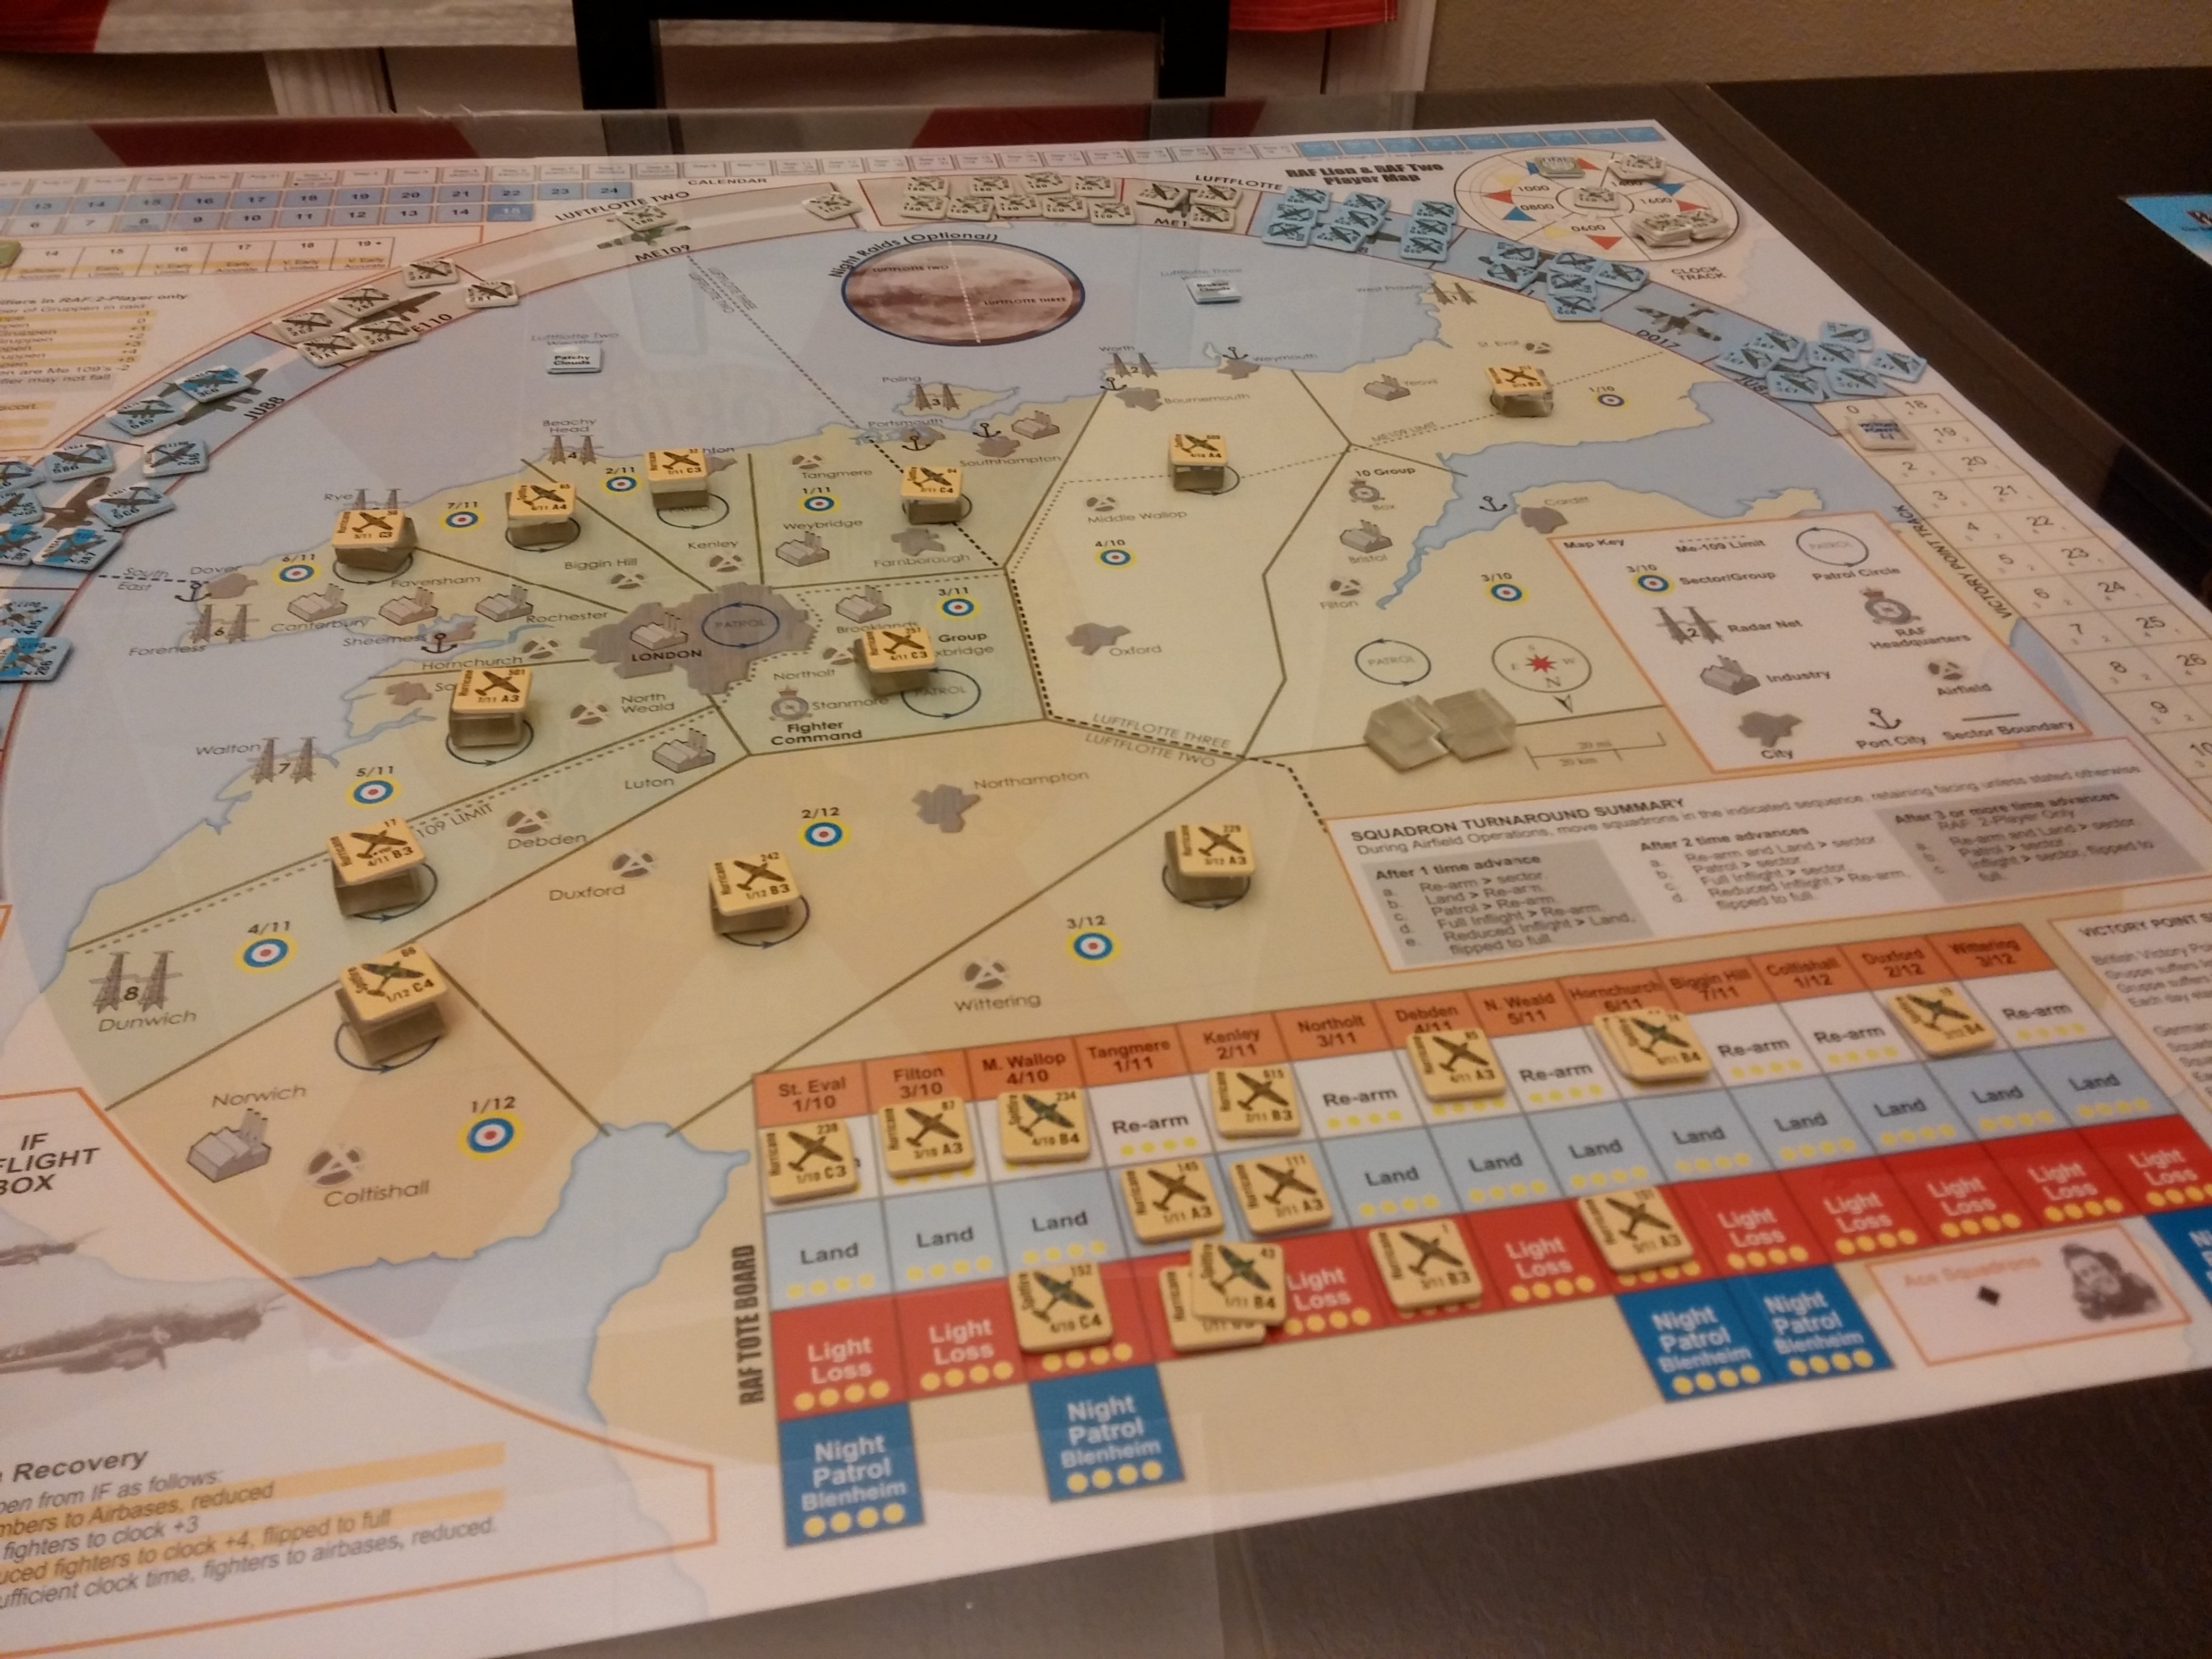
Components are quite nice in this edition. The maps are chock-full of player aids, as should be the case in solitaire games, and are generally pleasant to look at. They’re also pretty abstracted–Britain is a big pastel blob broken up into various squadron AOs with geographically correlated game-related iconography sprinkled over it. You don’t really need a detailed map, as it would be pretty visually distracting. The simplicity of the graphic design therefore doesn’t detract from the feeling of being under attack:

To achieve this, the designers flipped North and South, and the Luftwaffe tokens literally form a concave envelopment, giving you the feeling of being surrounded.
The counters are quite nice: printed on good stock, host to attractive plane silhouettes, clearly visible and parsable metadata, etc. Getting them out of the tree required a hobby knife though, leaving unseemly counter corners. I religiously clip my counters with a rounded corner punch so this didn’t bother me in the slightest. If you’re one of those heathens that doesn’t clip your counters, you may have to spend a little extra time trimming them out of the tree to achieve a reasonably presentable look.
An Aside on Jellybeans
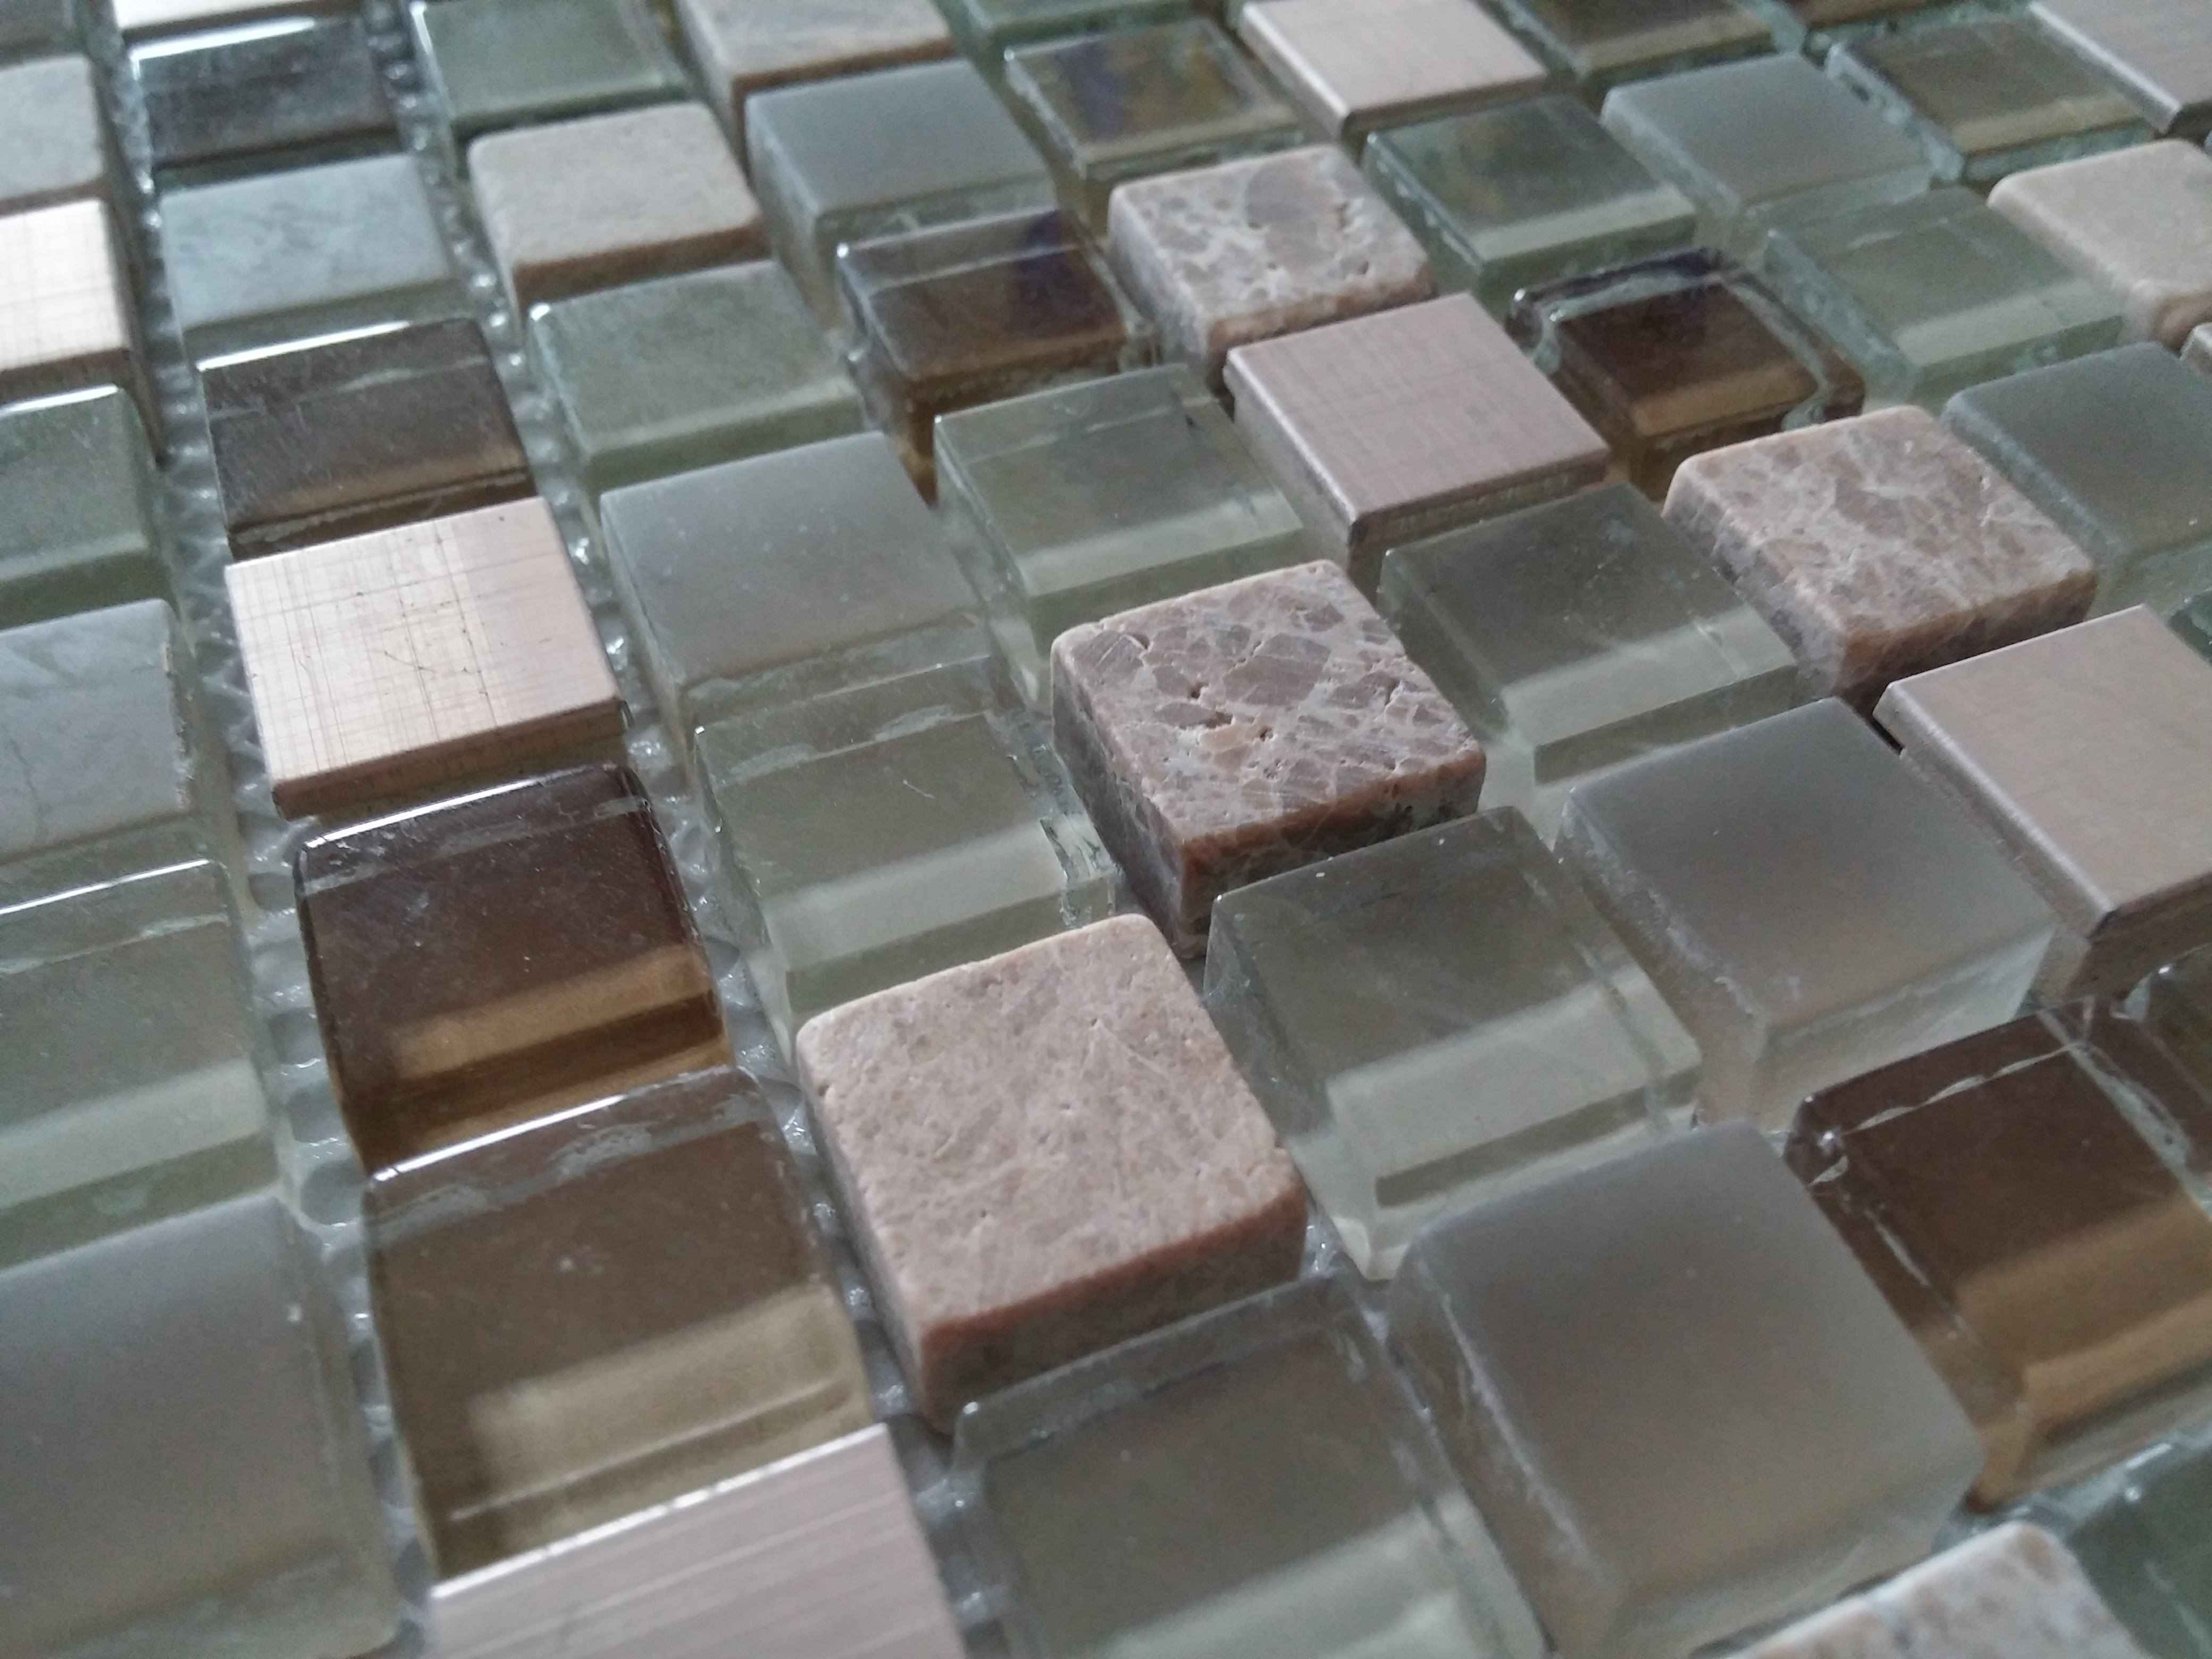
Jellybeans are what a friend of mine calls game pieces. It’s a good name. I started the following process by watching Stuka Joe‘s excellent introductory video to RAF: Lion and was super excited by his token riser game aids, which he uses for denoting squadrons on patrol. Essentially you put your squadron counter on top of these little tiles/risers, and squadrons on patrol literally “fly” over squadrons on the ground. It makes for easy visual identification of squadron status. I’ve followed StukaJoe’s advice on that and bought my own set of risers. Essentially what we both did was purchase tile mosaics from a hardware store.
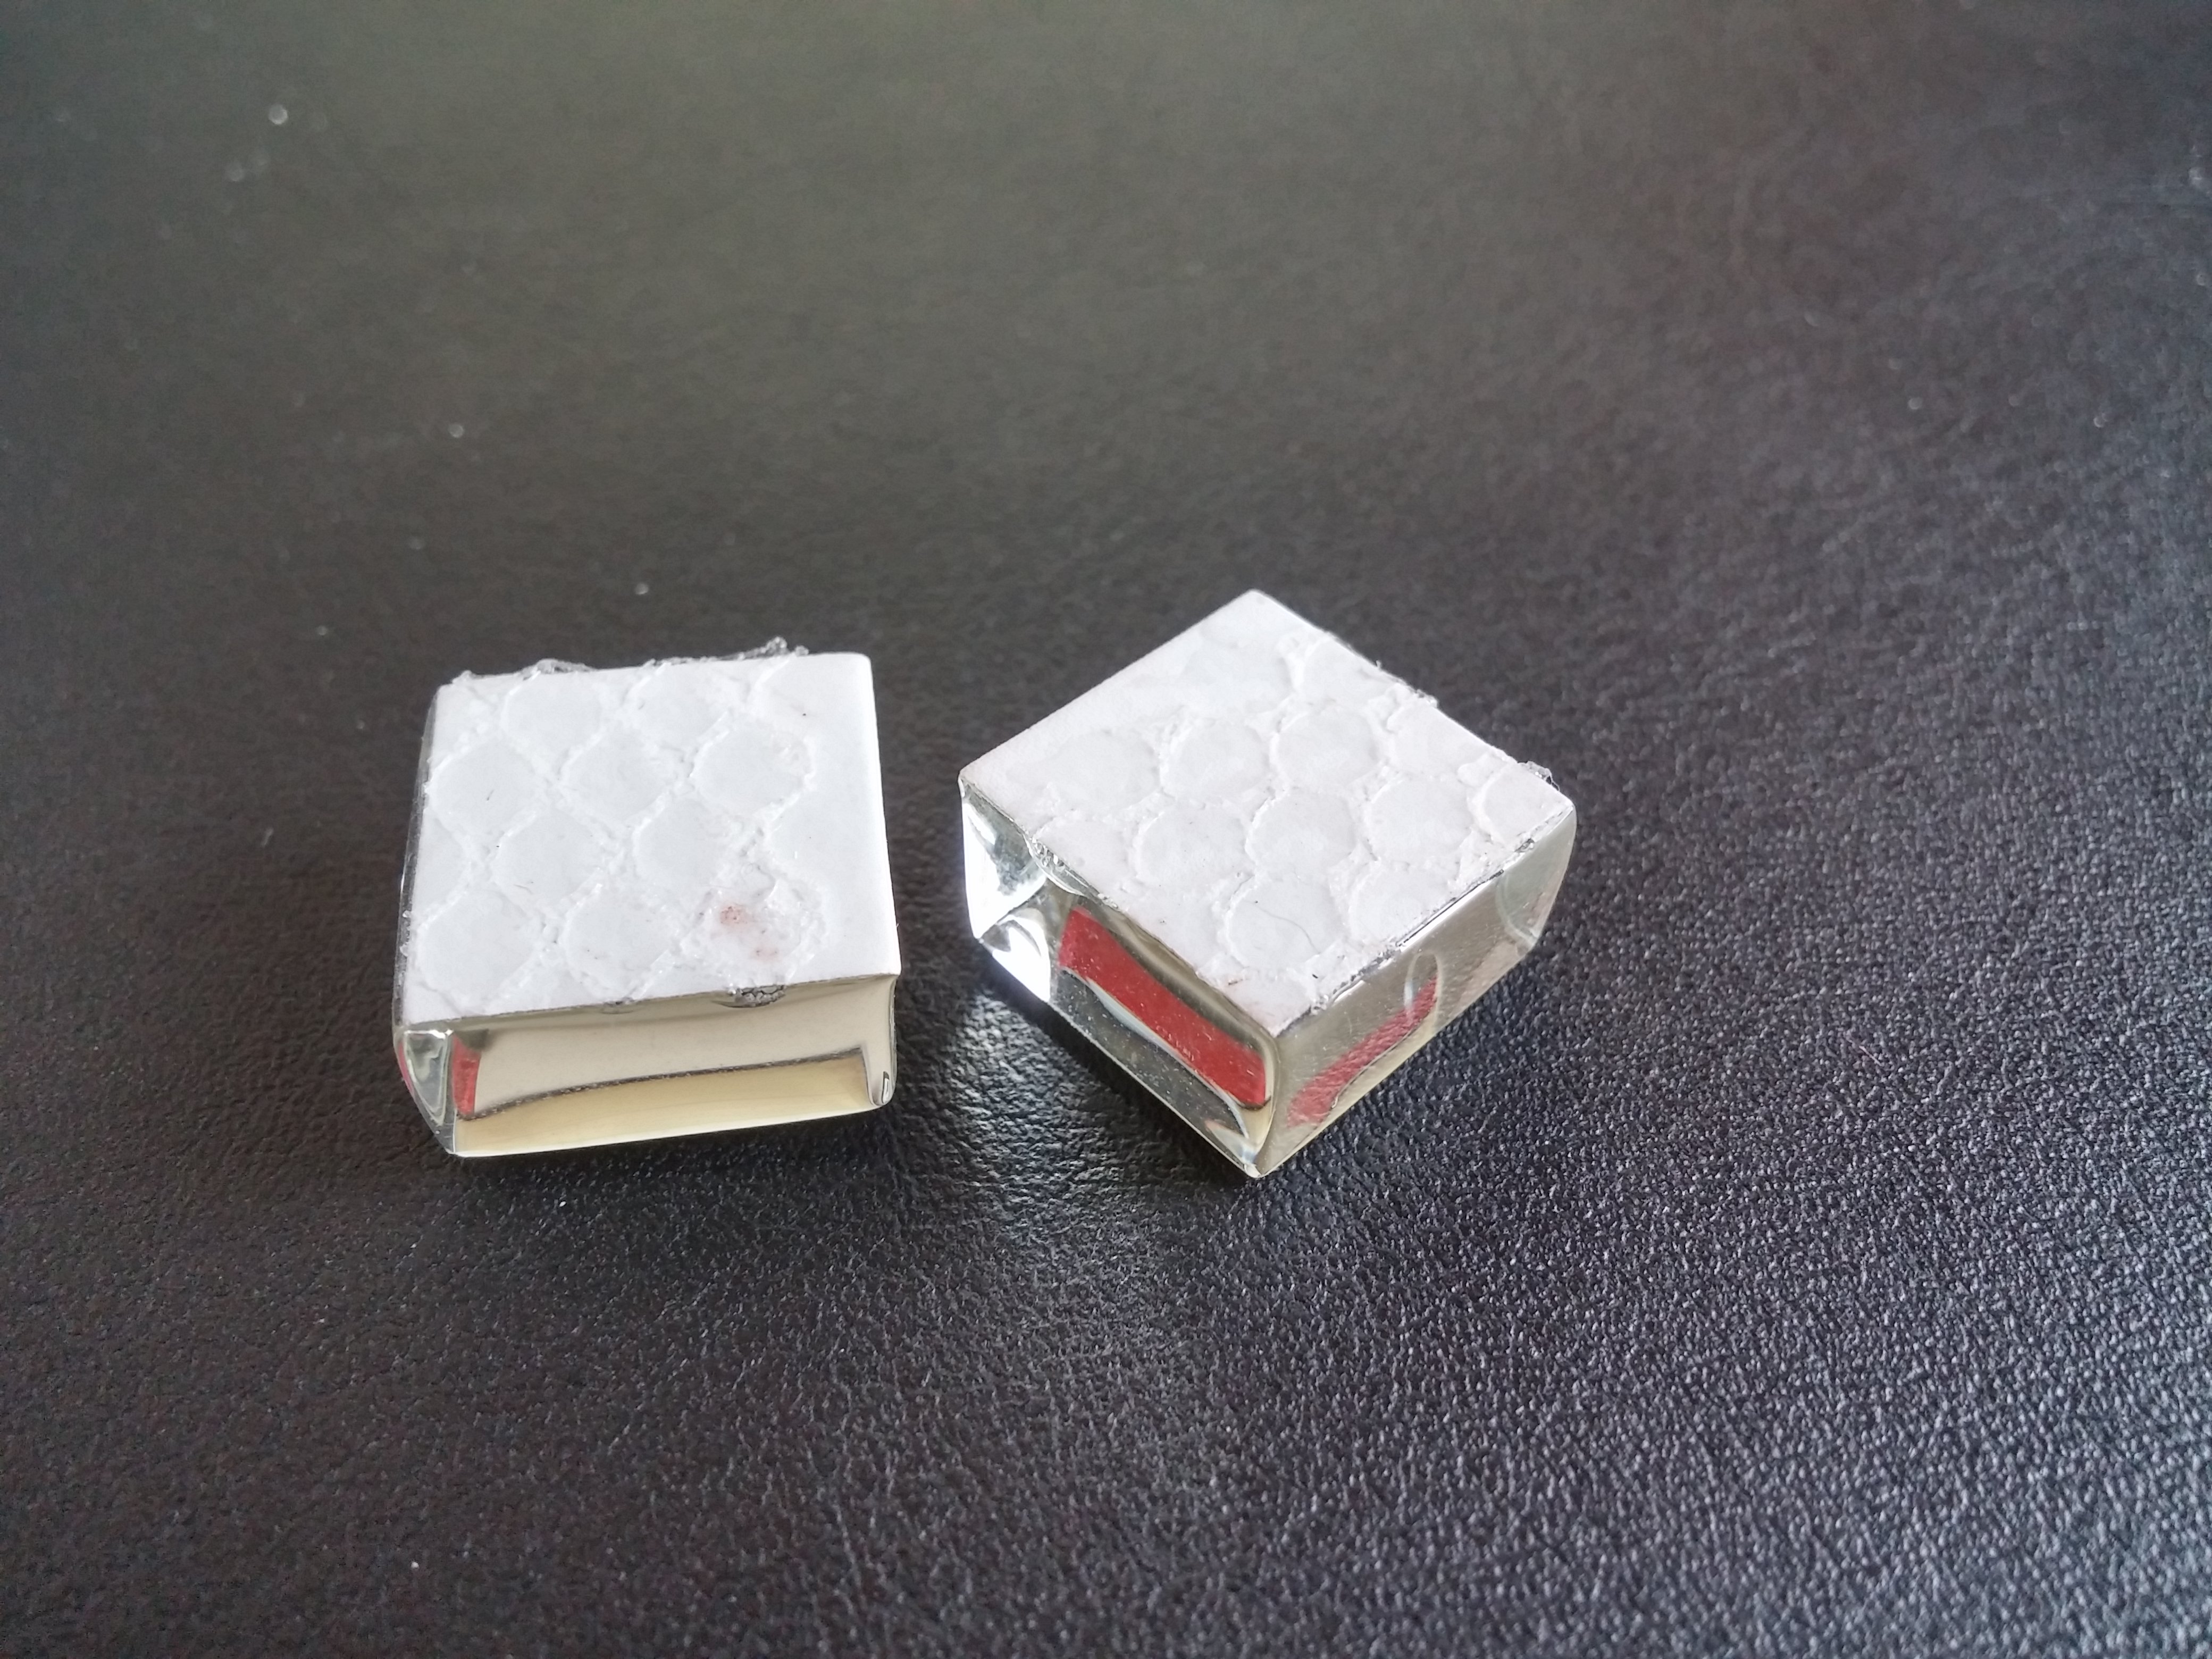
Each tile mosaic is an array of little glass and stone blocks glued to a backing mesh. You’re supposed to affix them to a wall or other surface, then mush a ton of grout on them to fill in the gaps to make an accent splash or tiled surface or some such. It ended up being about $15 USD as of this writing, which is pretty reasonable for the amount and variation of blocks that you get.
Once you pull the blocks off the mesh they’re affixed to, you have your counter riser. At least for the blocks I got, they have a bit of white backing stuck to one side (very stuck), presumably for appearance/aesthetics and to provide a surface for the mesh to stick to. You can see the glue from the mesh in the photo above, visible as the eyelet pattern. It’s pretty stubborn and required both the application of a solvent (I used Simple Green) and some elbow grease. I actually ran them through an ultrasonic cleaner, and the backing just continued on sticking. The risers are still a little tacky on my wargaming plexiglass, but they’re more than serviceable.
Gameplay
I started by playing the introductory scenario to Lion: A Prelude to Eagle Day, which basically just has you play through a single “calendar day,” which means you don’t model reinforcements, replacing fighter/bomber losses, or repairing damage from German bombing.
There isn’t much in the way of decision making in RAF: Lion. Basically the game uses cards to throw random waves of German fighters and bombers at you, with card-randomized targets. You, as the British player, have control over which squadrons you send against the Luftwaffe bombing raids. The complexity comes from the resource management aspect of inherent to juggling your squadrons.
At the start of each time period (there are multiple in a calendar day), you choose which of your squadrons will go on patrol. This makes them more likely to be able to respond to a raid, but they’ll have to land and rearm before they can respond again. Inclement weather, damaged radars, and squadron proximity to a raid can prevent them from being able to intercept a raid. You do have a choice of not responding to a raid, or responding with a subset of available squadrons, which might actually be a good idea if you don’t have overwhelming numbers. If you don’t outnumber the German bombers in combat, some will get away. You do have a choice as to which ones escape interception, but it’s not immediately clear about how to choose which bombers/fighters evade the RAF in a game-balancing way.
And that’s about it. Those are your choices for a calendar day. Reading the campaign rules, between calendar days you have control over how to allocate resources to repair RAF squadrons, British infrastructure, and that sort of thing, but pretty much everything else is random.
On Selectors
There is an additional “choice” in RAF, which definitely takes away from immersion, in my opinion. All RAF squadrons and Luftwaffe gruppen have what’s called a “selector,” which in practice is a A, B, or C letter designation. Combat is resolved by rolling a die and then consulting a table (surprise surprise) to determine what happens to each squadron/gruppen. Outcomes range from RTB to “OMG ALL THE PLANES ARE DED.” For example, your die roll might result in all squadrons marked A RTB, all B gruppen going on to the bombing phase, and all C gruppen asploding in fire and thereafter hurtling to their doom. The game calls that last one “heavy losses.”
Ideally, you’ll have an equal distribution of A’s, B’s, and C’s in combat to spread the pain around and to make combat a little more even. Having to manage the selector distribution increases the fiddle factor when setting up a combat and can dramatically effect the way a combat resolves if you grab a non-uniformly distributed pile of counters. Furthermore, counters will become ineligible for use due to squadron/gruppe damage, rearm, maintenance, or losses, which will reduce your ability to equitably cause bad things to happen to cardboard representations of planes and people.
I find that the selector problem is further exacerbated by the random events that happen. All A gruppen might get lost and not bomb anything, or all C squadrons on patrol might get tired and go home for a cuppa. The official game mechanic is that patrolling squadrons were vectored away from a raid, but if all your squadrons happen to be marked C because that’s what you had available, you are very sad. I should clarify that I think the random events are quite thematic. As the simulated commander of the RAF, having all your patrolling squadrons vectored away is probably historically inspired and definitely captures the feeling of wanting to storm across the HQ ops center and start shouting at some radio operator.
The Good
Let me start by saying that the combat system, in spite of the selector system, is quite ingenious. As with most wargames, combat is decided by a table. Columns are indexed by the number of gruppen involved in the combat, and rows are indexed by a firepower stat. With the exception of Me110s, German fighters generally do not contribute any firepower to air combat. British squadrons contribute 3-4 firepower, and German bombers 5 and up. Step-reduced gruppen contribute even more firepower than the full counter side. This system allows the game to track the overall lethality of combat in the form of the firepower stat, and the balance of forces by the gruppen count.
A low gruppen count, high-firepower situation generally means the RAF is pouncing on unprotected bombers and so the combat results favor the RAF. A high gruppen count, low-firepower combat generally means the RAF is facing many Me109s, so the RAF will take a beating. Although the final outcome is governed by what I think is a flawed selector system, I think the table is quite ingenious. It’s more interesting than the typical X-Y odds system you see in most hex and counter games and elegantly allows the game to model the difference in aerial combat effectiveness of Luftwaffe fighters versus bombers.
RAF: Lion, even in the introductory scenario, also captures the feel of being the RAF commander. You feel the relentless pressure of the German raids. You cringe when you send a handful of brave RAF pilots into overwhelming odds in the hopes that they will claw their way past the fighter screen and down some bombers. You sweat when you draw the top card of the event deck–will the Luftwaffe get lost, or will your squadrons? I definitely played a few too many raid phases over my morning coffee instead of getting a move on with my day, just to see what would happen next.
The Bad
I’m not a huge fan of the selector system. It feels inconsistent, and I’m left with a sense that I can “game the system” by pushing the counter distribution one way or the other. Obviously it was intended to model the randomness of combat without introducing a ton of dice rolling on a per-counter basis. Perhaps a blind counter draw from a cup would address some of my concerns.
The Ugly
Here’s the sad part. For all the elegance of the combat system, sans the selector issue, and the storytelling of the game itself, I’m not sure it has legs. Solitaire games are supposed to be hard, reward good play, and provide interesting choices. RAF: Lion isn’t easy, but I simply don’t think that there are enough decisions to make in the game, and the selector based randomness can seemingly invalidate what decisions you do make.
PATROL ALL THE THINGS seems to be a reasonable “decision.” The trouble is, which squadrons can respond to a raid is effectively governed by a die roll. There are other, arguably non-random factors involved too–if you let the Luftwaffe turn your radars into scrap metal, you won’t see them coming the next time, for example. You can round up every person who has flight time and send them up to fight the aliens, I mean Germans…
…but unless you’re prescient you may end up feeding a squadron or two piecemeal to a swarm of Me109s because they were the only ones near enough to respond.
I’m sure there’s more depth to the strategy that I haven’t seen yet, and a cursory read of the BGG forums informs me that there are some solid ways to win. Concentrating your fighters over particular sectors was definitely effective the few times I got lucky enough to have them in the right place at the right time.
In that sense, it adequately models the Battle of Britain–you have to make tough decisions about what sectors to leave undefended. Still, it feels like I’m just letting the game play itself, if I’m honest. I’m just making educated guesses turn by turn and hoping that the dice/cards come up in my favor as opposed to feeling like I can make a long term strategic decision. I wish the decision horizon was longer, or at least was better exposed to the player.
In the meantime, I’m just doing bookkeeping for the game. There’s a story that happens, to be sure, but I might as well read a book on the subject to get the real deal. I’m told RAF: Eagle is much better, and there are some house rules from the BGG community that improve things, but I’m skeptical.
When all is said and done, this gaming medium demands fiddling, counter pushing, die rolling, table consulting, and card shuffling. I happen to enjoy all of those things, especially sitting quietly in the evening with a stiff drink, snoring dogs, and the better half curled up with a book in her chair. However, I want some return on the investment of my time with a game, and I’m just not sure RAF: Lion will deliver in the long term. It’ll be awhile before it sees table time again, but I’ll definitely give it another shot sometime down the road.