

Tower Defense
We’re coming up on another tournament, and I really want to play Druze. So when Adam agreed to try my custom mission I couldn’t resist putting the boys and girls in green and yellow on the table.
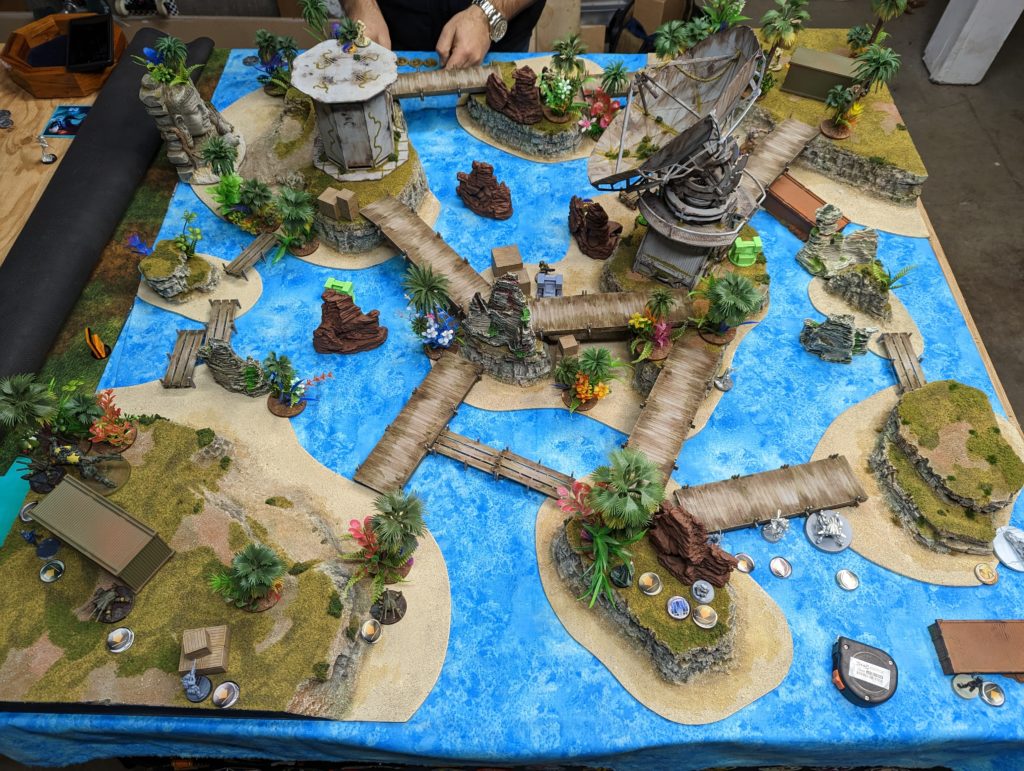
Plus it was on the island table, which is always a hoot.

Overview
- Mission: Blockade Runner
- Forces: Druze Bayram Security versus USAriadna Ranger Force (300)
- Deploy First: Druze
- First Turn: Druze
If you want to know more about the Blockade Runner mission, you can either read the previous Tanko Tempura report or check out the text here:
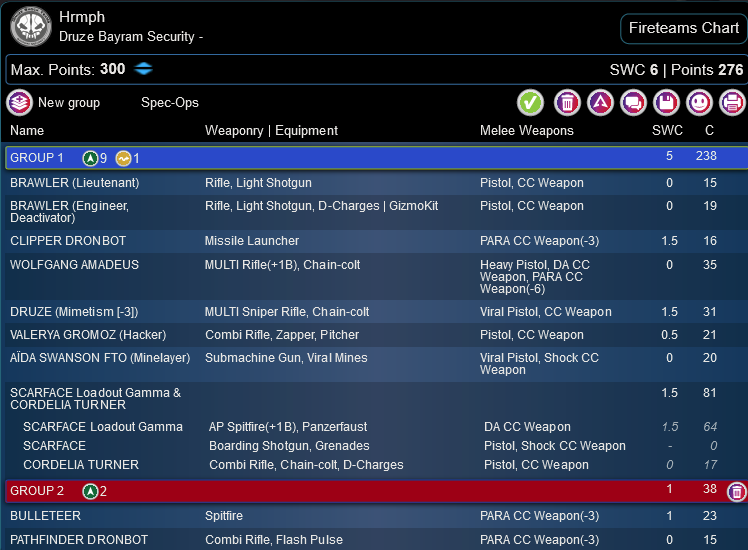
I’ve been having an absolute bear of a time trying to make a Druze list I like. Most of the problem is trying to include too many Druze in your list, which tends to eat up too many points! I eventually settled for only taking one Druze, the sniper, which is only available in Druze. I threw in a Brawler Haris powering a Clipper, complete with engineer support, and then used Wolfgang, the Druze MSR, Valerya, and Aida in a link to do everything else. The rest of the power came from Scarface.
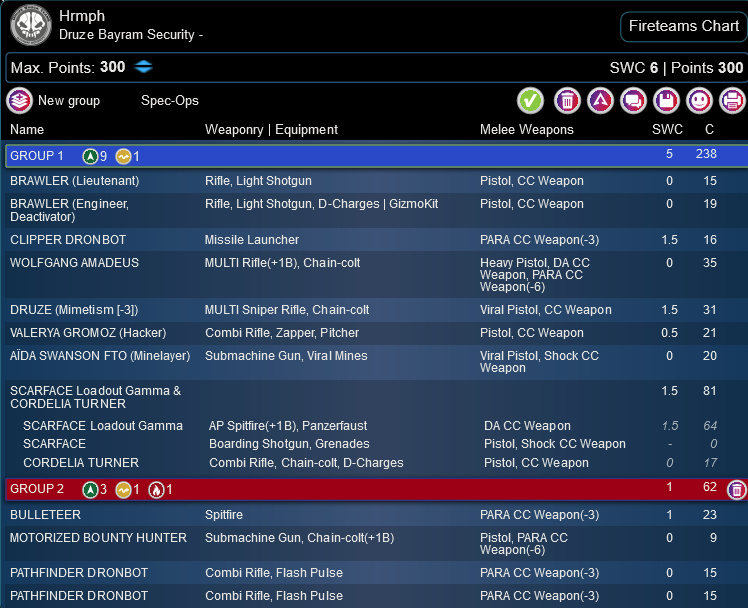
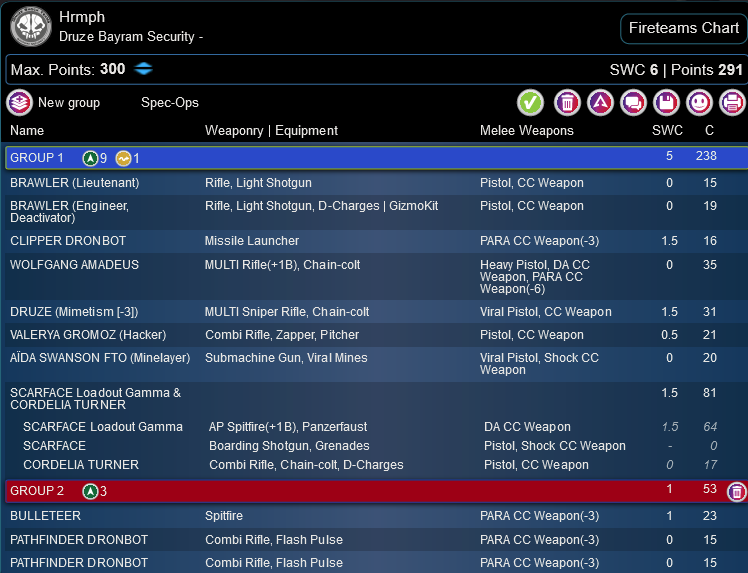
Hrmph
GROUP 1
9
1
BRAWLER (Lieutenant) Rifle, Light Shotgun / Pistol, CC Weapon. (0 | 15)
CLIPPER DRONBOT Missile Launcher / PARA CC Weapon(-3). (1.5 | 16)
WOLFGANG AMADEUS MULTI Rifle(+1B), Chain-colt / Heavy Pistol, DA CC Weapon, PARA CC Weapon(-6). (0 | 35)
DRUZE (Mimetism [-3]) MULTI Sniper Rifle, Chain-colt / Viral Pistol, CC Weapon. (1.5 | 31)
VALERYA GROMOZ (Hacker) Combi Rifle, Zapper, Pitcher / Pistol, CC Weapon. (0.5 | 21)
AÏDA SWANSON FTO (Minelayer) Submachine Gun, Viral Mines / Viral Pistol, Shock CC Weapon. (0 | 20)
GROUP 2
SCARFACE Loadout Gamma & CORDELIA TURNER undefined / undefined. (1.5 | 81)
SCARFACE Boarding Shotgun, Grenades / Pistol, Shock CC Weapon. (- | 0)
CORDELIA TURNER Combi Rifle, Chain-colt, D-Charges / Pistol, CC Weapon. (0 | 17)
1
BULLETEER Spitfire / PARA CC Weapon(-3). (1 | 23)
MOTORIZED BOUNTY HUNTER Submachine Gun, Chain-colt(+1B) / Pistol, PARA CC Weapon(-6). (0 | 9)
PATHFINDER DRONBOT Combi Rifle, Flash Pulse / PARA CC Weapon(-3). (0 | 15)
6 SWC | 300 Points | Open in Army | Copy Code
Somehow I could also fit a pair of Pathfinders and a Bulleteer/MBH duo, which has been quite difficult to get use out of although it does look very good on paper.
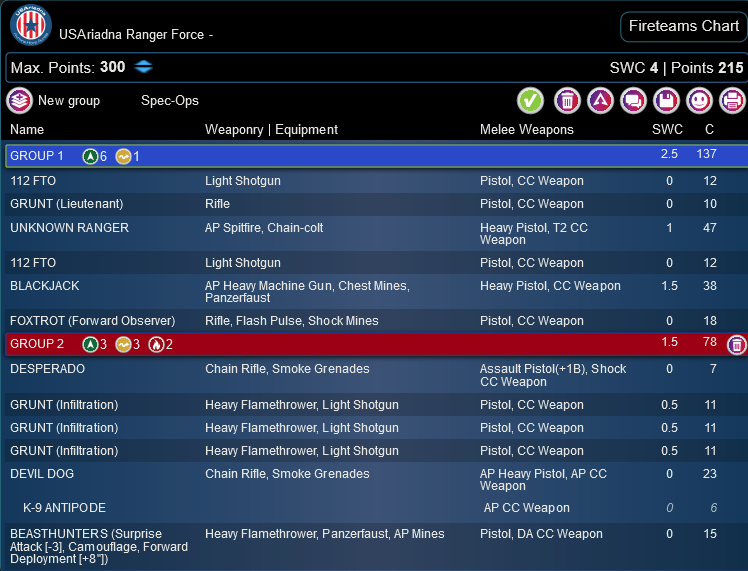
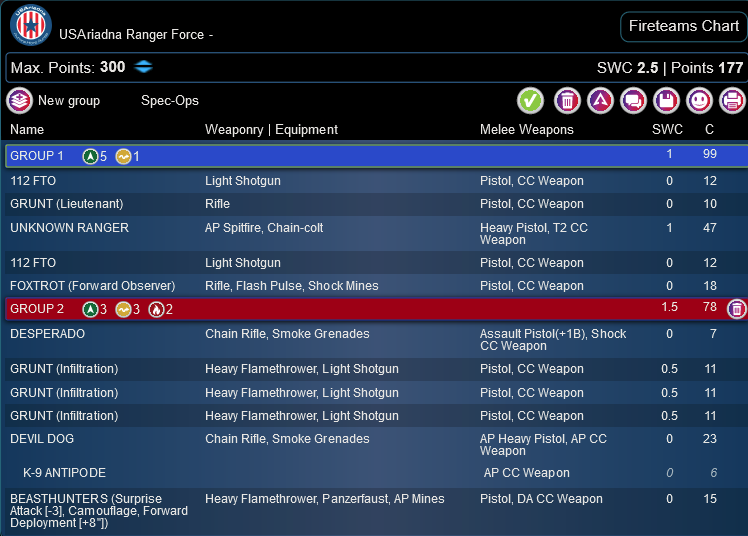
Adam’s on a USARF kick and is currently enamored with the fact that 112 can make links cheaper, so he paired an Ohio AP HMG with two mooks to give it +1 burst and then built a shooting powerhouse with the 112, Marauder Sniper, and UKR. The Desperado, Blackjack, and Devil Dog offer some truly terrifying force projection as well.

GROUP 1
112 FTO Light Shotgun / Pistol, CC Weapon. (0 | 12)
GRUNT (Lieutenant) Rifle / Pistol, CC Weapon. (0 | 10)
MINUTEMAN (NCO) AP Heavy Machine Gun / Heavy Pistol, AP CC Weapon. (1.5 | 35)
UNKNOWN RANGER AP Spitfire, Chain-colt / Heavy Pistol, T2 CC Weapon. (1 | 47)
MARAUDER (Multispectral Visor L1) Sniper Rifle(+1B) ( ) / Heavy Pistol, CC Weapon. (0.5 | 32)
GROUP 2
BLACKJACK AP Heavy Machine Gun, Chest Mines, Panzerfaust / Heavy Pistol, CC Weapon. (1.5 | 38)
FOXTROT (Forward Observer) Rifle, Flash Pulse, Shock Mines / Pistol, CC Weapon. (0 | 18)
DESPERADO Chain Rifle, Smoke Grenades / Assault Pistol(+1B), Shock CC Weapon. (0 | 7)
DEVIL DOG Chain Rifle, Smoke Grenades / AP Heavy Pistol, AP CC Weapon. (0 | 23)
K-9 ANTIPODE AP CC Weapon. (0 | 6)
BEASTHUNTERS (Surprise Attack [-3], Camouflage, Forward Deployment [+8″]) Heavy Flamethrower, Panzerfaust, AP Mines / Pistol, DA CC Weapon. (0 | 15)
6 SWC | 300 Points | Open in Army | Copy Code
The rest of his list is an absolutely nightmarish midfield with three grunt infiltrators, two foxtrots, and a Beasthunter. Fortunately I’m quite comfortable fighting USARF these days, and I know what I need to do in terms of dealing with his forces. If the Grunts don’t over-infiltrate I have enough in the way of board coverage to delay them. I just need to remove the HMGs and the Marauder as soon as possible, then rely on close range viral to fight off the Devil Dog. It’s not great, but there’s a clear order of operations here, I just need to make it hard to him to move and then scalpel things out as I get opportunities to do so.
Deployment
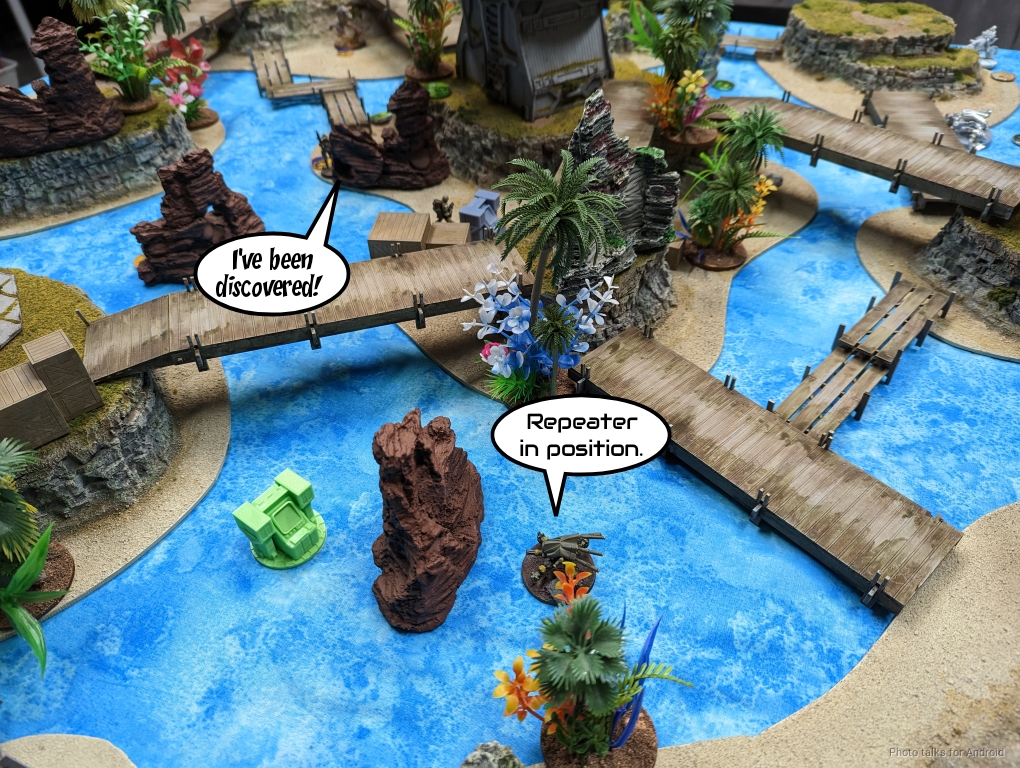
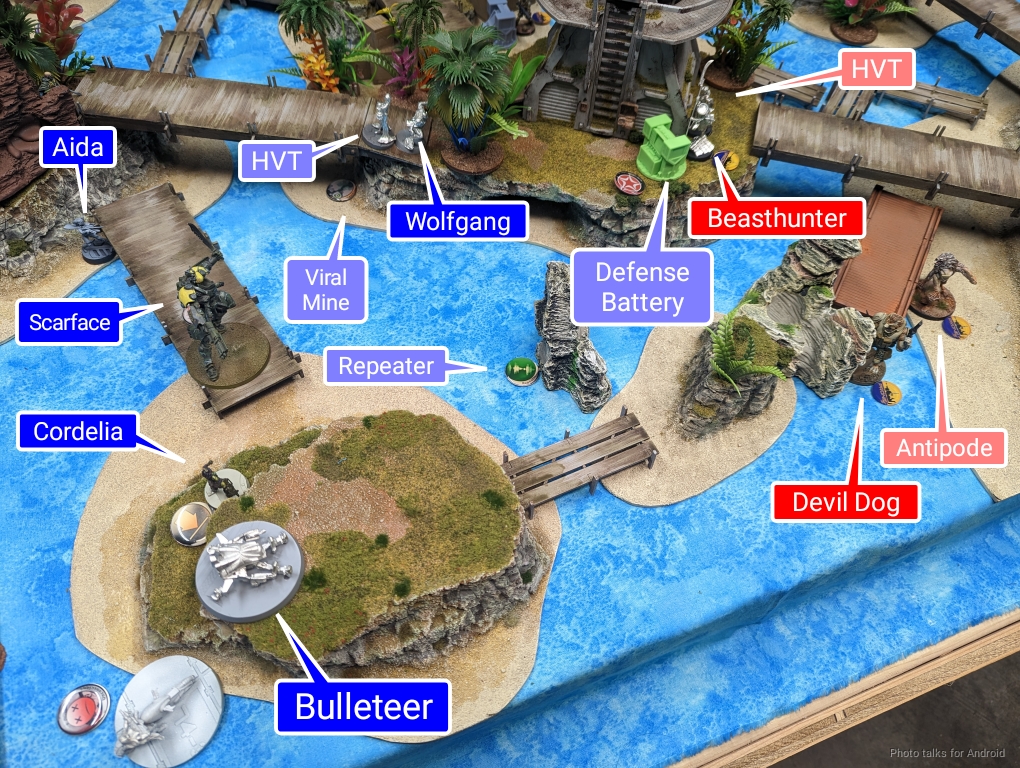
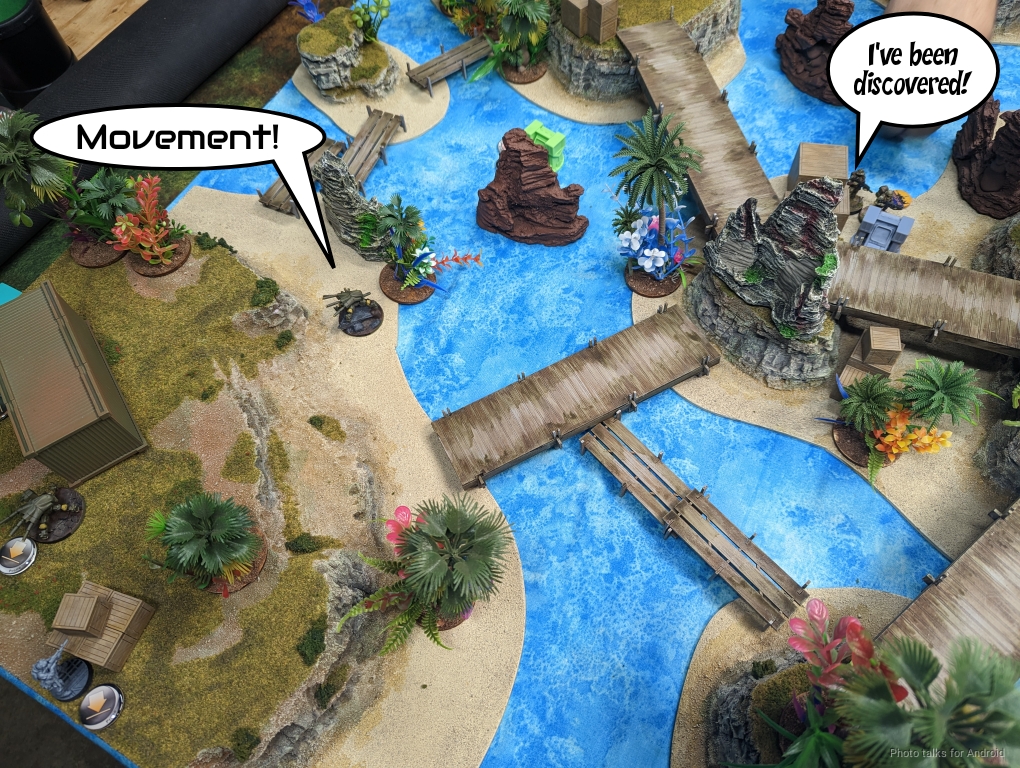
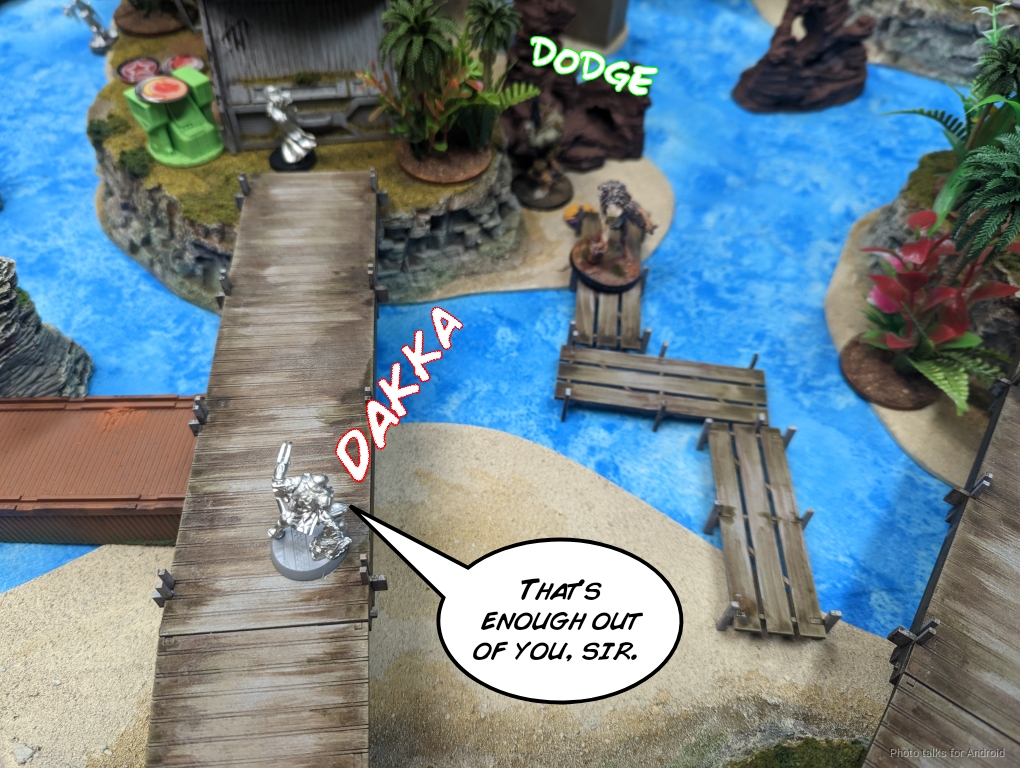
Adam won the rolloff and took table side, so I took turn order. I was pretty convinced that I could take on anything with the Clipper, or at least make Adam think twice about dealing with it. I was concerned about Van Zant, of course, so I put the Clipper in what I thought was a commanding position, covering a diagonal from my left to the middle of Adam’s deployment zone.
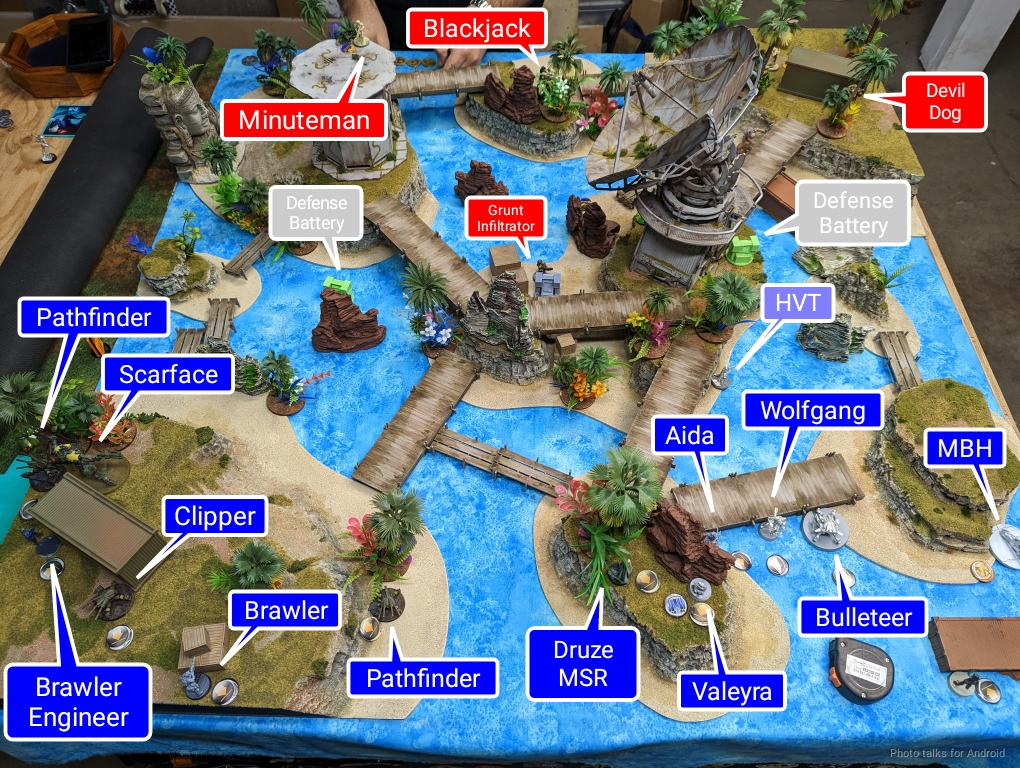
The Brawler Lt and Engineer covered various angles and the back table edge to defend against Van Zant, and then I telegraphed Scarface by putting Cordelia on the back table edge as well, but on the right. Wolfgang and Aida hung out on the right, mostly because there just wasn’t a good spot for them to be. I put the MBH on the right to encourage Adam to put an ARO there, trying to shape his deployment, and then I put the Pathfinders down basically wherever I thought they might be safe. The one on the leftmost was sort of just where was legal, and then the middle Pathfinder was to set up a repeater on the left Defense Battery.
Valerya was on the right along with the Druze MSR, both prone and ready to pop out to engage targets of opportunity, and with Valerya ready to fire pitchers at the turrets. My holdbacks were Scarface and the Bulleteer. Adam then started putting all kinds of nasty down. The Foxtrots and Beasthunters went in the middle ready to dive on the console. As I had hoped, the Marauder went down watching the MBH, basically taking it out of the fight, at least for my turn, relative to the entire rest of the table. Worth it! The UKR and their 112 friend were nearby.
Adam put a pair of Grunt Infiltrators down, one on the center console one on the back table edge. The former was to dissuade me from securing the console, and the latter was to prevent me from coming behind everything unopposed. The Desperado showed up ready to rock behind a rock on the right. WIth that, it was time to deploy both Scarface and the Bulleteer.
I put the Bulleteer prone next to the MBH so they could be in their duo together (and of note the MBH rolled an HMG, which is yet another reason Adam put the Marauder down watching it). I had originally intended to have Scarface and Cordelia as a duo as well, but I decided that I could attack the Ohio with Scarface, and potentially attack into some of the Foxtrots and maybe even the Grunt on the console.
Adam’s reserve was the Devil Dog, ready to dive into the Bulleteer. With that, we were off.
Turn 1
Top of 1 – Druze
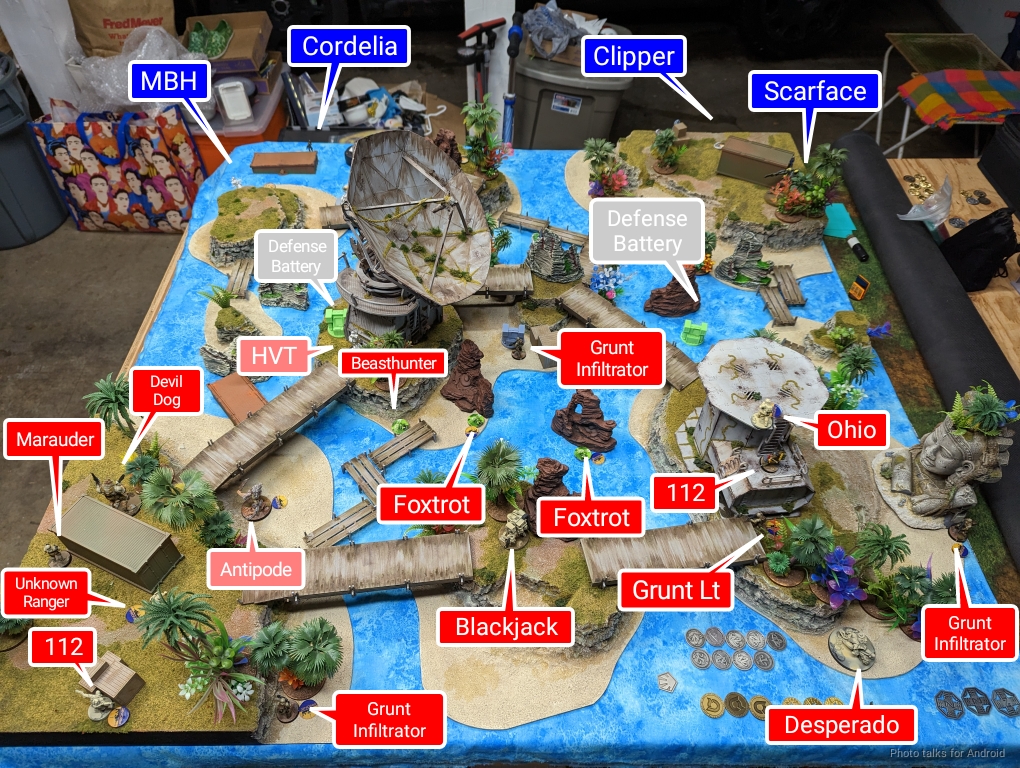
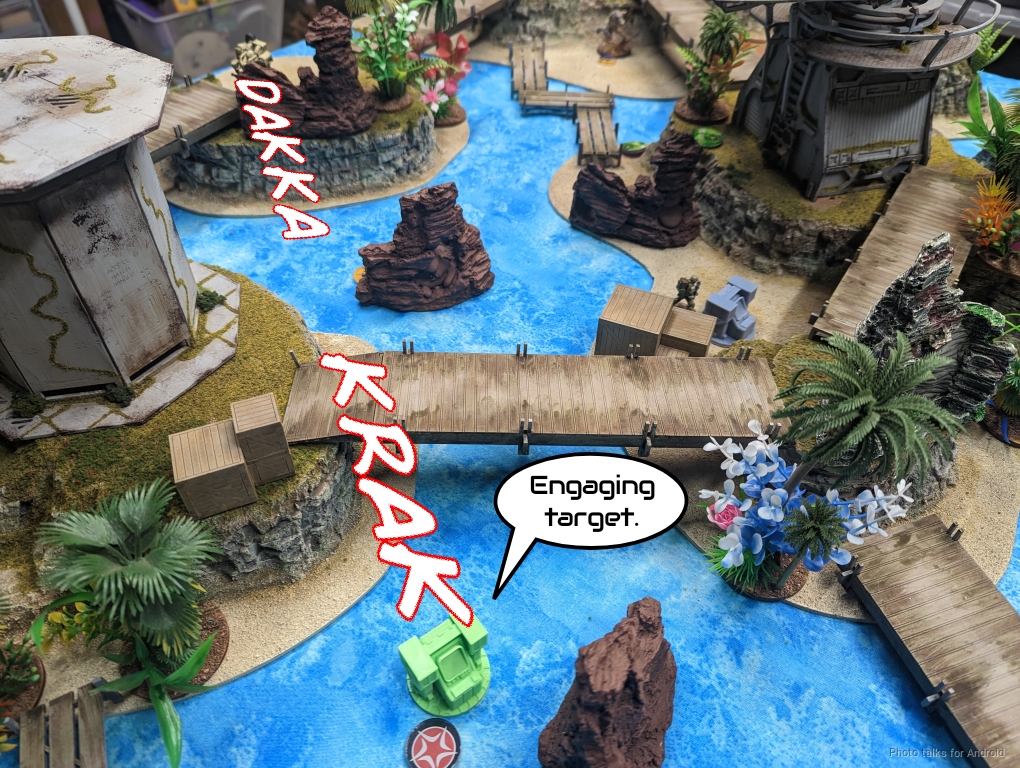
Adam took two orders from my second smaller group, as expected. My first order of business was dealing with the Defense Batteries. I had come prepared, unlike the last time I played this mission with JSA!
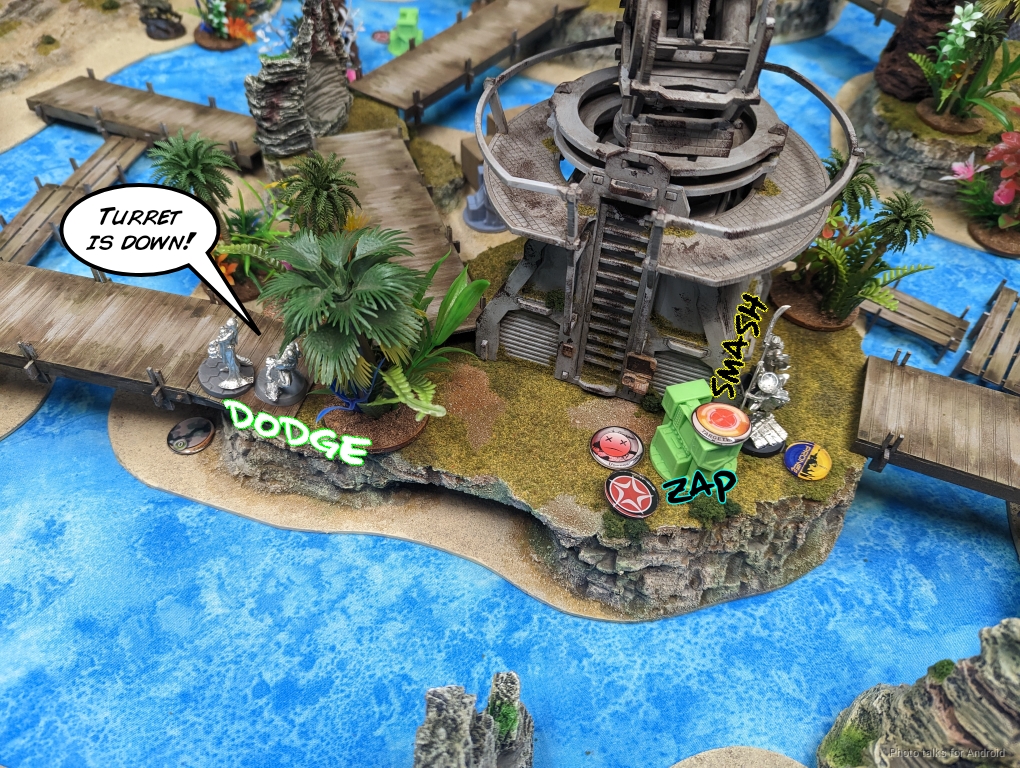
Valerya fired a pitcher at both batteries, but only landed the rightmost one. This was okay, because there was a safe approach path to the left Defense Battery for one of my Pathfinders, because I had planned it that way!
I move the Pathfinder into position as planned, and even get a Sensor-boosted discover off on a Foxtrot on the way!
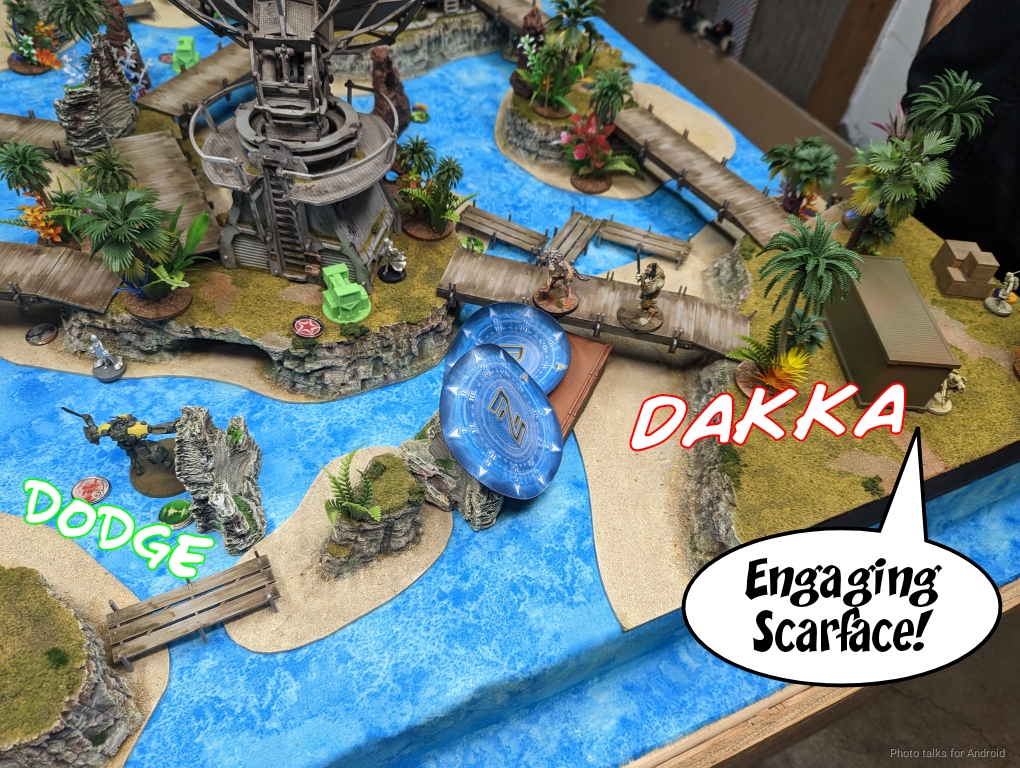
I immediately sic Scarface on the Foxtrot and delete it.
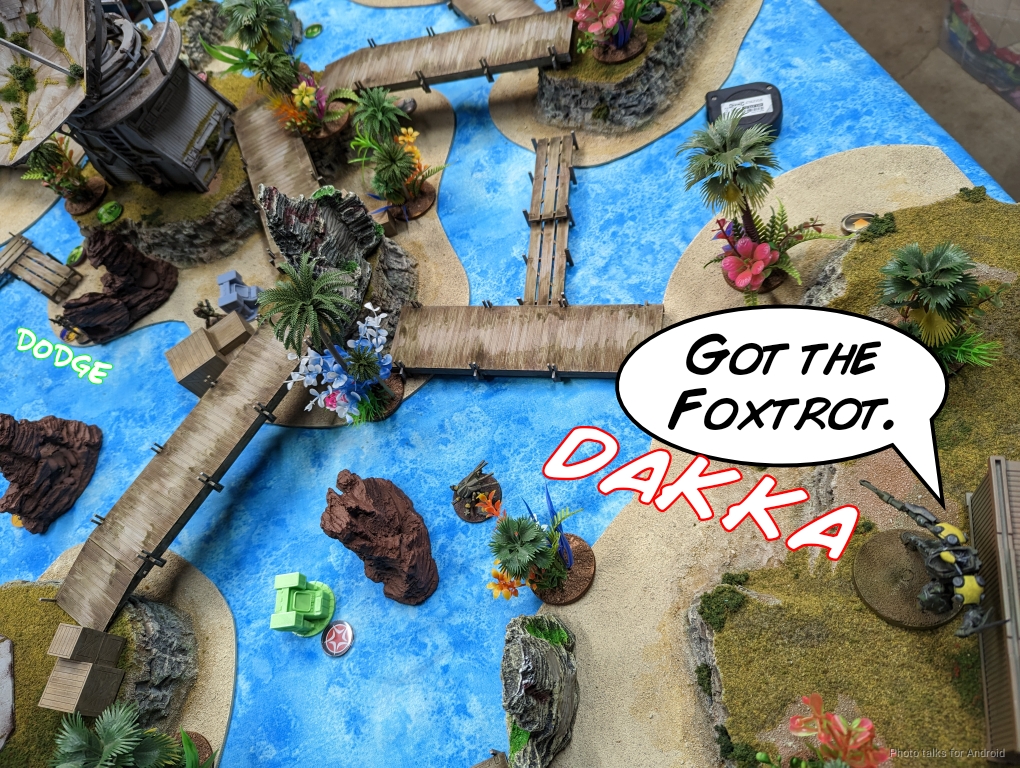
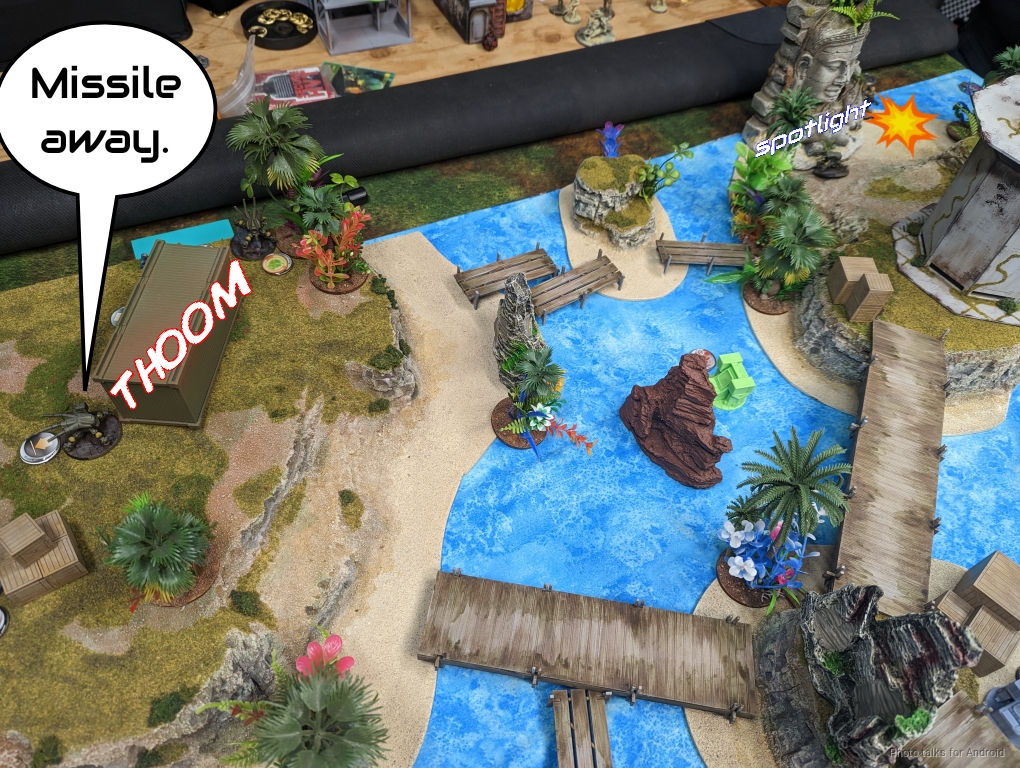
This is quickly followed by hopping Scarface onto a shipping container and saying hello to the AP HMG Ohio and killing that too. Importantly I do enough wounds to take it off the table so the 112 can’t pick it back up.
I then spend the rest of my orders in that pool moving Scarface to the right side of the table and delete the Marauder Sniper as well, also doing enough wounds to take it off the table to prevent Adam from picking it back up with the other 112.
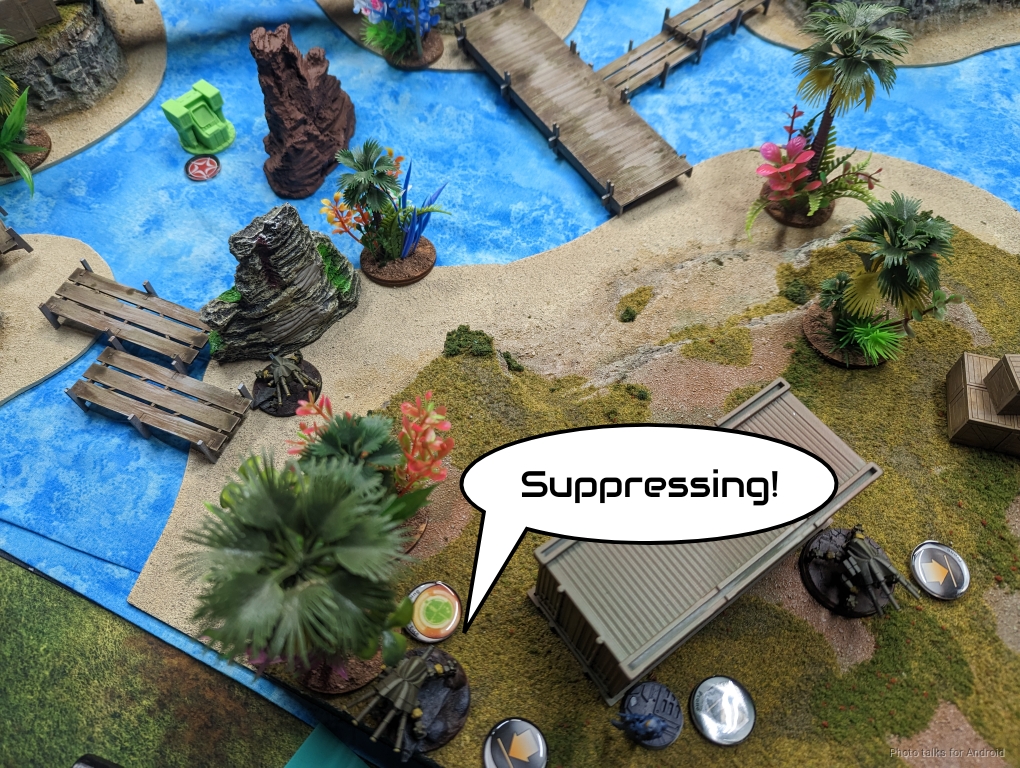
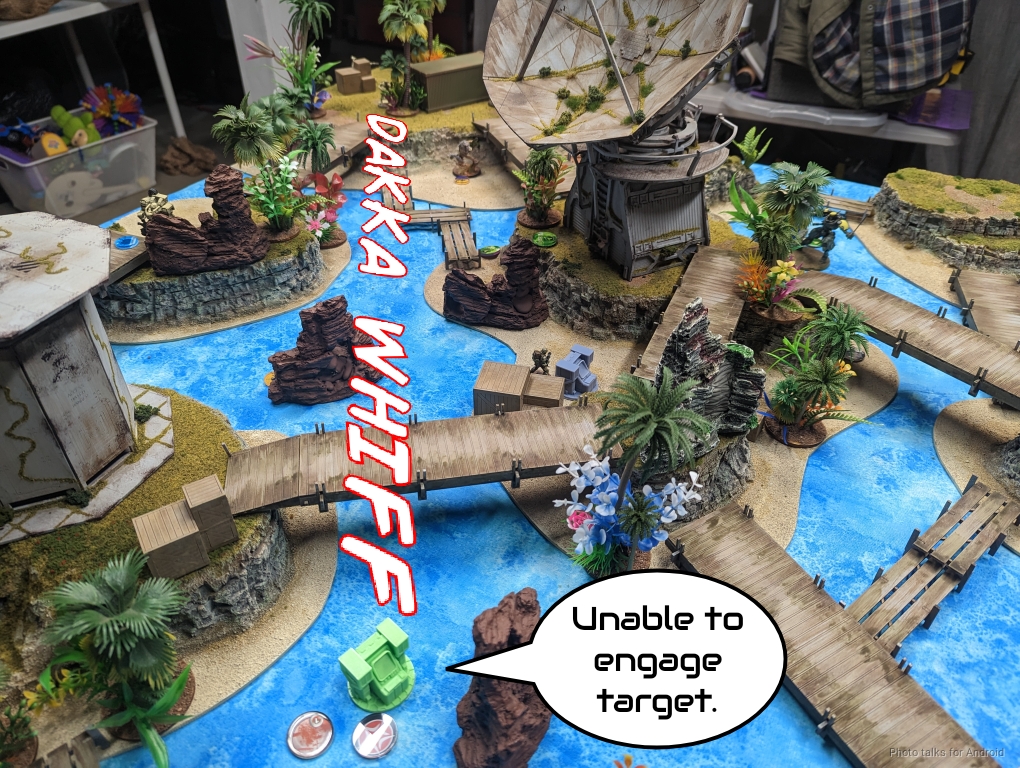
I’ve got a single tac aware order left on the other Pathfinder, so I throw it into suppression and pass the turn.
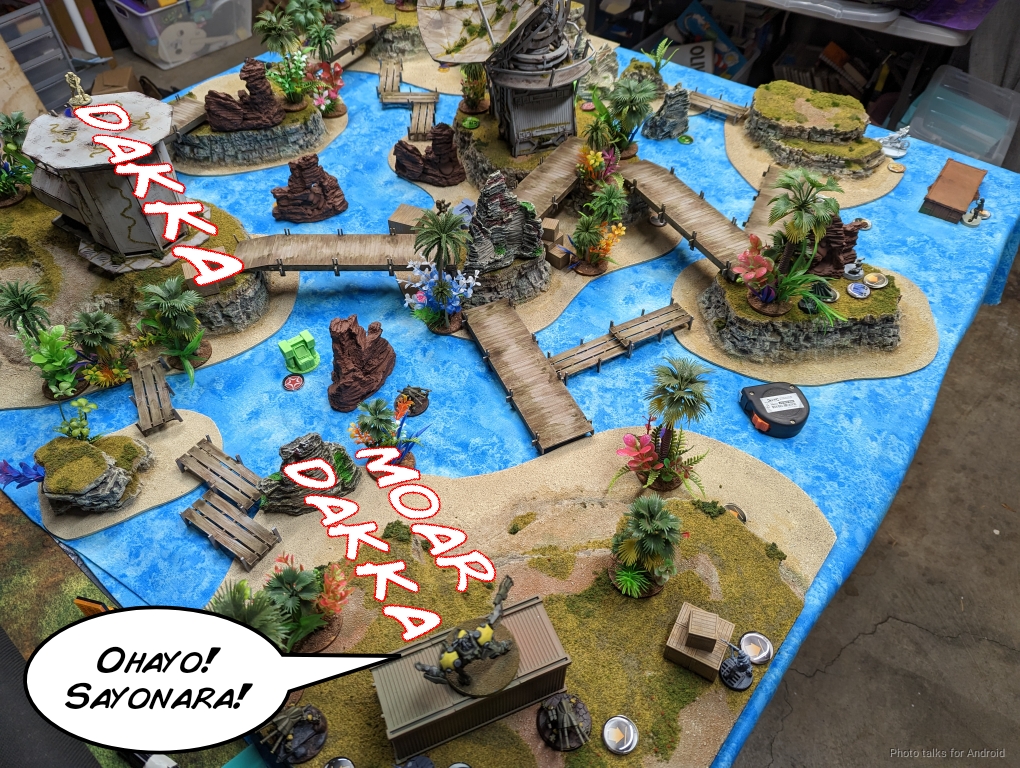
Bottom of 1 – USARF
I haven’t really done a huge amount of damage in terms of orders–I’ve taken out three things. However, I’ve removed 2 SWC and two major attack pieces. The Unknown Ranger and Blackjack are still very dangerous, but they have to get through the Defense Batteries, and the Defense Batteries will help guard me against Grunts and the Devil Dog. So there’s a clear order of operations for Adam–take on the Defense Batteries then start engaging targets of opportunity. He really should be delivering a Foxtrot to the center objective too so as to start racking up points.
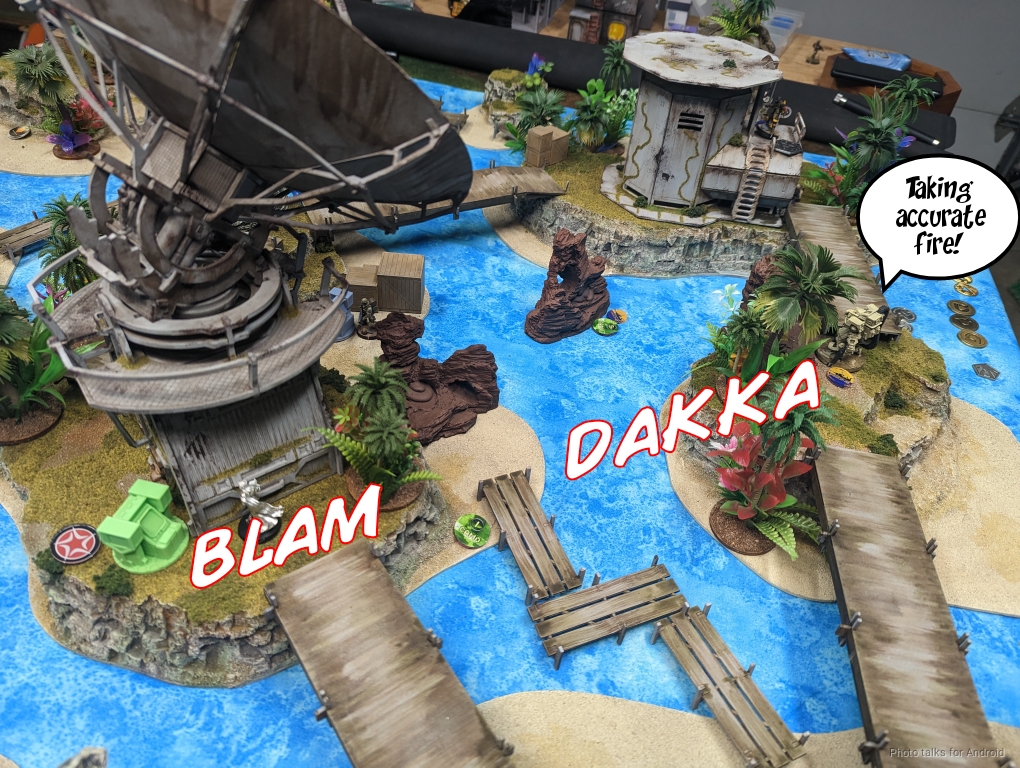
The Blackjack is in a good spot to do this, albeit a little under pressure from my Clipper who can see it if it stands up. It engages the Defense Battery on my right and takes a wound. Shockingly, it’s really not all that unlikely:
| 23.58 | 44.89 | 31.54 |
It then tries on the other Defense Battery and takes its second wound, going unconscious. The Blackjack is slightly favored to win the engagement and do a wound, but it’s actually a pretty tough nut to crack with just straight brute force. There are many other tools available though in Adam’s list, so I think that this was probably the wrong tool here, especially given that both the Blackjack and the Defense Batteries were in good range, although the Blackjack did have cover.
With the Blackjack down, Adam decided to use the Unknown Ranger outside of 24″, which is what I think he should’ve started with. This admittedly puts the UKR on 10’s, but it puts the Defense Battery on 1s. I mention this, and of course immediately after saying so, Adam rolls nothing but 11s and up on 4 dice. Thankfully I don’t crit him, but I can hear the frustration in his laugh. It takes him another order, and the Defense Battery finally goes down.
Adam now faces the difficult choice of what to do with his remaining orders in the pool. He decides that it’s easy enough to take out my MBH with an HMG, and the dice agree.
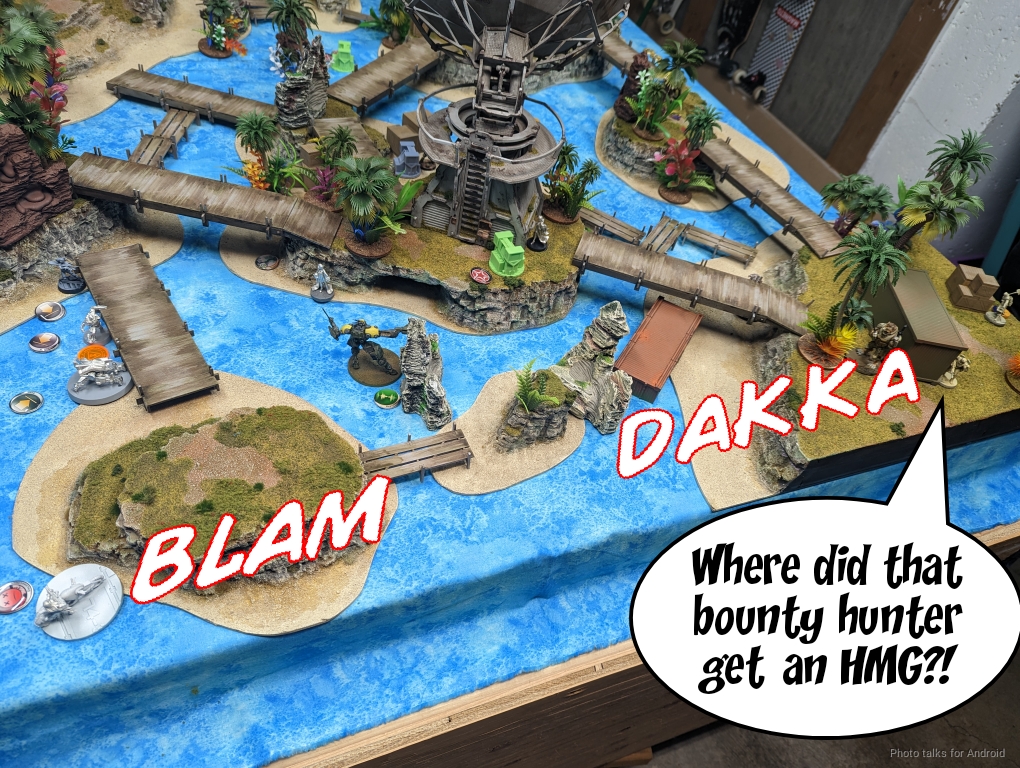
He’s got an order on the 112 to pick up the Blackjac, but ends up killing it, which is a pretty big feels bad.
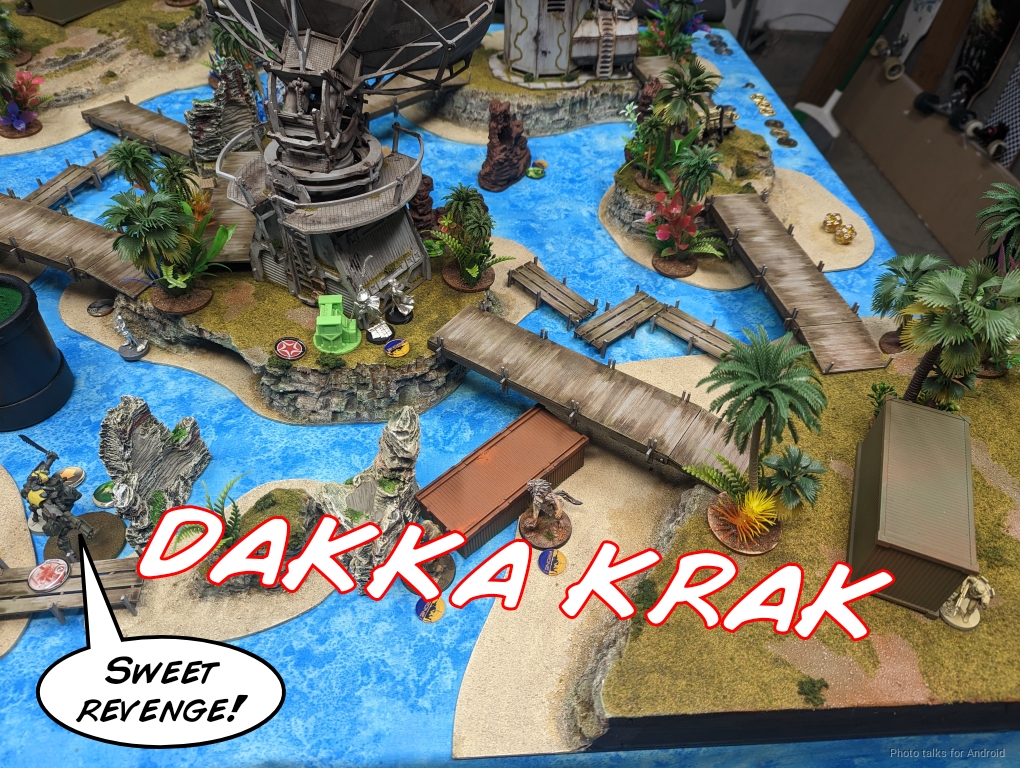
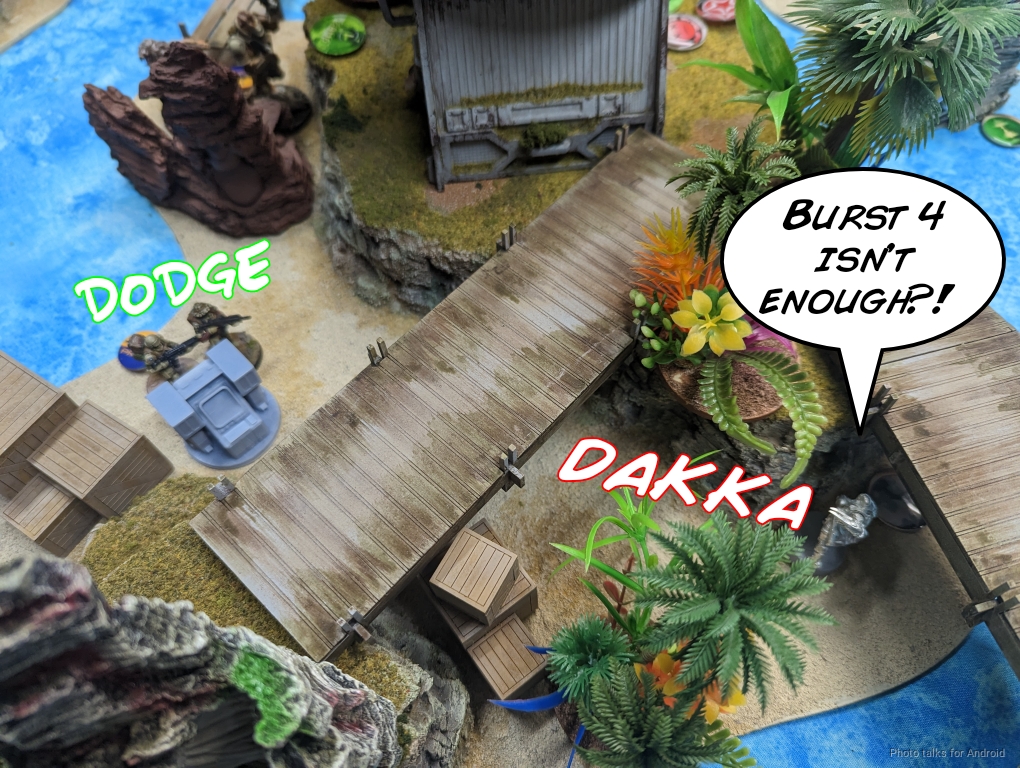
He does, however, have plenty of orders to spend on the Devil Dog. After smoking out the turret and Scarface, he pushes the pair of puppies into the midfield to set up for an attack run on Scarface.

The UKR then puts two wounds on Scarface through the smoke, which is bad for me but great for Adam.
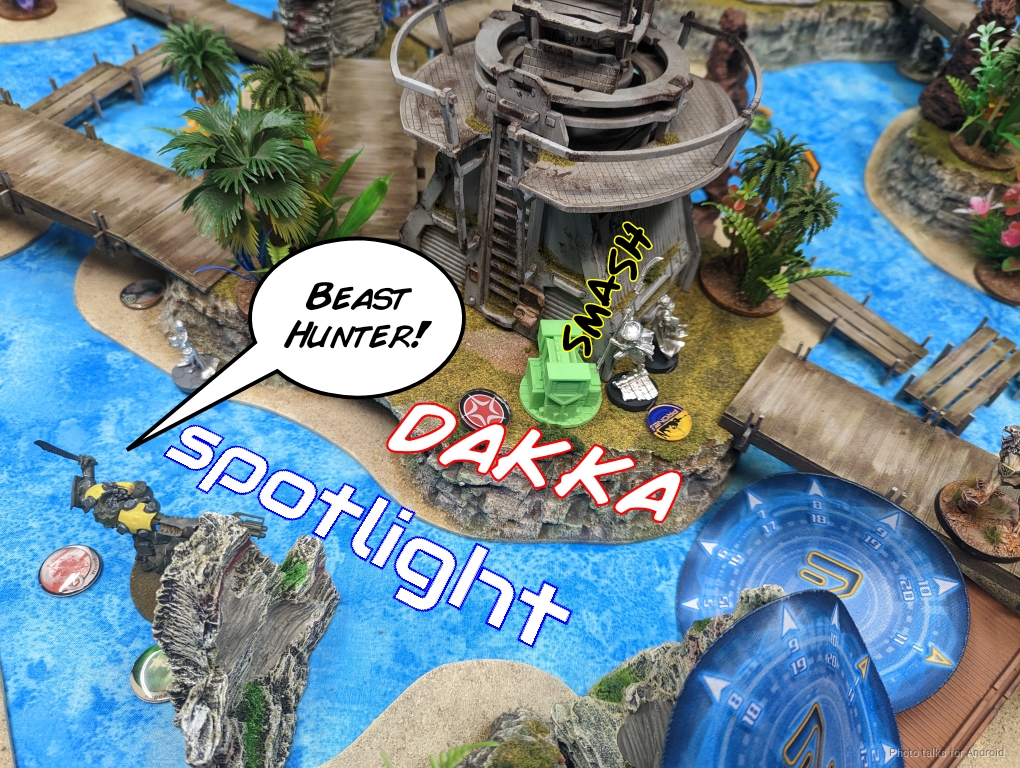
The Beasthunter gets into base to base with the remaining Defense Battery but fails to take it out, surprisingly. I manage to spotlight it at least.
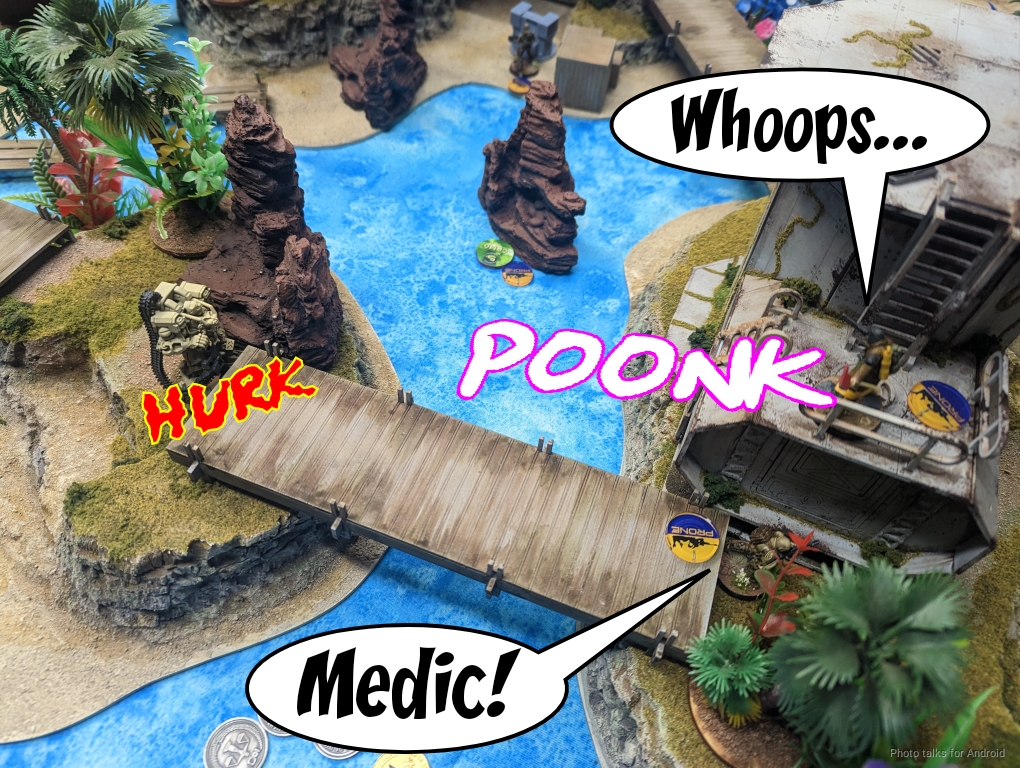
I manage to fend off the UKR with some good ARM saves on Scarface, and I think I’m safe because the UKR is out of orders.
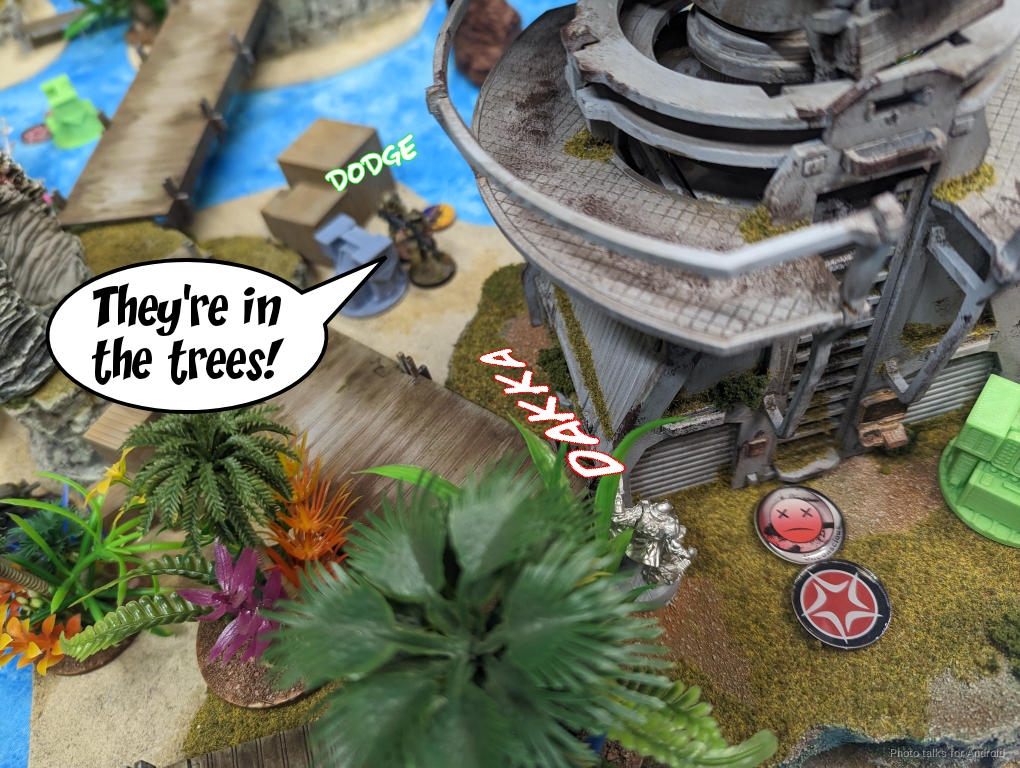
Infinity lives up to its reputation as a super lethal game though, and the Devil Dog peeks out of the smoke and chain rifles Scarface unconscious while taking no damage itself.

Turn 2
Top of 2 – Druze
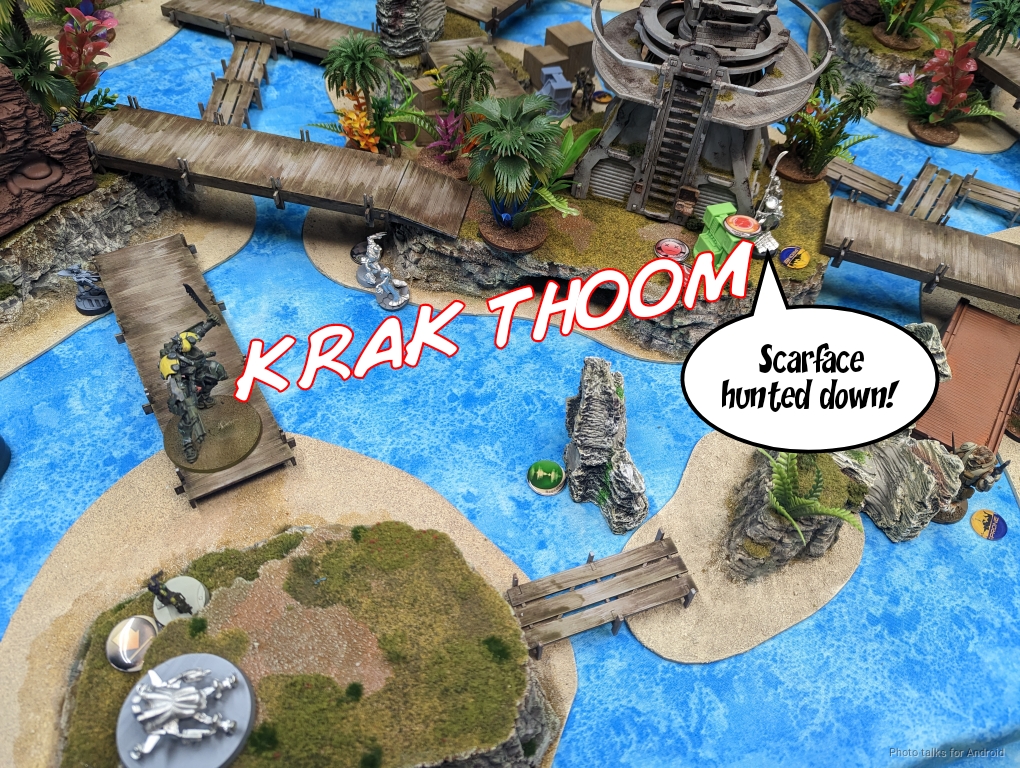
Well, I am quite happy with that turn. Obviously I’d like to still have Scarface up, but he’s taken out the Ohio AP HMG and the Marauder Sniper and basically eaten all of Adam’s orders along with the Defense Batteries, so I’m doing great. I pick Scarface up with Cordelia and then delete the Unknown Ranger. Adam laments that he’s got a 112 right there if the UKR had only taken one wound, but sometimes Cpt Ariadna has to hang up his shield and let… Foxtrot? pick it up? I dunno.
I decide to push forward aggressively with my Pathfinder on the left, now that I’ve identified the last possible lieutenant option, barring a Foxtrot lieutenant–the rifle-toting Grunt. Unfortunately, the Grunt infiltrator springs his trap and dodges into view as I approach.
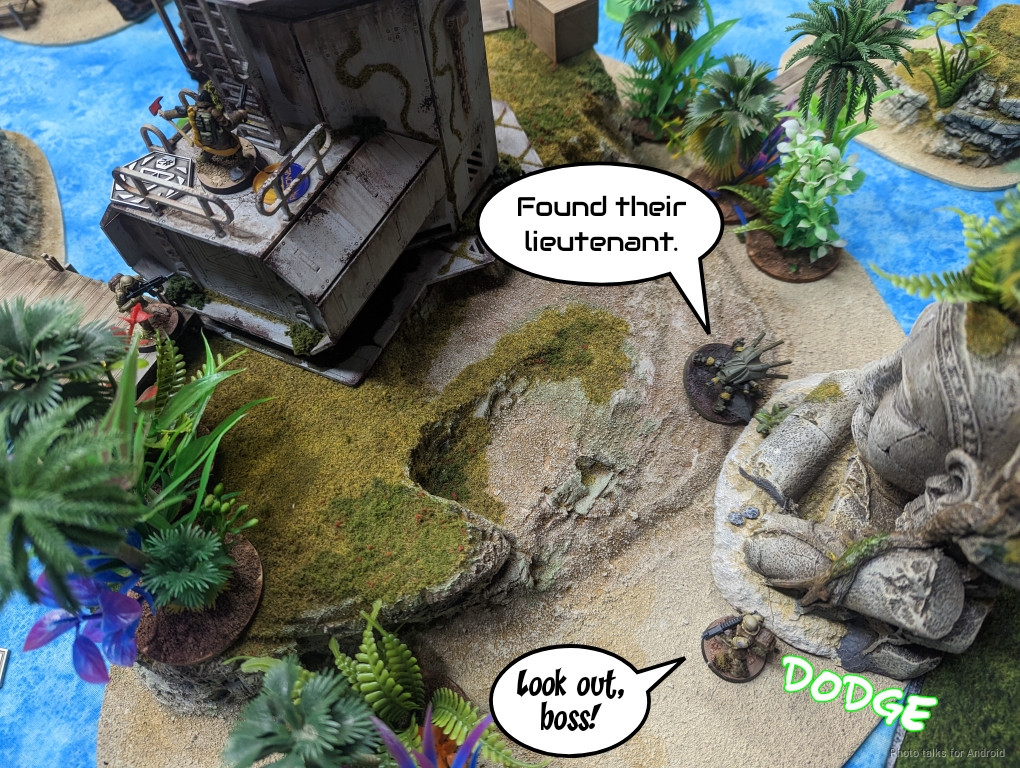
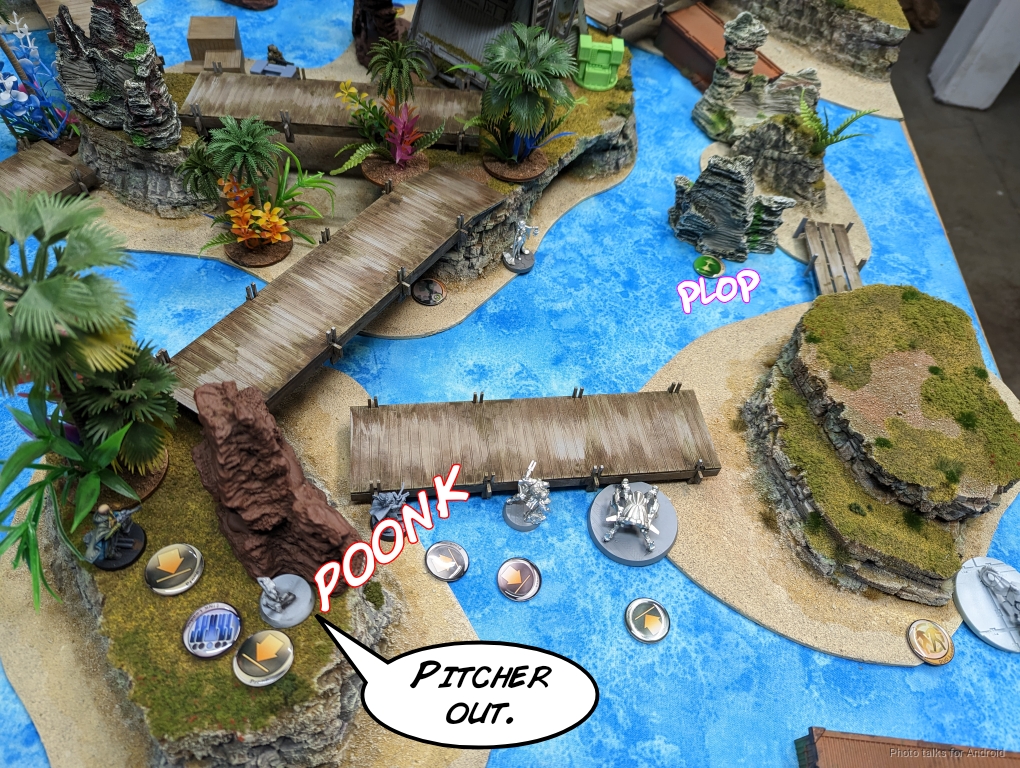
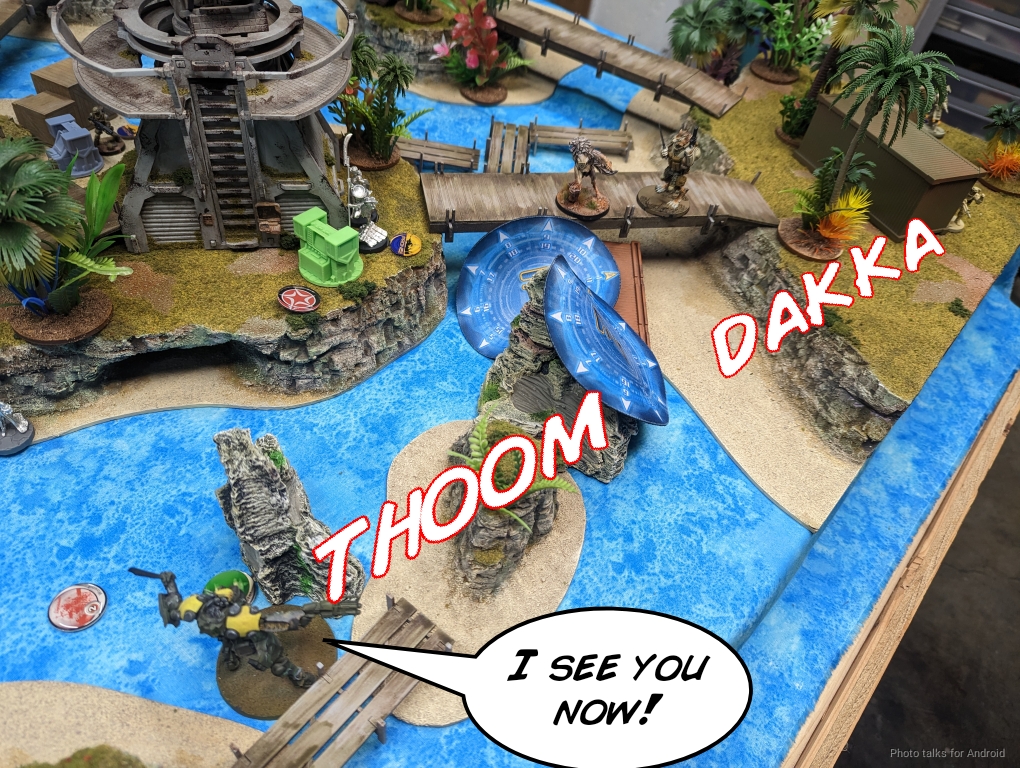
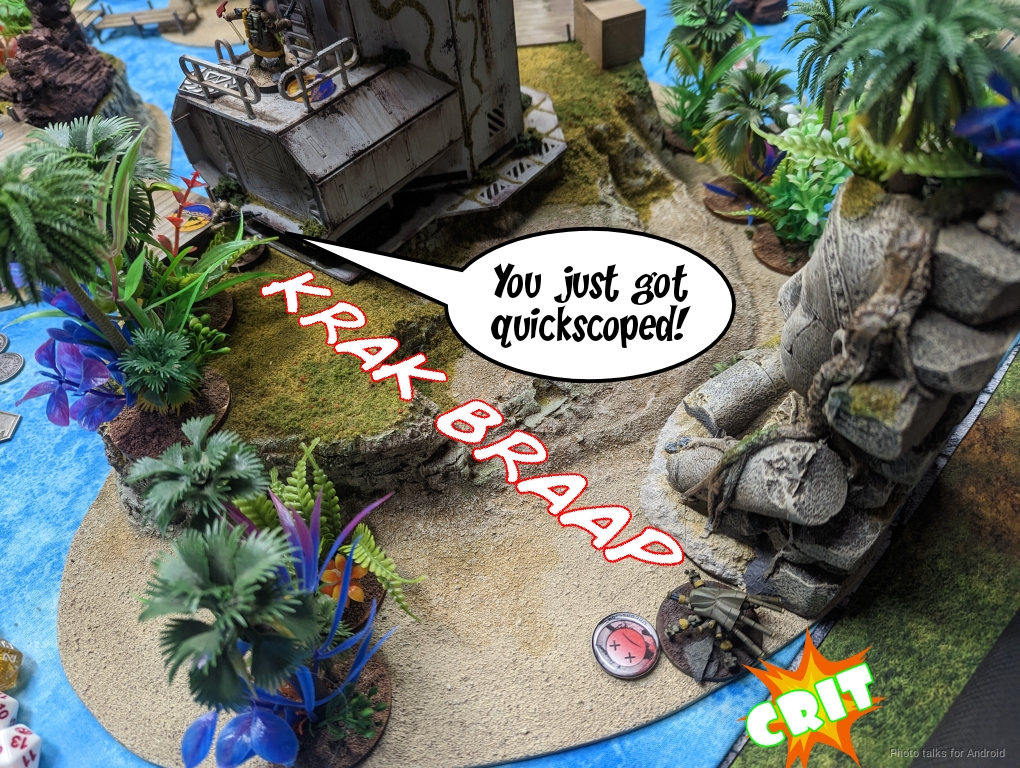
I’d like to take out Adam’s Lieutenant here, so I figure I’ll just spotlight the Grunt Infiltrator and missile it, then take on the Lieutenant with the Pathfinder. I’d also like to develop my link a little, but in moving around I see the Desperado, so the Druze MSR pastes it easily.
Valerya does her thing and the Clipper drops a missile on the Grunt’s head, deleting it.
Feeling rather annoyed at the amount of effort it took to set this up and lamenting the loss of a perhaps better line of play, I send the Pathfinder in… and get crit by the Grunt, losing the Pathfinder. Adam’s Lieutenant lives to fight another day!
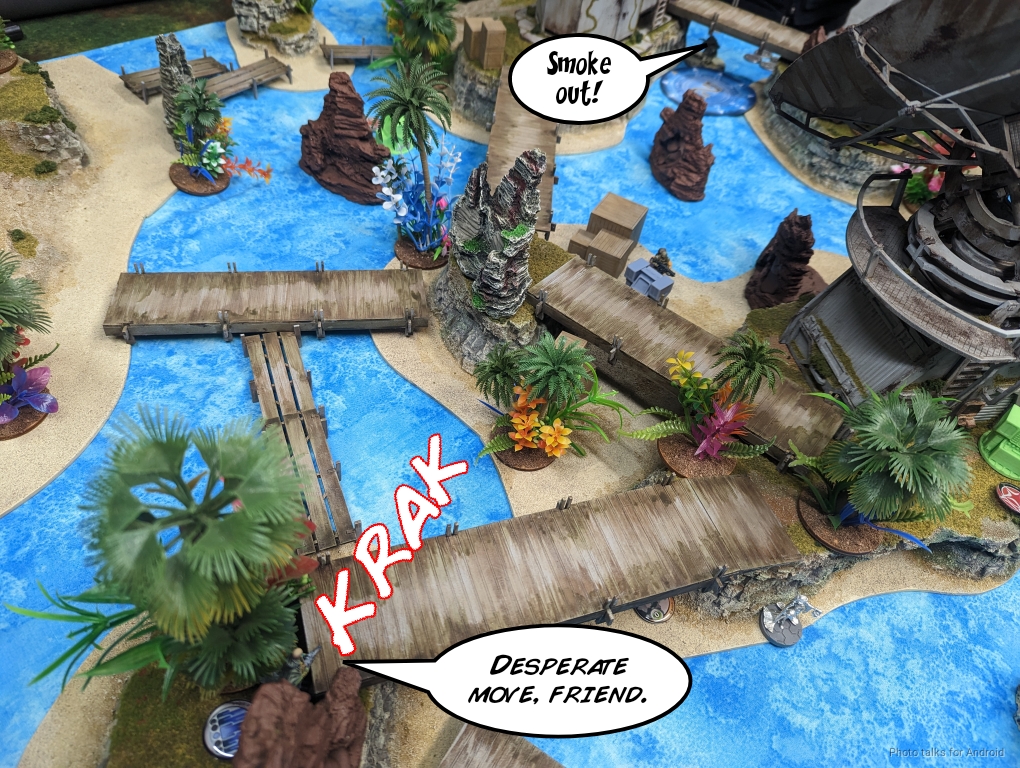
At this point I retreat Scarface, send Wolfgang in to retrieve my HVT, and set up for the next turn by standing Aida up to take some viral shots at the Devil Dog if it stands up.
Bottom of 2 – USARF

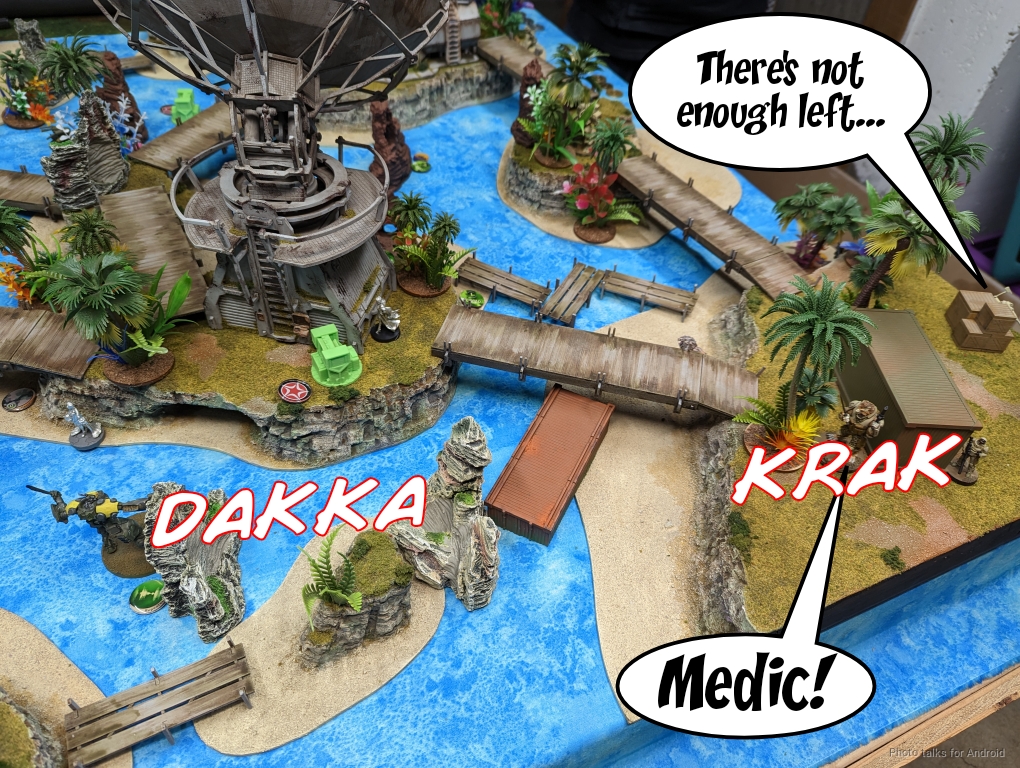
Things are pretty stable for me at this point, I just need to keep Wolfgang alive and delay the Devil Dog and the Beasthunter. The Beasthunter starts off by finally taking down the Defense Battery he’s been fighting, allowing Wolfgang to dodge away.
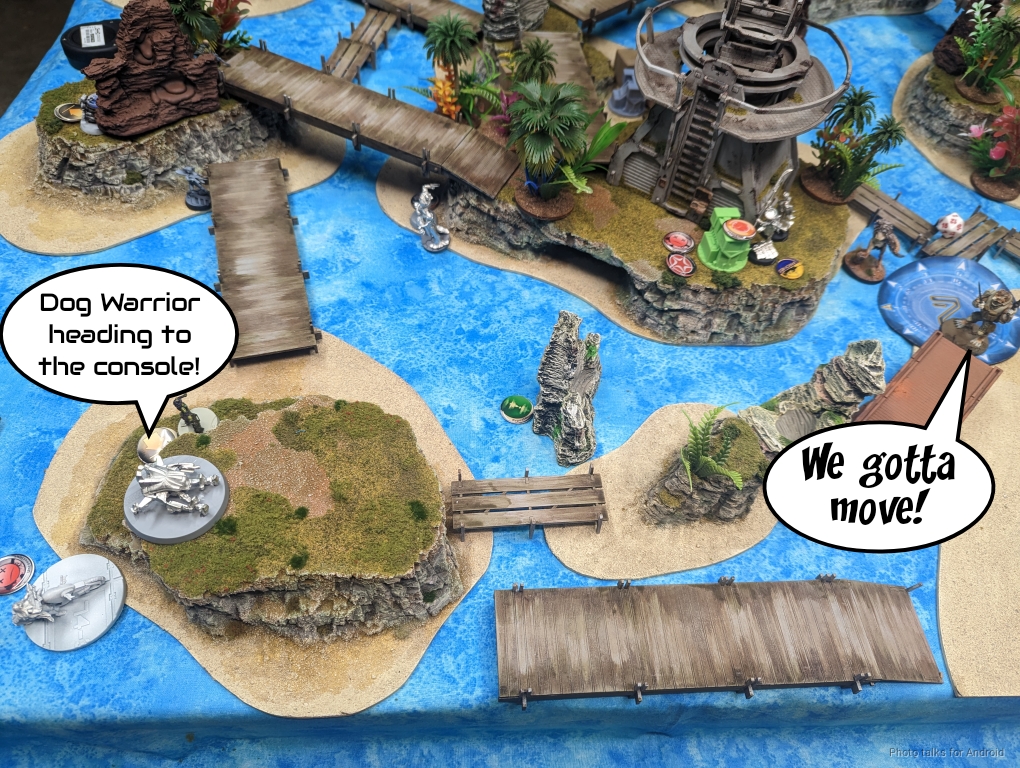
Playing to the objective, Adam gets his remaining Foxtrot near the central objective, but I discover it with my last Pathfinder.
With the central console in reach, Adam decides to take on Scarface and manages to do so by panzerfausting him off the table with the Beasthunter.
All Adam has to do now is hold the central console with the Foxtrot and keep my HVT on my table side and he’s probably got a win. It’s a tall order, but the Devil Dog definitely can do some work here. It smokes out my AROs and heads towards the center, but doesn’t have the orders to get there. Fortunately, the Foxtrot does.
Turn 3
Top of 3 – Druze
Adam’s got a point, thanks to the Foxtrot. I move everything into Group 1 and start my turn with 10 orders.
At this point it’s just the Wolfgang show. He starts off by attempting to take down that pesky Foxtrot, but fails.
The Bulleteer clears out the Beasthunter…

which allows Wolfgang to get some elevation and catch the Foxtrot in the open, dropping it.
Wolfgang keeps on going, putting a wound on the Devil Dog…
and ultimately dropping it.
I make use of Wolfgang’s climbing plus and put him on the shipping container near one of Adam’s 112s and try to take it down but instead take a wound.
I fail guts, going prone and passing turn.
Adam’s in retreat but is securing my HVT, so we call it here at a
4-2, 212-56 Druze Bayram Security Victory!
Post Game Analysis
Well, that was a rough and quite low scoring game. There’s a lot going on in this mission, and I played it much better this time than when I faced James.
Adam had strong feelings about the Mk12 armed Defense Batteries. He was of the opinion that they should be sidegraded to Rifle + Light Shotgun turrets. Initially at the table I agreed, we had just seen them wreak havoc on his army. After a few days had passed and I was able to take a more objective look at it, I think the Mk12 turrets are fine.
Here’s the reasoning. One of the big issues that exists in Infinity right now is the strength of a well-executed Alpha Strike. See my last game where Penny rolled through Frank’s Yu Jing for an example of the possible damage (not as an example of particularly well-executed strike, haha!).
The Defense Batteries force both players to deal with them, especially the first player. All factions have the tools to deal with them–if you don’t have hackers, you have smoke and close combat capabilities. Adam certainly did in his army. There’s something to be said regarding the 24″ rangeband as well. That does punch deep into the deployment zone, but NOT to the opposite corner, as we discovered with the Unknown Ranger taking shots across the table. Also, any situation in which that’s not possible due to blocking terrain means you can safely ignore one of those turrets.
You have to stack negative mods on the turrets, just like you do on TR bots. I think the key finding here is that instead of being able to outrange the TR bot with a mimetism sniper, you either have to do that with an HMG (readily available to most factions) or get in close under 8″ to also issue a -3 due to rangeband. CC also works (although the dice didn’t bear that out against Adam). At the time, Adam was pretty frustrated, he thought he was using the right tools and that the Blackjack should have been able to challenge the turret successfully, but as we saw earlier, the odds don’t really support that in 24″:
| 23.58 | 44.89 | 31.54 |
Burst 3 DAM 15 is a threat, even to a high ARM model, and a 25ish percent chance is quite high. If nothing else, I have an almost 70% chance of forcing Adam to spend another order on it. Compare that to the Unknown Ranger’s chances outside of 24″:
| 3.04 | 67.32 | 29.64 |
Yes, it still has a 70% chance to force Adam to try again, but it’s pretty darn safe! In a world where he had used the Unknown Ranger to take out the left Defense Battery and then the Beasthunter can take out or at least tie up the other one. I think that’s a valid strategy too–you don’t need to kill the Defense Battery, just standing in base to base with it even if you get zapped takes it offline.
In any case, I think this was just a case where neither of us really had any experience with the mission–all I knew was that I wanted to take the turrets over by possessing them, and then I wouldn’t have to think about it any further. Adam thought he could just (in typical USAriadna fashion) brute force his way through all problems, which is usually true, but not in this particular case. In future iterations of the mission, I think he’ll plan more carefully about his attack into the Defense Batteries–I think both players will have to.
The mission has a lot of moving pieces, and I think it’s actually quite fun. It asks a lot of both players across all turns, and the pacing of it feels good. It is a mission where you need to plan for it during list build, but it’s not as demanding as say, Looting and Sabotaging. All in all I’m looking forward to playing it more, it’s certainly a welcome departure from the usual fare, and offers a fun and complex challenge. Thanks for reading!
I’m wondering if the turrets are doing what you want… preventing an alpha strike (at least one of the goals). So normally in an alpha strike the player that goes first charges a big powerful unit and rambos through the other player. The turrets stop this (because they shoot anyone that activates in LoS) UNTIL the first player hacks them. So the first player hacks the turret and THEN alpha strikes. Sure they have a few less orders, but it’s not that hard to get a pitcher or repeater out (for some armies at least)…
Then it’s the second players turn, now they have to deal with any alpha strikers AND the two turrets, while the first player has “free run” of the board (these are all generalizations). You could argue this makes the second player’s turn HARDER, not easier.
Look at the first turn: both turrets got flipped and then Scarface went on a rampage. In response USARF had to respond to a TAG AND the turrets, and wound up getting smacked pretty hard.
At a very basic level: “all the first player has to do” is get some hacking out and they get two sweet ARO pieces in the midfield “for free”. Maybe hacking the turret should just deactivate it? Then this becomes a tough(er) choice for the first player. Do they work around the turrets and leave them active to harass the second player, or do they deactivate them to allow their alpha strike to move forward. The turrets become a problem/puzzle for both players, not an asset for the first player after a couple hacking rolls… It probably means the turrets will have much less of an impact (once they’re hacked they’re “gone”) though…
This is very stream-of-thought, so take it with a grain of salt