Inexorable Irregularity
Pete (YueFei23) and the gang were all discussing ITS mission ideas, and Pete pitched one called “Holographic Havoc.” It sounded pretty fun, and Jordan (sprocketgx) generously granted me a playtest game on this map:
Overview
- Mission: Holographic Havoc
- Forces: Dahshat Company versus Kosmoflot (300)
- Deploy First: Dahshat Company
- First Turn: Dahshat Company
The general idea behind Holographic Havoc is to be a sort of Mindwipe prequel. That Rogue AI had to come from somewhere, right? Pete also wanted the primary mechanic of the mission to be Holoprojector, because that’s a pretty underutilized skill and it’s pretty fun to use and abuse.
You can read the mission here:
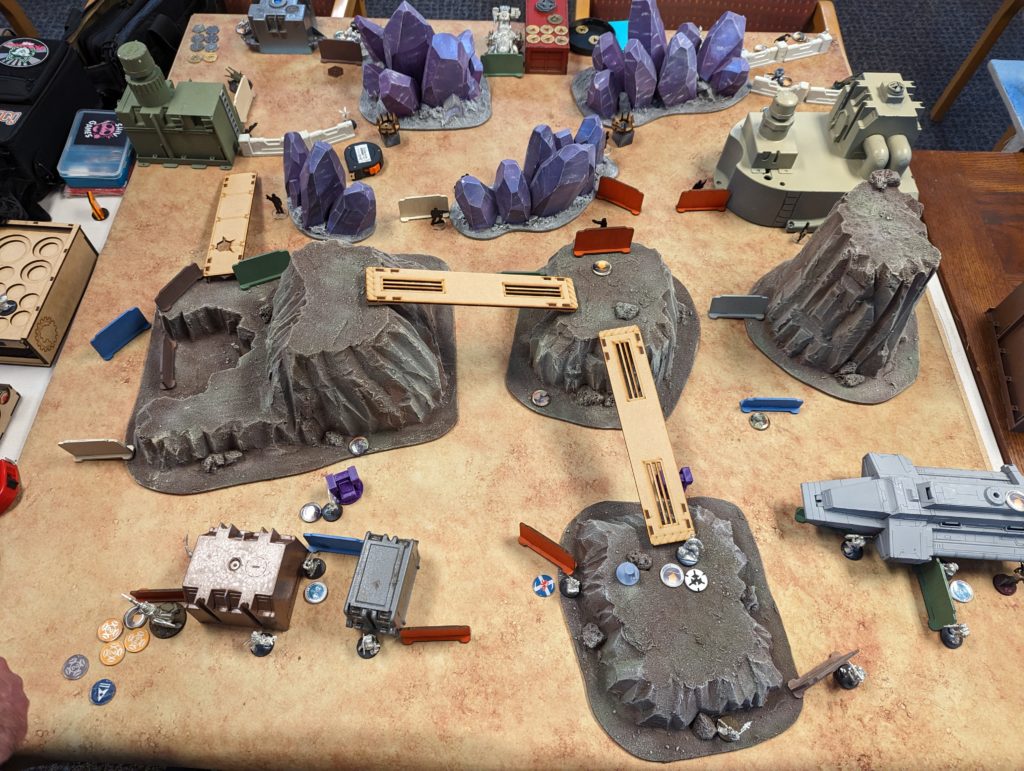
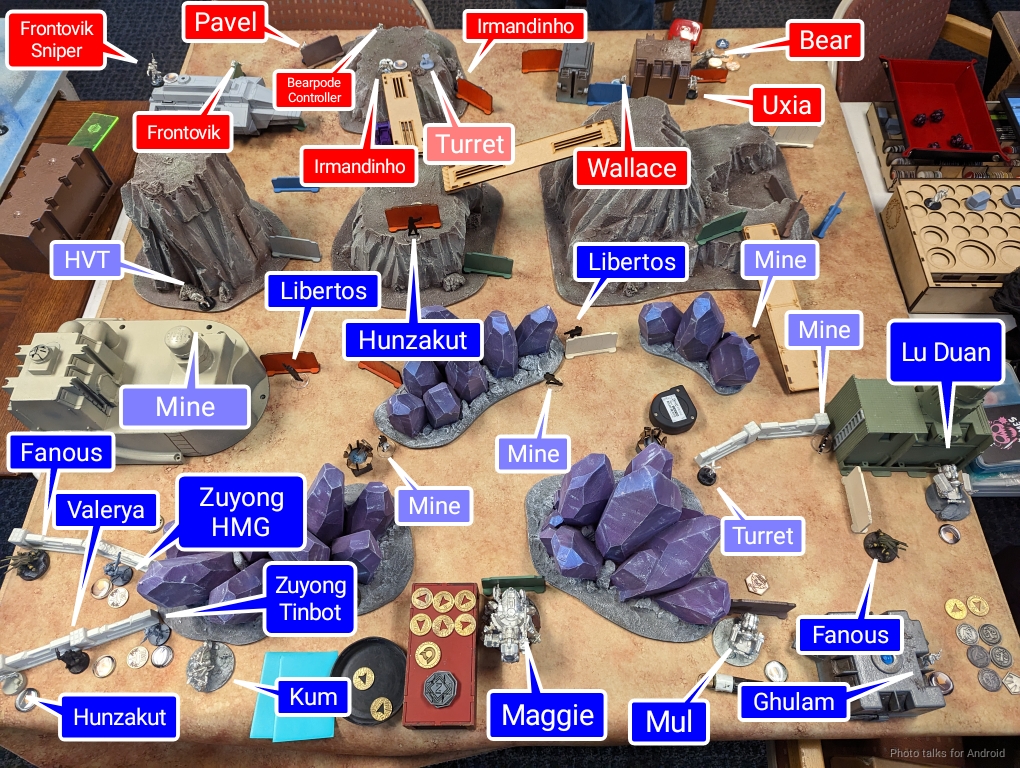
Note that it’s a live Google Doc so the mission I play here might have been updated by the time you read this. Anyway, here’s a picture of the table setup:

There are two consoles, and you basically have to upload a Data Pack to the console (aka the Rogue AI). Points are as follows:
- 3 Points – Upload a Data Pack (total 6 points)
- 2 Points – KIll more enemy specialists
- 2 Points – 2 Classifieds
Uploading a Data Pack is easy, you just walk up to it and WIP roll the console, and you’re done. The rest of the points are pretty self explanatory. Now comes the complexity:
- 3 free mines – You can deploy 3 mines as if deployed by a Minelayer in your Defense Zone
- 1 free turret – You can deploy the F-13 turret anywhere in your deployment zone, as normal. It’s the TR combi one.
- Data Pack – Two specialists start with a Data Pack at the beginning of the game. This grants them the Holomask and Holoprojector rules, and they cannot deploy outside the deployment zone.
If you drop the Data Pack because you die, another specialist (either yours or your opponent’s) can pick it up and deliver it to your console. Anything carrying a Data Pack gains the Holoprojector rule, but not the Holomask rule. That’s just a deployment thing for the two nominated troopers. And that’s it!
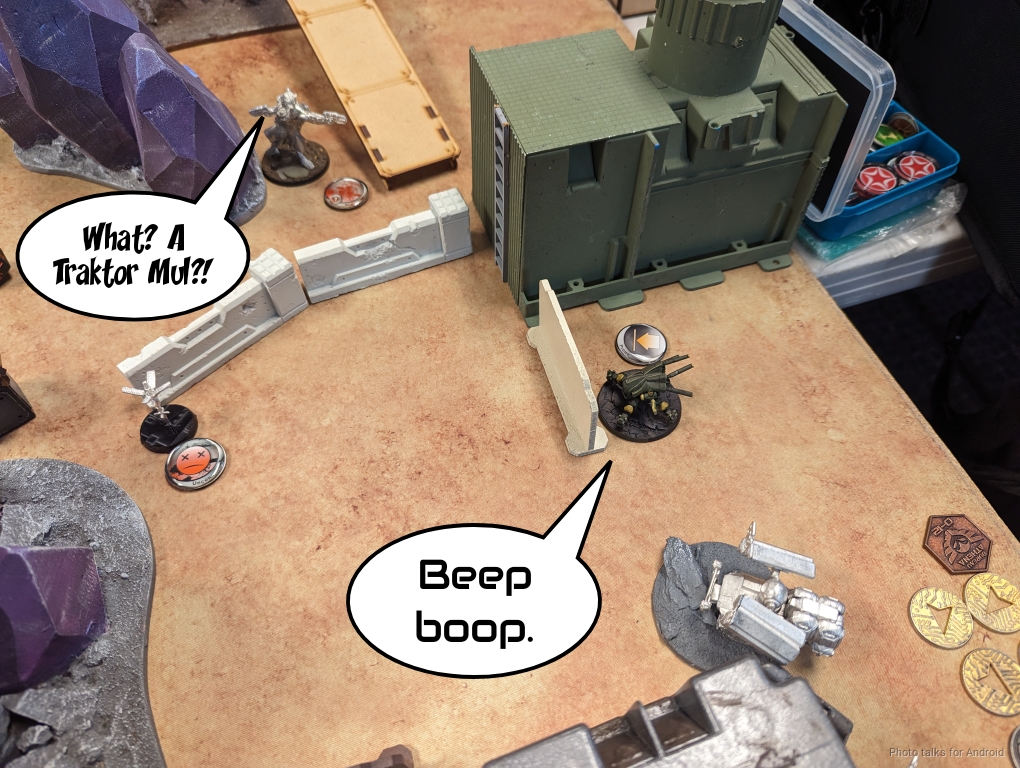
As far as the list is concerned, I built it before I knew I was playing this mission, I was just prepping to play Dahshat for funsies. I decided to play a game with Maggie, and just packed her group full of what looks like just orders… but also secretly contains a Lu Duan hiding as a Traktor Mul.
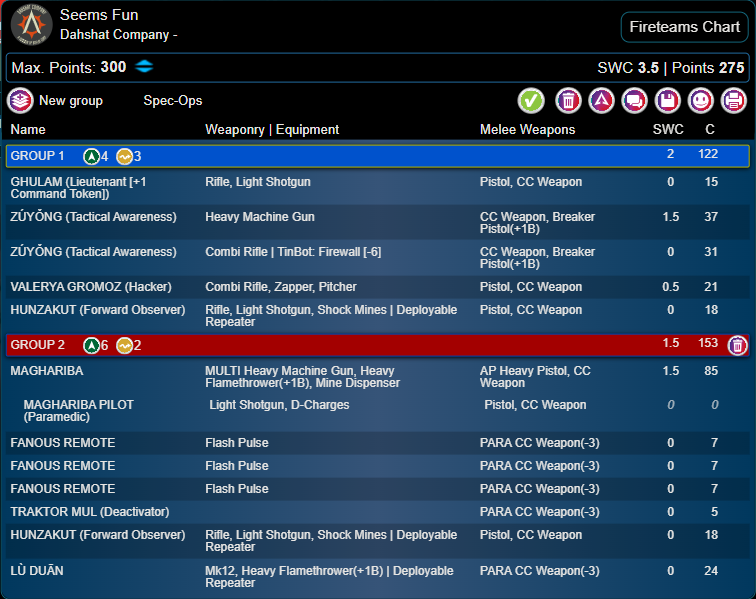
Seems Fun
GROUP 1
4
7
1
GHULAM (Lieutenant [+1 Command Token]) Rifle, Light Shotgun / Pistol, CC Weapon. (0 | 15)
LIBERTO (Mimetism [-3], Minelayer]) Light Shotgun, Shock Mines / Pistol, CC Weapon. (1 | 9)
ZÚYǑNG (Tactical Awareness) Heavy Machine Gun / CC Weapon, Breaker Pistol(+1B). (1.5 | 37)
VALERYA GROMOZ (Hacker) Combi Rifle, Zapper, Pitcher / Pistol, CC Weapon. (0.5 | 21)
GROUP 2
HUNZAKUT (Forward Observer) Rifle, Light Shotgun, Shock Mines ( | Deployable Repeater) / Pistol, CC Weapon. (0 | 18)
KUM Light Shotgun, Smoke Grenades / Pistol, DA CC Weapon. (0 | 7)
MAGHARIBA MULTI Heavy Machine Gun, Heavy Flamethrower(+1B), Mine Dispenser / AP Heavy Pistol, CC Weapon. (1.5 | 85)
MAGHARIBA PILOT (Paramedic) Light Shotgun, D-Charges / Pistol, CC Weapon. (0 | 0)
FANOUS REMOTE Flash Pulse / PARA CC Weapon(-3). (0 | 7)
TRAKTOR MUL (Deactivator) ( ) / PARA CC Weapon(-3). (0 | 5)
LÙ DUĀN Mk12, Heavy Flamethrower(+1B) ( | Deployable Repeater) / PARA CC Weapon(-3). (0 | 24)
5.5 SWC | 300 Points | Open in Army | Copy Code
As for the rest, this link is pretty much a staple of Dahshat for me:
It’s not cheap at 89 points and 2 SWC, but it does offer a whopping 5 orders for that price and a good deal of capability, especially with the synergy between Valerya and the Tinbot Zuyong. I wish the weapon options were different–it would be really nice to slot in a template weapon on one of the Zuyong, but now I’m just being picky. The power here lies in the fact that it can run itself, more or less, which frees up the rest of the combat group to do other things.
The usage model is to spend the Tac Aware orders and maybe one more order moving the link into the midfield. They can’t really 100% take care of themselves in the reactive turn, so you really need to be conservative with their placement. Limiting the forward movement to only 2-3 orders (including the Tac Aware) forces you to be careful, which is a nice little mental safety interlock to keep you from doing something silly. The HMG rangebands also allow you to with some reasonable chance of success delete something that’s troublesome.
Then on Turn 3 you have probably 2 members of the link still alive and kicking and you can pour orders into them to get some work done with tolerance to variance due to the good stats on the HI and 2W. Valerya is there primarily to push buttons, not to get into hacking fights–the Tinbot is really there to keep her from getting punked before you need her.
I decided to take the whole midfield oppression package, with two Libertos, two Hunzakut, and even a Kum biker. Apparently you need some sort of “legal lieutenant” or something, so I took a +1 Command Token Ghulam to help me with all the irregular orders. The primary issue I ended up facing was that there just weren’t very good specialists to have the Data Pack. I ended up having to choose Valeyra and one of the Hunzakut, which was less than good.
Jordan took his usual Wallace + Varangian Haris, and then took a full Frontovik core. There’s a bear in there, because of course there is, it’s Kosmoflot 9_9.
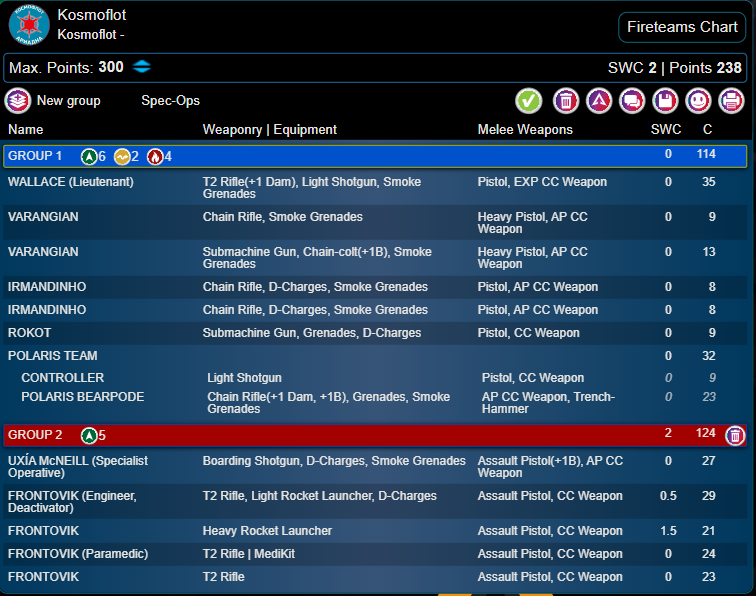
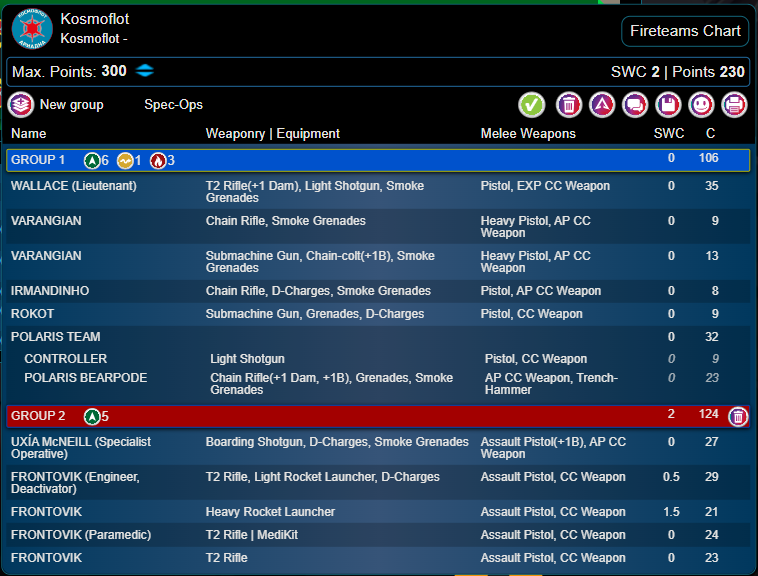
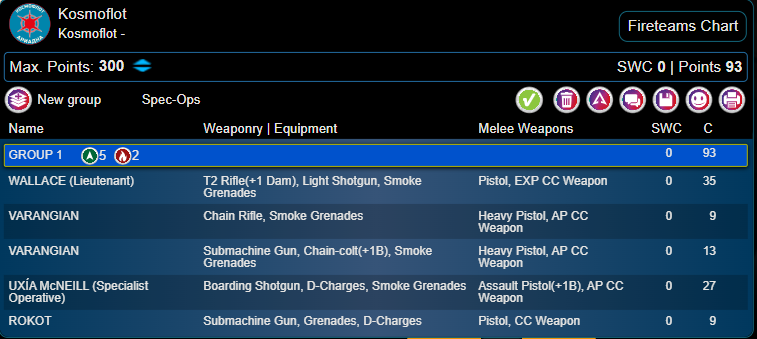
Kosmoflot
GROUP 1
WALLACE (Lieutenant) T2 Rifle(+1 Dam), Light Shotgun, Smoke Grenades / Pistol, EXP CC Weapon. (0 | 35)
VARANGIAN Chain Rifle, Smoke Grenades / Heavy Pistol, AP CC Weapon. (0 | 9)
GROUP 2
IRMANDINHO Chain Rifle, D-Charges, Smoke Grenades / Pistol, AP CC Weapon. (0 | 8)
ROKOT Submachine Gun, Grenades, D-Charges / Pistol, CC Weapon. (0 | 9)
POLARIS TEAM undefined / undefined. (0 | 32)
POLARIS BEARPODE Chain Rifle(+1 Dam, +1B), Grenades, Smoke Grenades / AP CC Weapon, Trench-Hammer. (0 | 23)
UXÍA McNEILL (Specialist Operative) Boarding Shotgun, D-Charges, Smoke Grenades / Assault Pistol(+1B), AP CC Weapon. (0 | 27)
PAVEL McMANNUS Ohotnik, Chain-colt, Shock Mines, D-Charges / Pistol, T2 CC Weapon. (0 | 32)
FRONTOVIK (Multispectral Visor L1) AP Sniper Rifle ( ) / Assault Pistol, CC Weapon. (0.5 | 30)
2.5 SWC | 300 Points | Open in Army | Copy Code
What’s fun is he’s taking Pavel as well, a pair of Irmandinho, Uxia, and then a random Rokot?
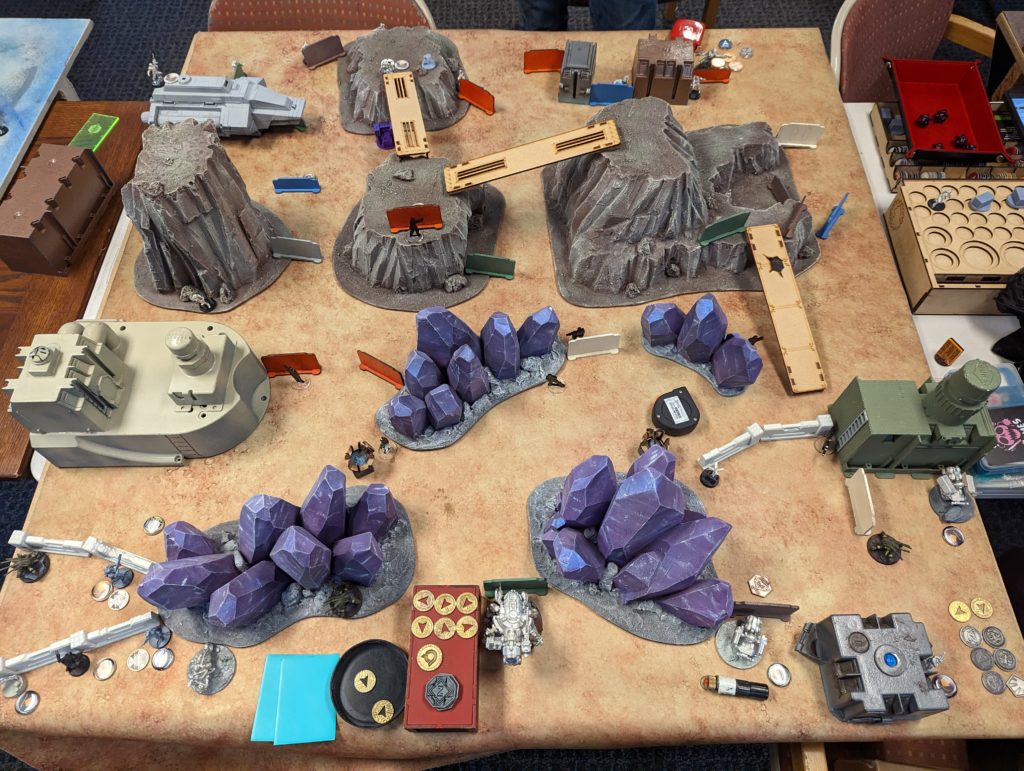
Deployment
Jordan chose deployment, so I ended up going first. It seemed fine, I guess. I had so many mines to deploy in the Defense Zone along with the Libertos’ mines and the Hunzakut it got a little silly. I tucked the Fanous and the real Mul into reasonable spots across the deployment zone, then hid the Lu Duan as a Mul in an advanced spot on the right so I could use it.
One of the Hunzakut went on a mesa in the middle of the table, and the other pretended to be a second Ghulam Lt option, with the real one on the right. I didn’t realize until later that I placed both of my Data Pack carriers on the left, which turned out to be a real pain for me. I hid Valeyra as a Digger on the left, figuring that was a reasonable lie. Maggie was my reserve.
Jordan’s deployment was pretty straightforward. Plenty of mines, the Varangians, Wallace, and the Bear on the left, and the Frontoviks on the right.
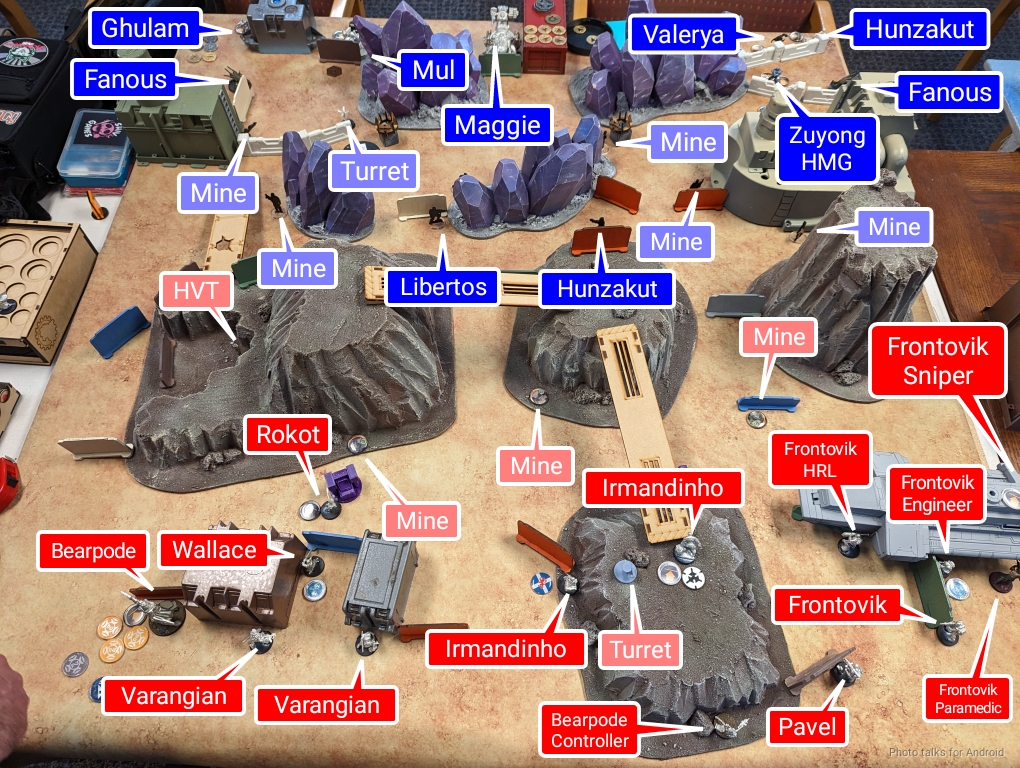
The Frontoviks went on the right and the Irmandinhos in the middle. What’s interesting is that he Holomasked both Pavel and Uxia as Scots missile launchers out of camo, which was just so wildly suspicious. Of course, he hadn’t really constructed the list with plausible lies and was a similar position as me in terms of having an awkward list. Like many missions, Holographic Havoc is one that requires at least some consideration during list construction time.
Maggie was my reserve and the Bear was Jordan’s.
Turn 1
Top of 1 – Dahshat
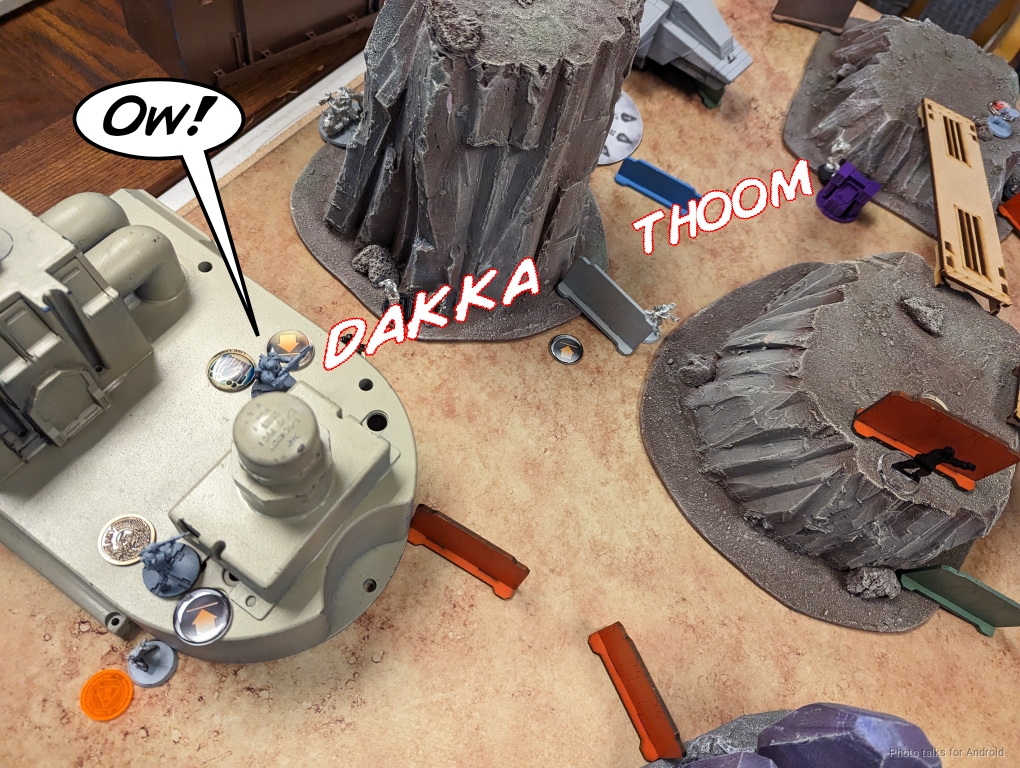
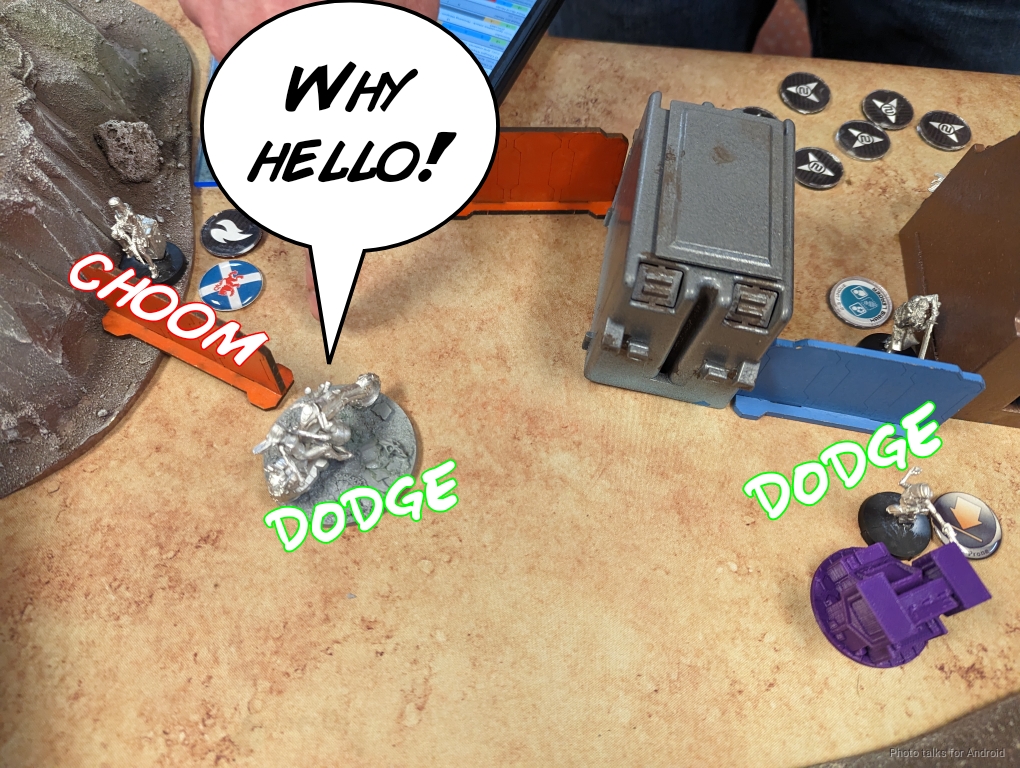
Jordan took two orders from the TAG, which seemed fine. I might have taken from my first group to artificially tax my command tokens early, but that’s me. Limiting TAG order access certainly isn’t bad. In any case, I was pretty sure those Scots ML weren’t real, so I challenged one with Maggie right off the bat and forced a dodge.
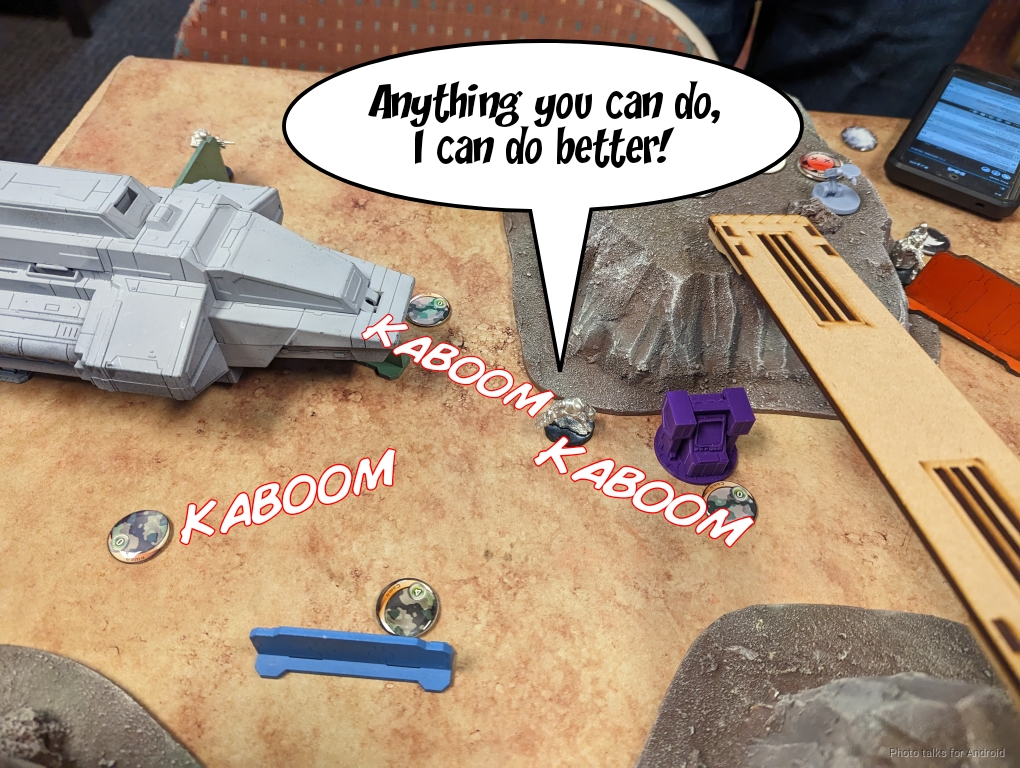
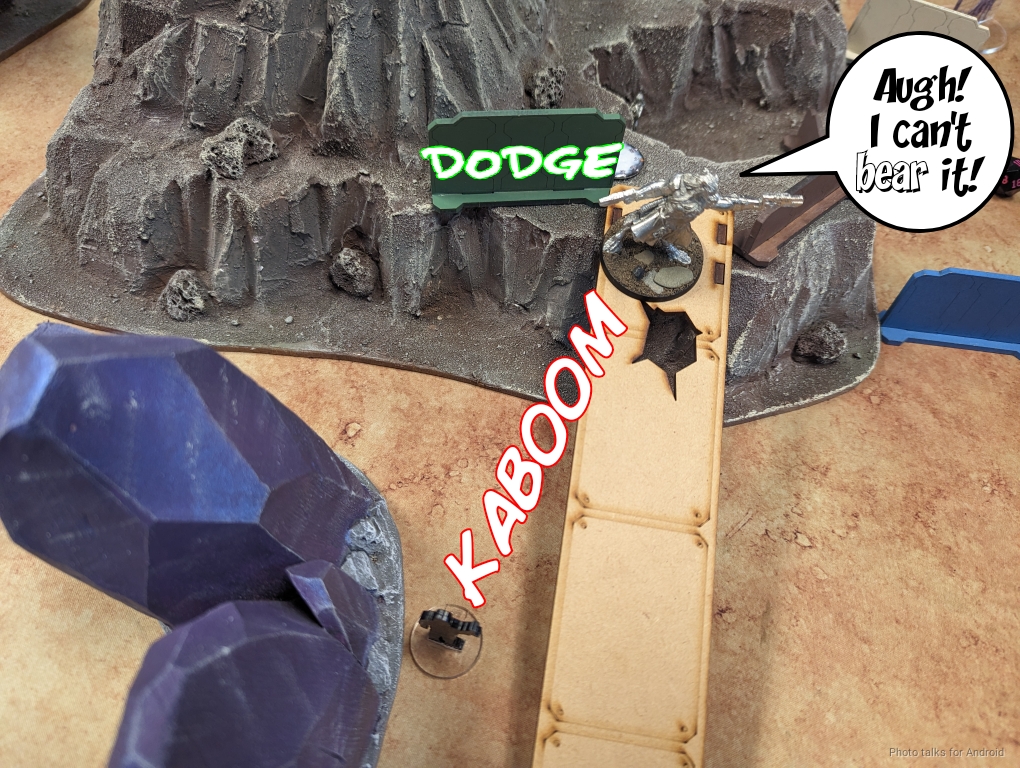
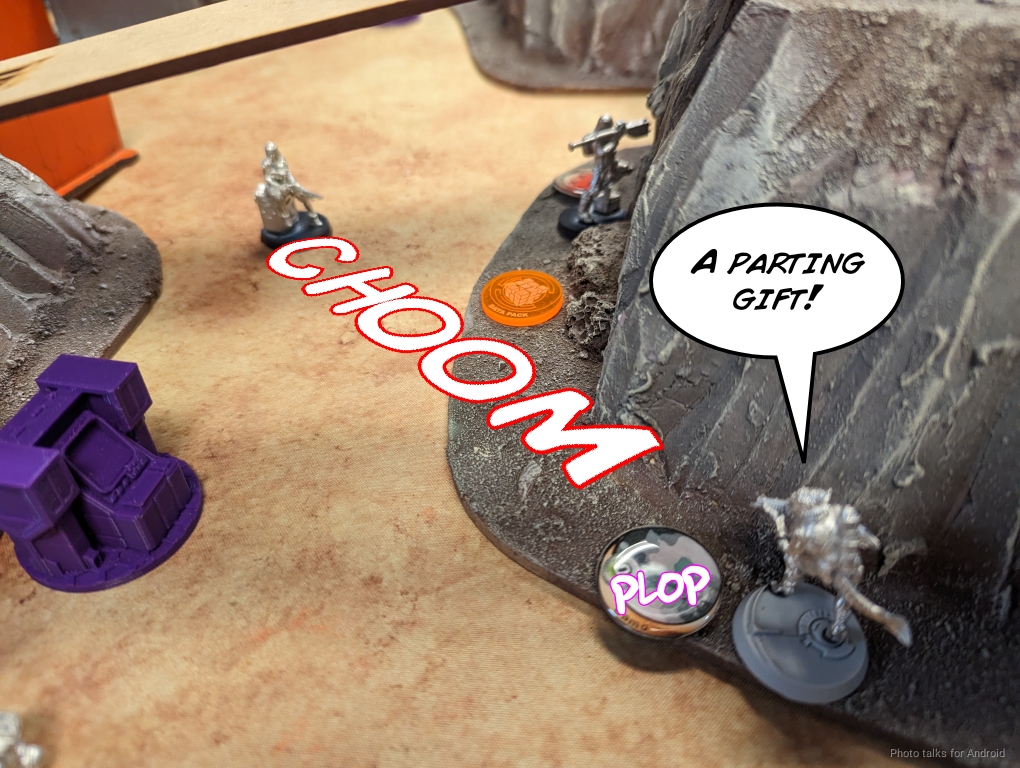
I wasn’t able to take Pavel down, since we both just whiffed, so I tried again and was able to down Pavel. This meant one of Jordan’s Data Packs was on the table and up for grabs!
Next I started setting up some mines to lock down the Frontoviks.

It took a few orders because I had to reload and then fire again. I did grant a smoke to an Irmandinho here, which I thought was fine, but turned out to be problematic.
There was a bit of miscommunication about whether or not one of the mines covered the Frontovik sniper–I ended up just letting it go and blasting the Frontovik down with the Zuyong HMG that moved into the midfield.
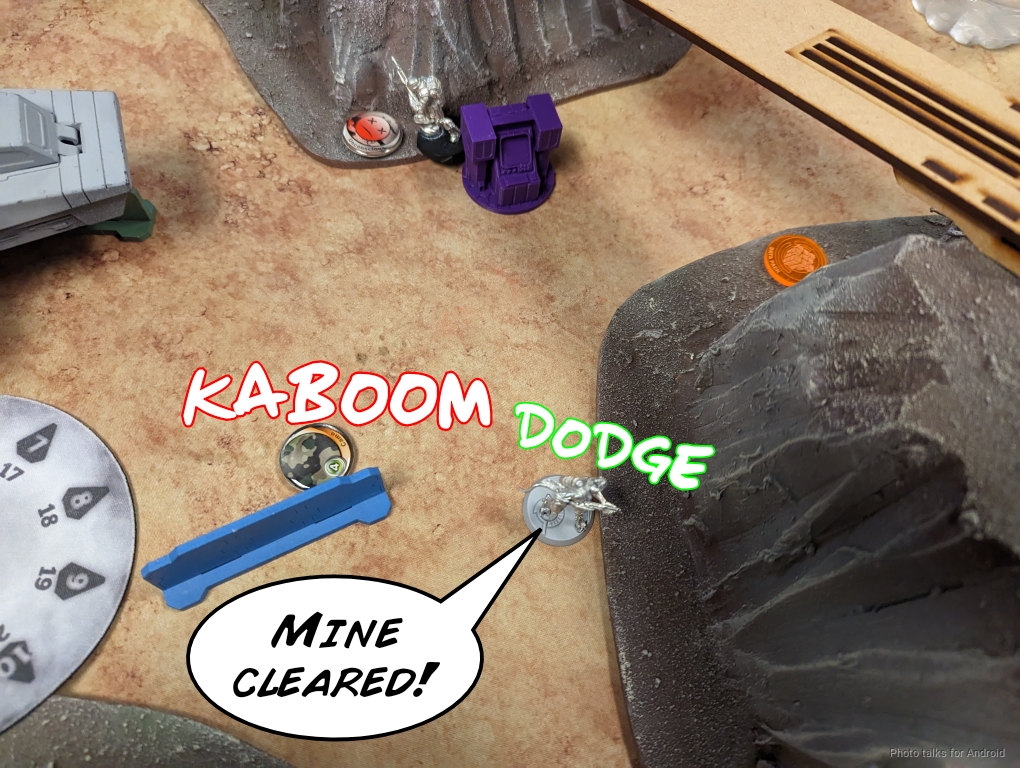
I had a few orders left to spend on one of the Libertos. I wasn’t really thinking about leveraging the Holoechoes yet–it’s not a tool I have or use often, so I defaulted to just rolling with the Libertos and mine-clearing with it. This is one of the downsides to building patterns of play–you leave some efficiency on the table. In any case, I just walked the Libertos into the mines on the second short skill and sacrificed it to clear the mines.
Definitely not great–I would probably have been better off setting the Libertos up for an attack run and a dodge mine clear later, but I got the job done and cleared the way for further turns. Sometimes in Infinity you just have to commit to resource expenditure and solve the problem, because you won’t have time or resources later. Life lessons or something.
Bottom of 1 – Kosmoflot

That Irmandinho that I let live ended up long-skill climbing off the mesa and detonating all of Maggie’s mines. It almost survived too, passing 2/3 saves. In retrospect I wish I had taken it out–it is still a full order because of Wallace, so that would have been worth it.
With the mines out of the way, the Frontovik Paramedic picked the Frontovik sniper up. Jordan can generally be relied upon to spend orders on attempting to MediKit stuff back up, which sometimes can really swing games in either direction, and he did not disappoint here.
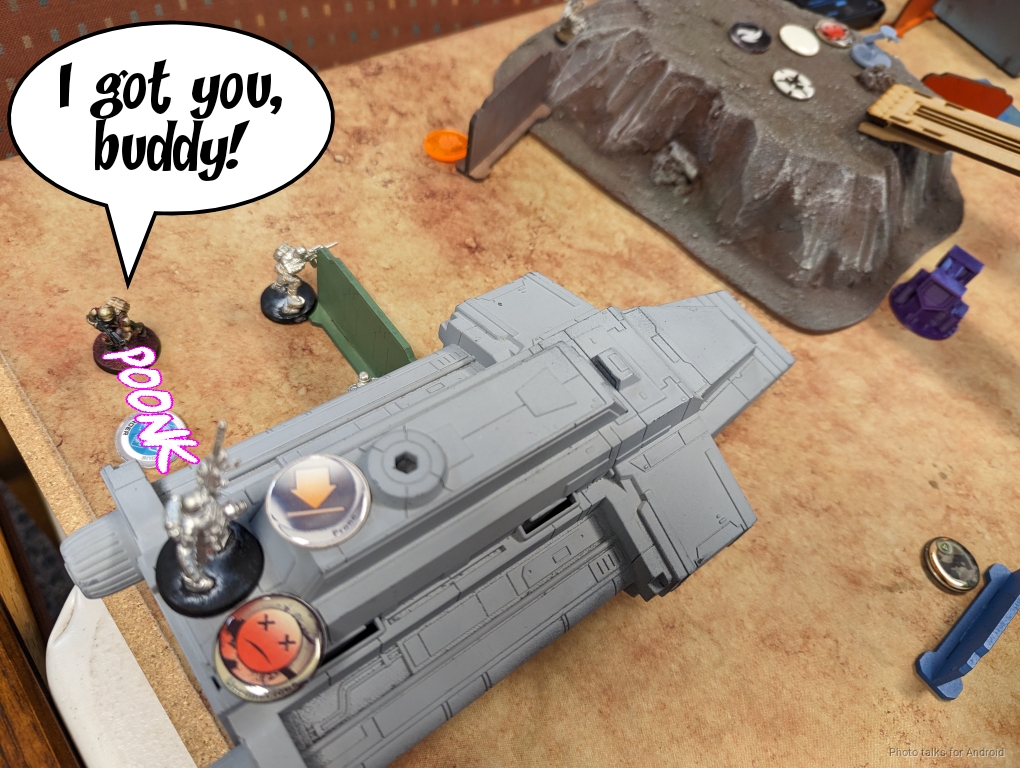
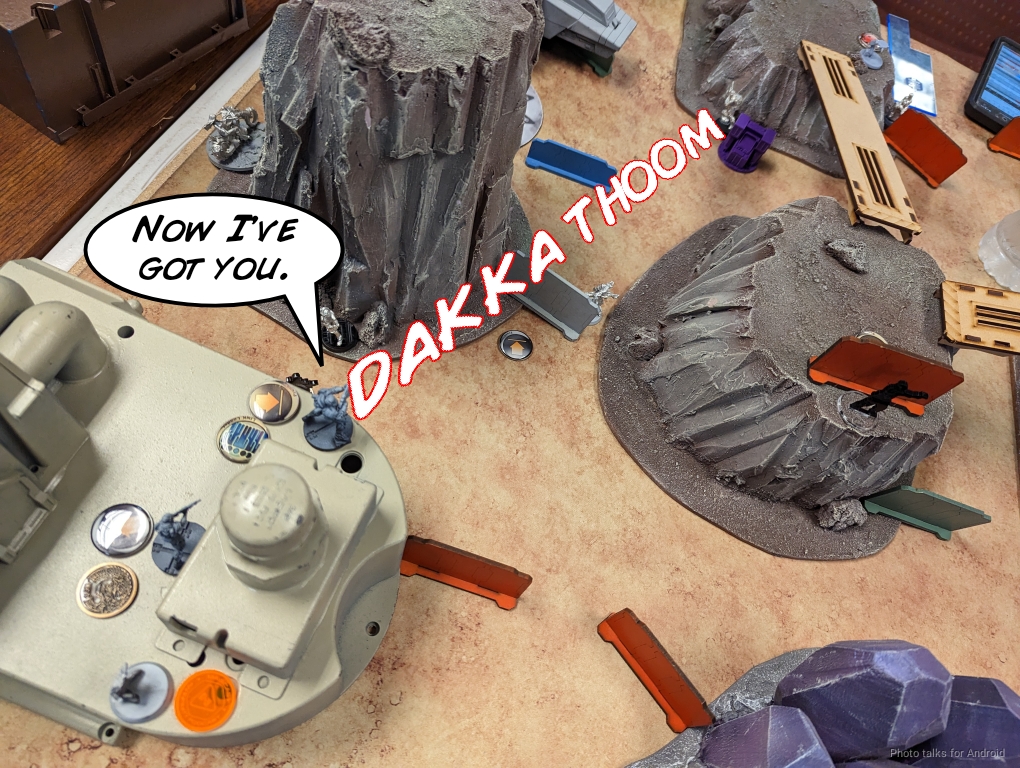
The Frontovik Sniper then challenged the Zuyong and the nearby Kum biker, which dodged. The Zuyong managed to crit and fully took the Frontovik Sniper off the table with two failed saves. Can’t really hope for a better outcome for me–multiple orders spent for no material gain definitely puts me in a better position here.
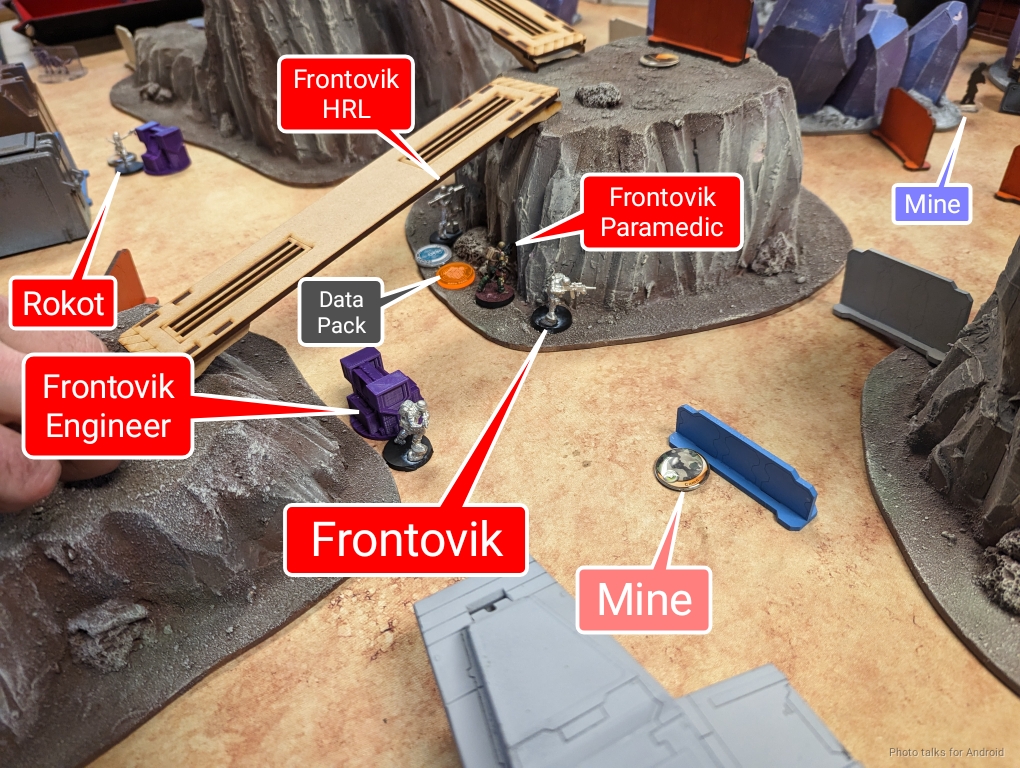
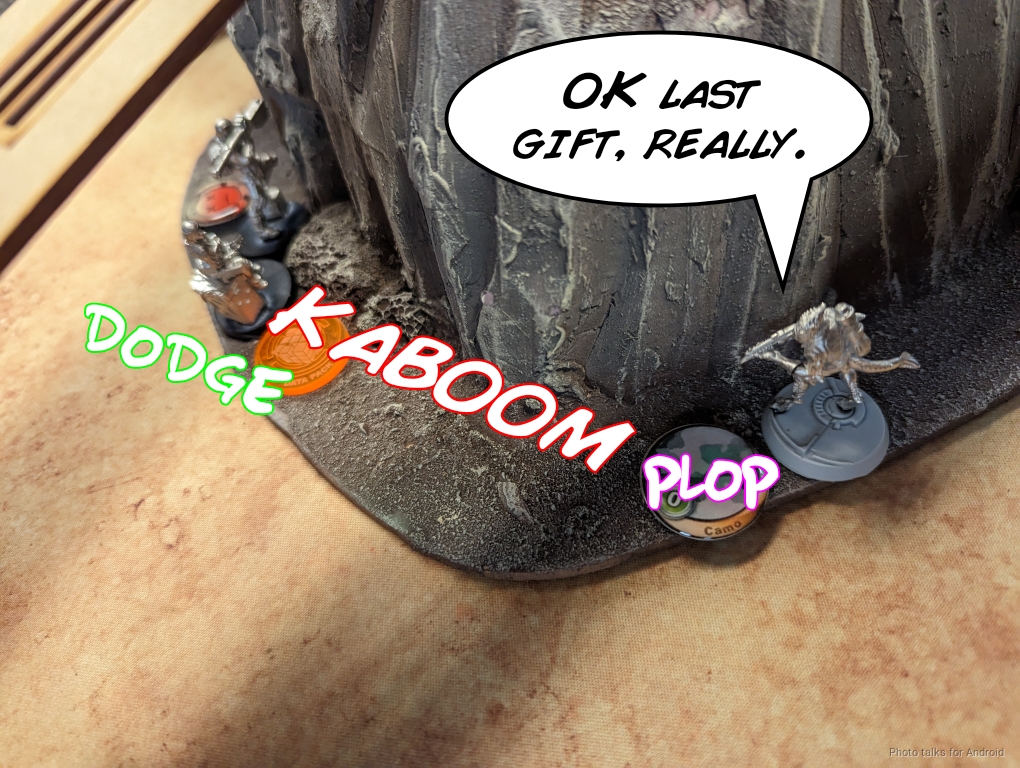
Jordan then pushed the Frontoviks forward, grabbing Pavel’s Data Pack with the Paramedic on the way up. He didn’t have a ton of order for this, with both Pavel and one of the Frontoviks down at the start of the turn, meaning he had to leave the link stacked up in a pretty vulnerable position just outside his deployment zone. There is a mine there to help, but it’s not really in a great position to defend more than just the console.
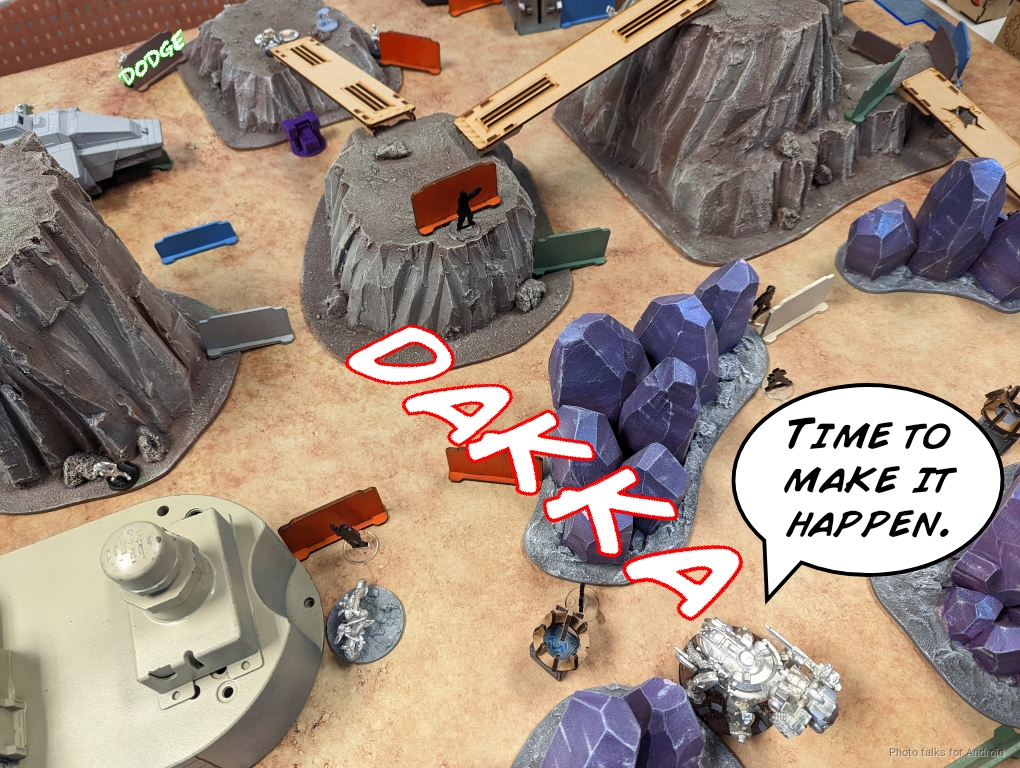
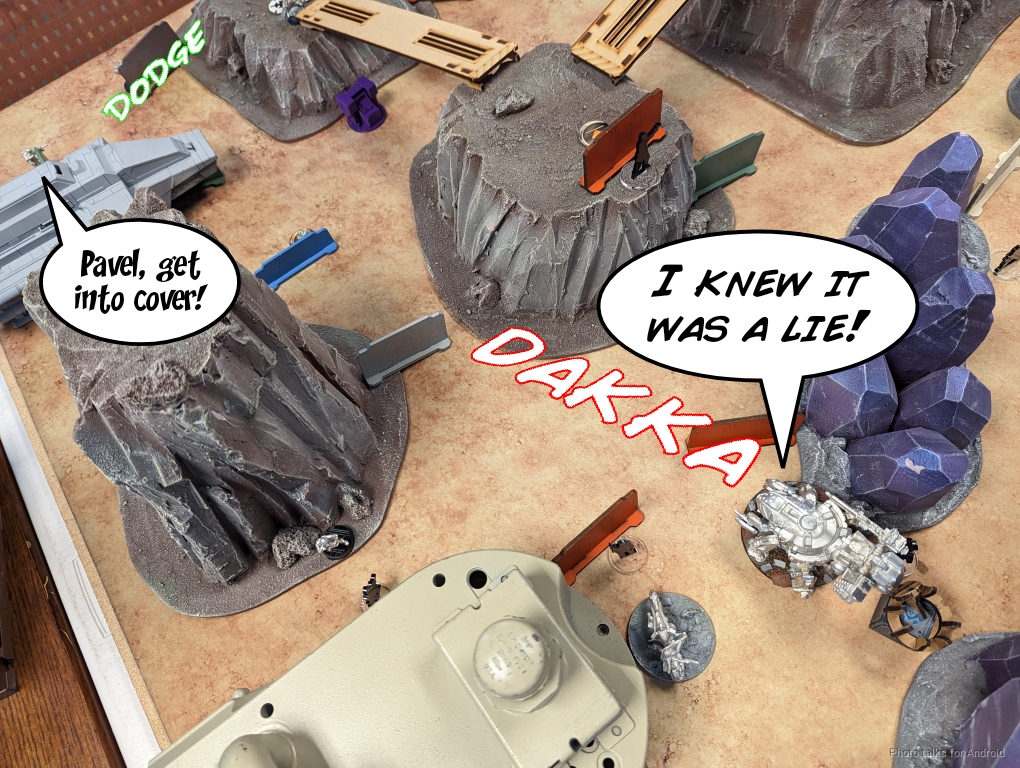
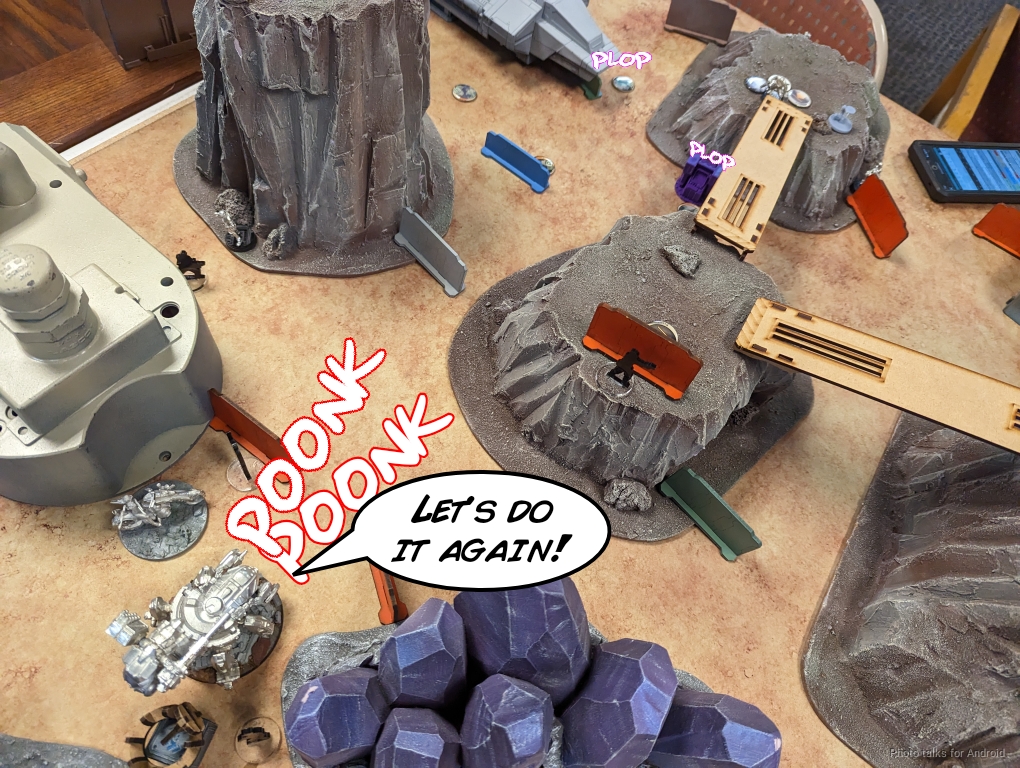
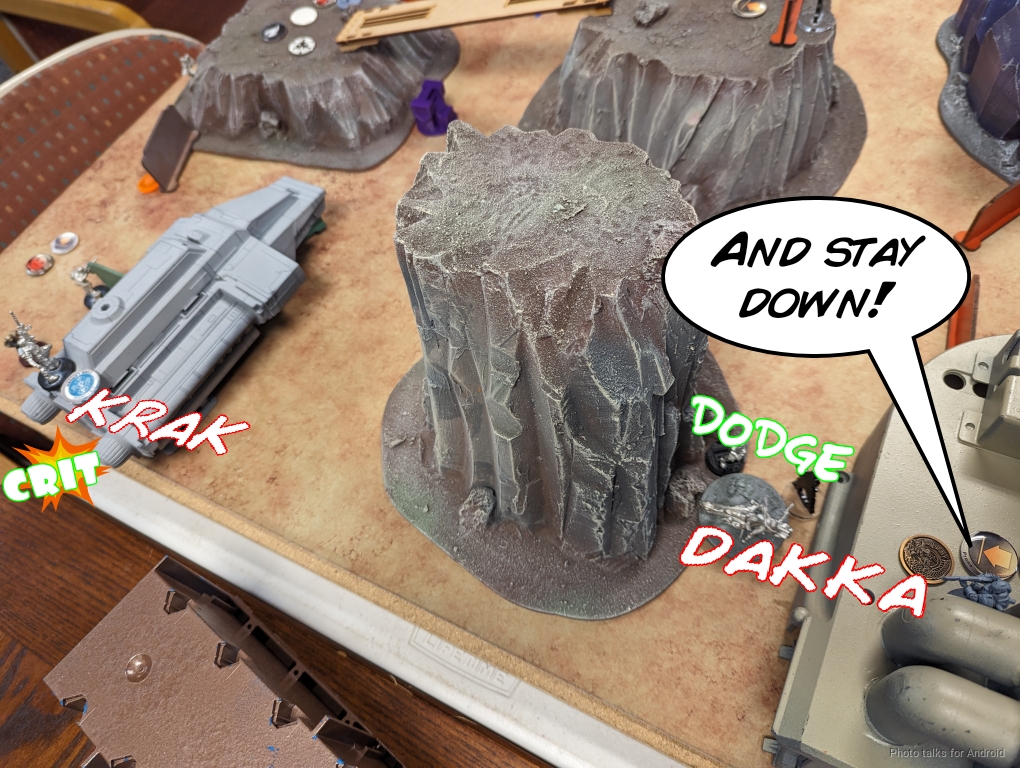
Jordan does have plenty of orders for his Bearpode, so he sends it in, smoking the approach to avoid getting shot by Maggie on the way in. The bear easily dodges the first mine…
and the second, but the turret (represented by Netrod here) does a single wound.
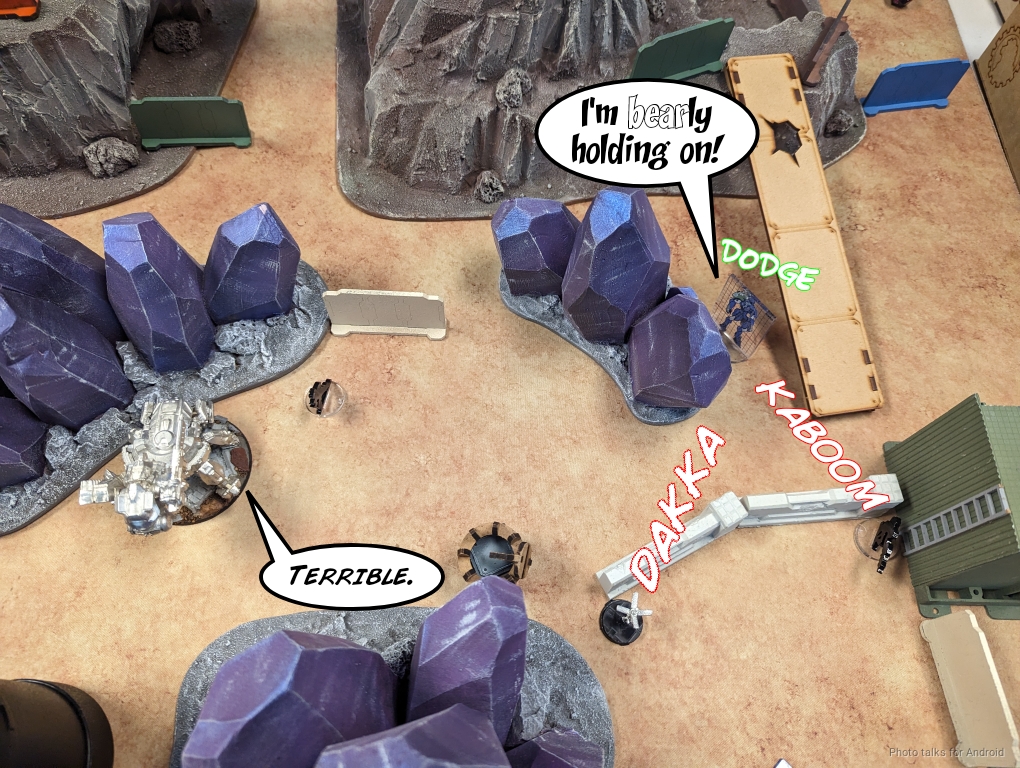
The bear downs the turret and tanks all the saves (and ignores the flash pulse, I was just trying to contest a potential dodge roll). It also hits the Fanous, which passes ARM and tucks back into total cover.
Turn 2
Top of 2 – Dahshat
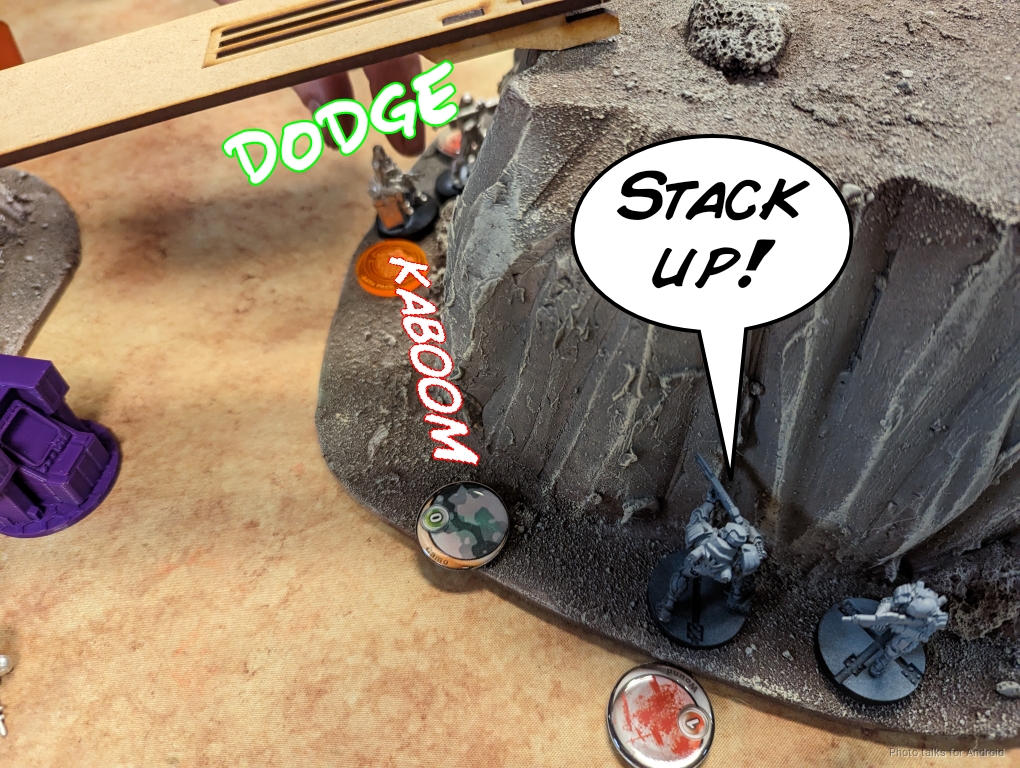
After setting up smoke with the Kum’s impetuous, I need to deal with the bear. The bear is in my face, and Jordan was very careful in that he left it in a spot where Maggie (the only tool he thinks I have) will have to get into a position where he can dodge into close combat. Good play by him for sure. I can’t leave the bear alone, and it looks like I have no way of dealing with it except Maggie, or worse–my Lieutenant.
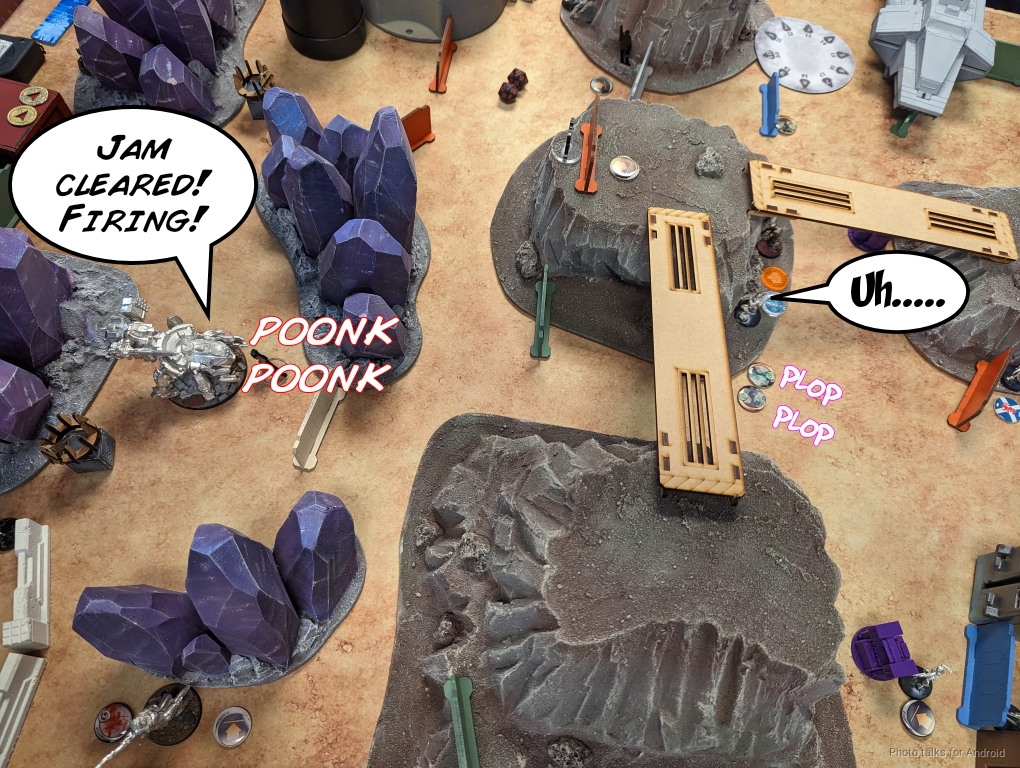
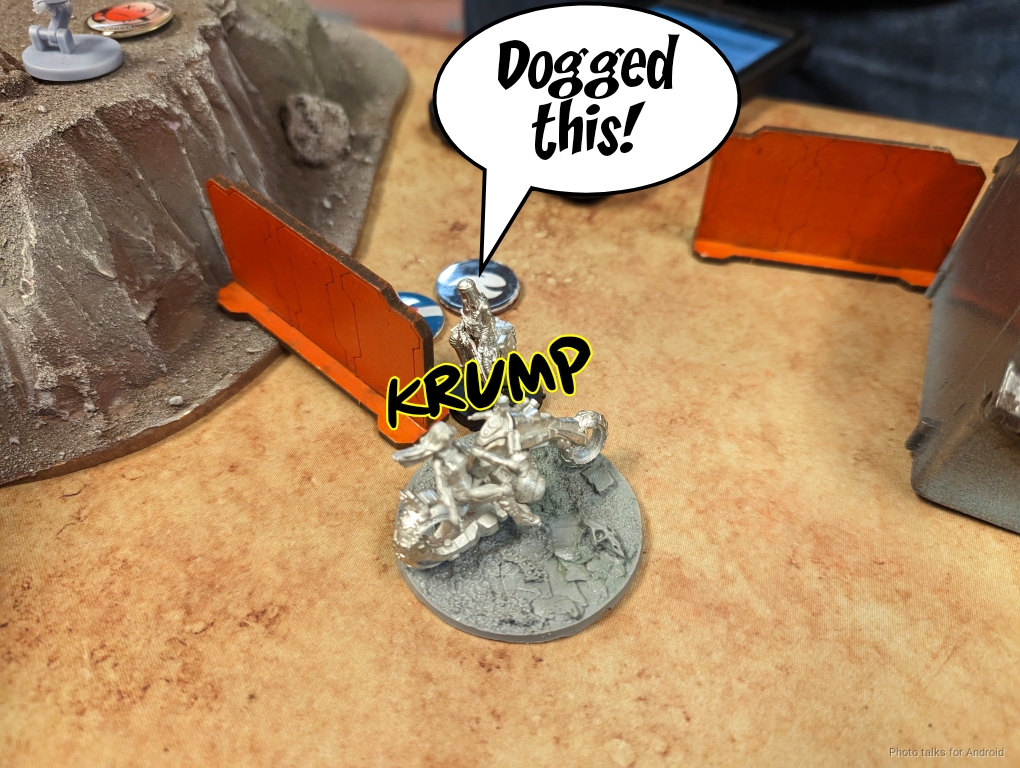
Of course, the Traktor Mul in the corner is not a Traktor Mul. I swing it around and reveal it as a Lu Duan and force a dodge. I get one wound through, and Jordan decides to put the Bear dogged, which means I can just leave it alone and I’ll be fine.

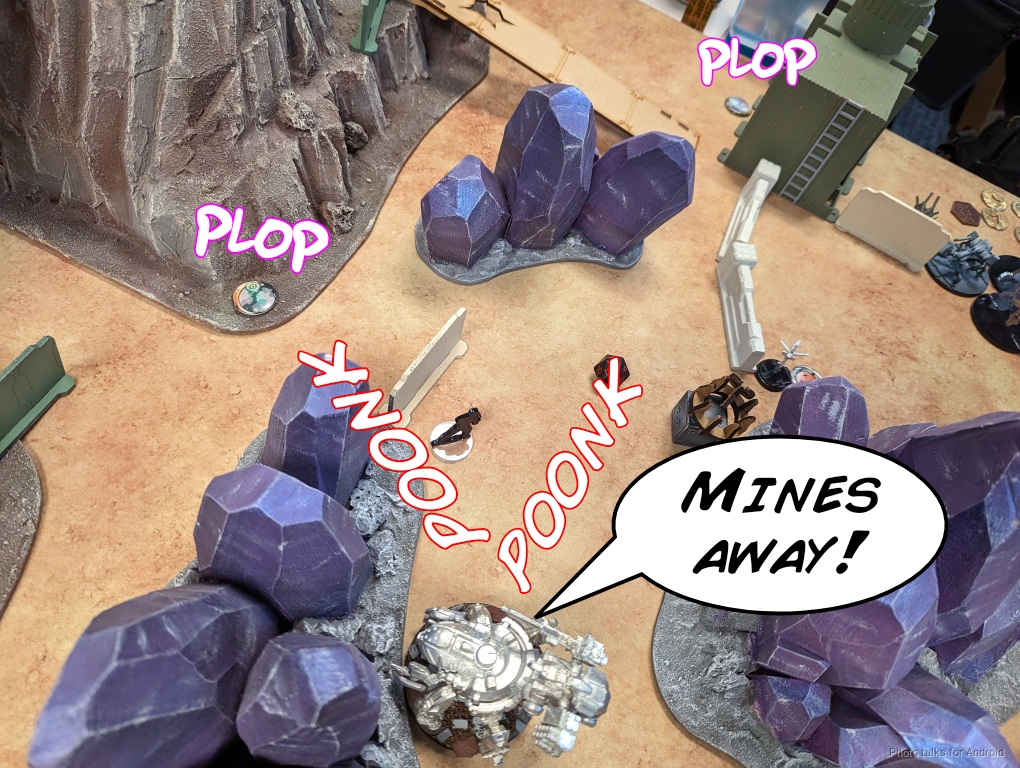
I move on to attempting to delete the Frontoviks. Maggie starts by attempting to land two mines and failing…
so I reload and fire again, this time landing both mines.
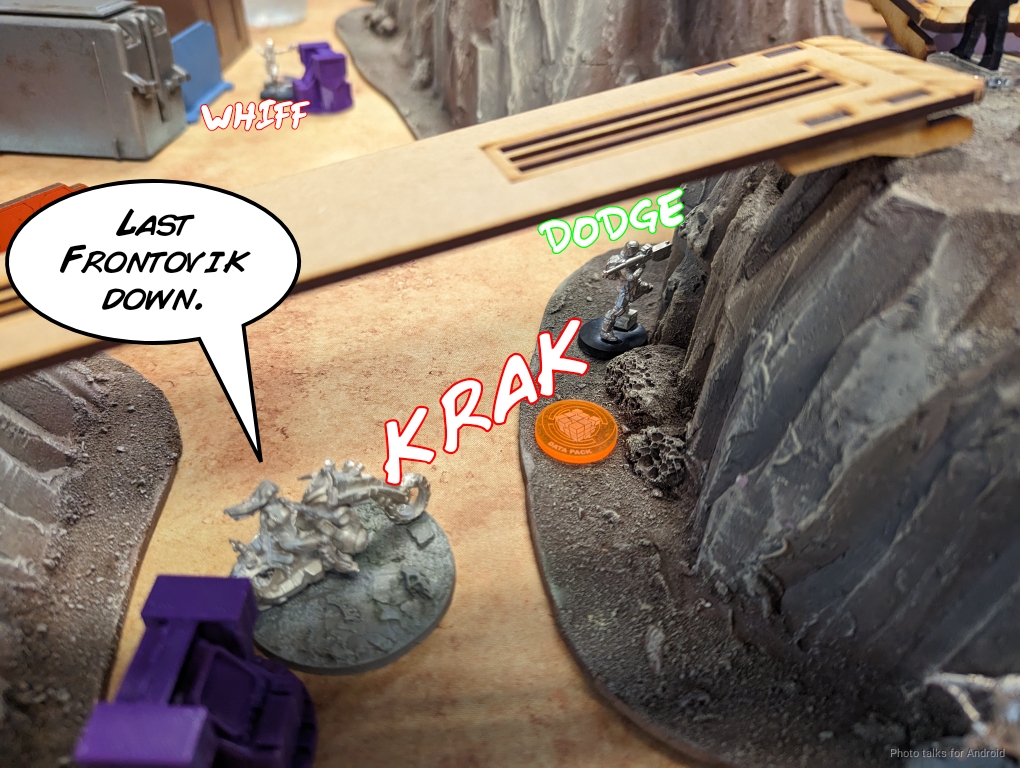
My remaining Libertos comes around the corner and asks for AROs–the link dodges and the Paramedic and regular Frontovik get deleted by the mines with just the HRL and Engineer surviving.
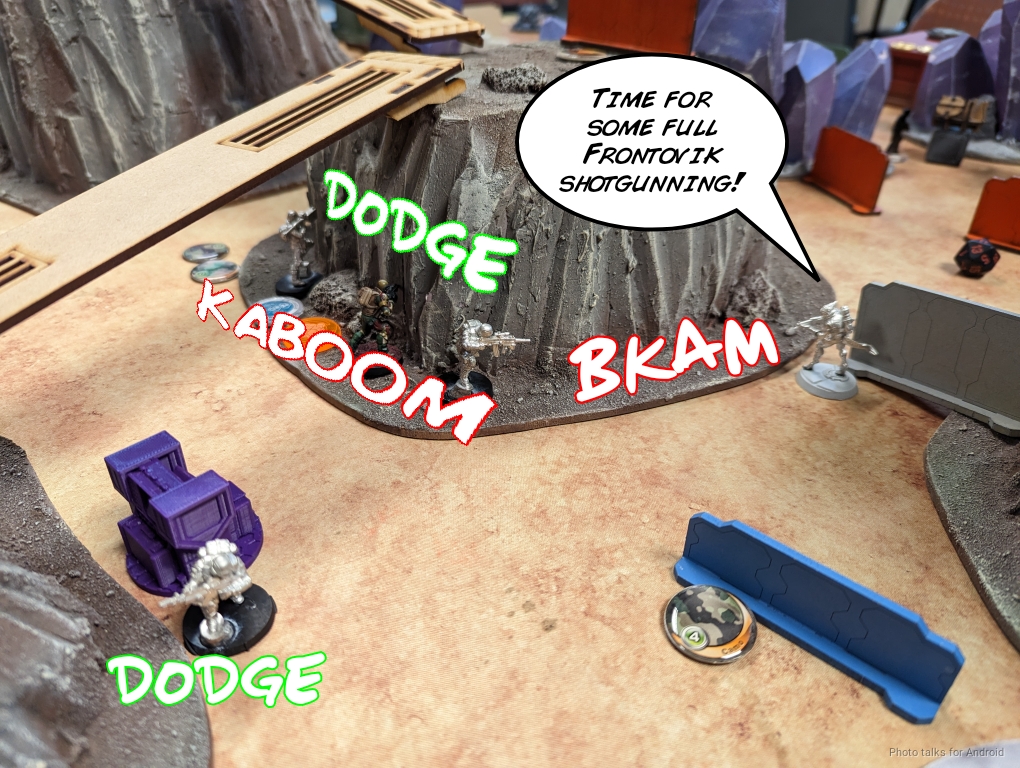
My Zuyong takes shots on the Frontovik engineer but eats a LRL hit and takes a wound…
but manages to get through on the second attempt, taking out the Frontovik.
I clear the last mine with my remaining Libertos and set it up to box Jordan’s Irmandinho in.
My Kum comes racing around the corner and shoots the Frontovik in the back, dropping it.
I do a quick retreat threshold check in my head, and decide that I can keep pushing. The Kum challenges the Rokot and the Irmandinho, so I dodge and force Jordan to deal with it on his turn.
My last orders are spent setting up more mines to defend against a run by Uxia, and then I pass turn.
Bottom of 2 – Kosmoflot
Jordan moves Uxia to group 1. I’ve deleted the Polaris team from the list and made the points/orders work by adding a Rokot in place of the controller. The Irmandinho rolls in to CC the Kum, and I agree to the fight instead of just templating–it’s more fun this way. Jordan D-Charges to get around the dogged (potentially) and I lose the Kum.
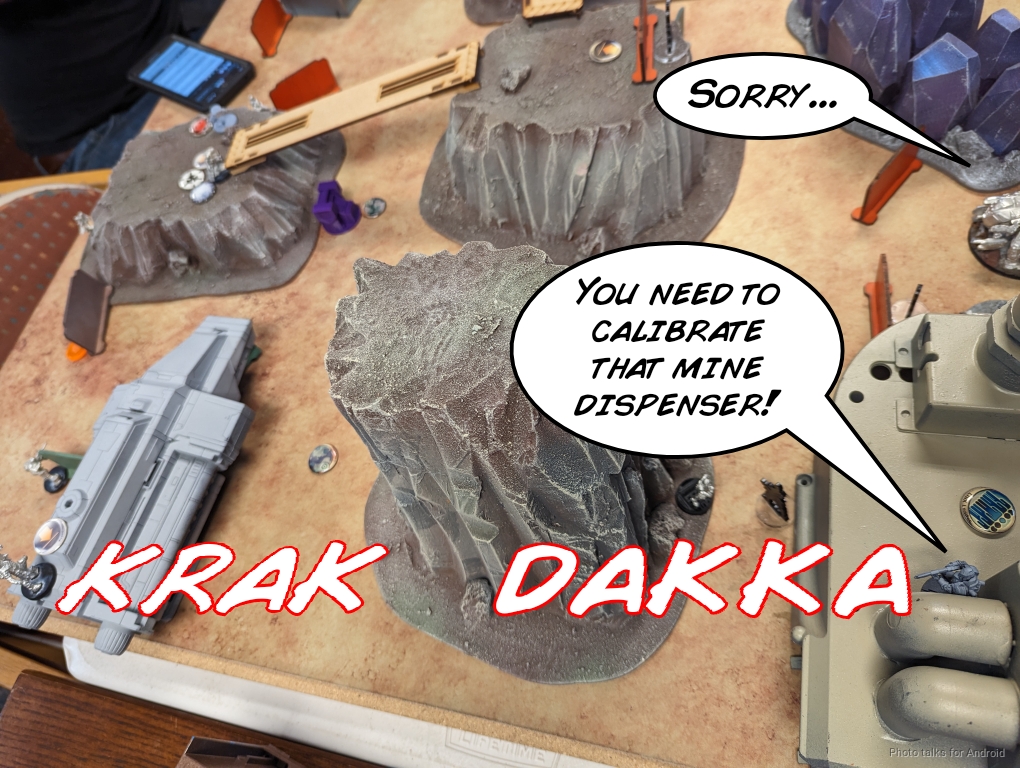
Really I’m just trying to drain orders and shape movement, and while this is costly, it’s hilarious and does some of what I want. It is a game, after all. The Irmandinho keeps coming, so I drop a mine with the Libertos watching him, and take a wound from the chain rifle.
Jordan is trying to get the Data Pack off the downed Paramedic, so he dodges the first mine and I just drop another one. This does exhaust the Liberto’s mines, but Jordan is also out of orders now.
Turn 3
Top of 3 – Dahshat

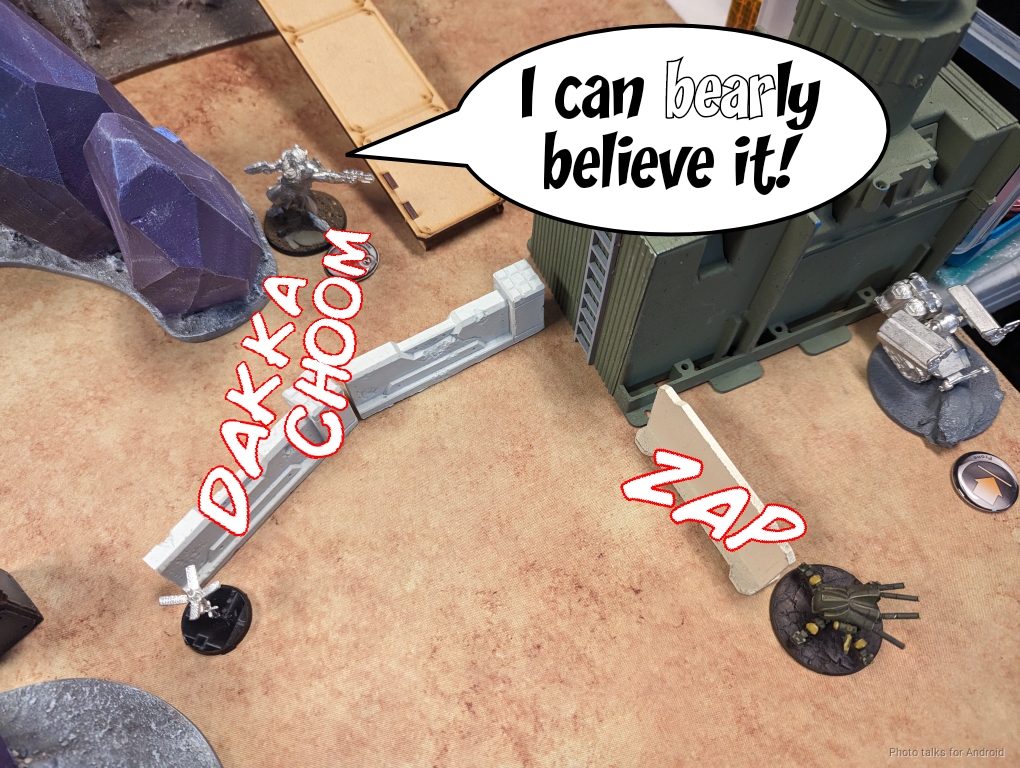
I’ve taken a fair amount of damage in terms of my throwaway units, but that’s sort of the point. I move the infiltrated Hunzakut into the second group for orders and start my turn. As I discussed in the Overview, the Zuyongs are there for the turn 3 push after being carefully developed turn 1 and 2. Now’s the time. I march in the Zuyongs, which grants a dodge to the Irmandinho to clear the mine…
but burst 4 breaker pistols on 16s is still very good, and I easily take down the Irmandinho.

The Rokot is in the way, so the Zuyong HMG easily pastes it…
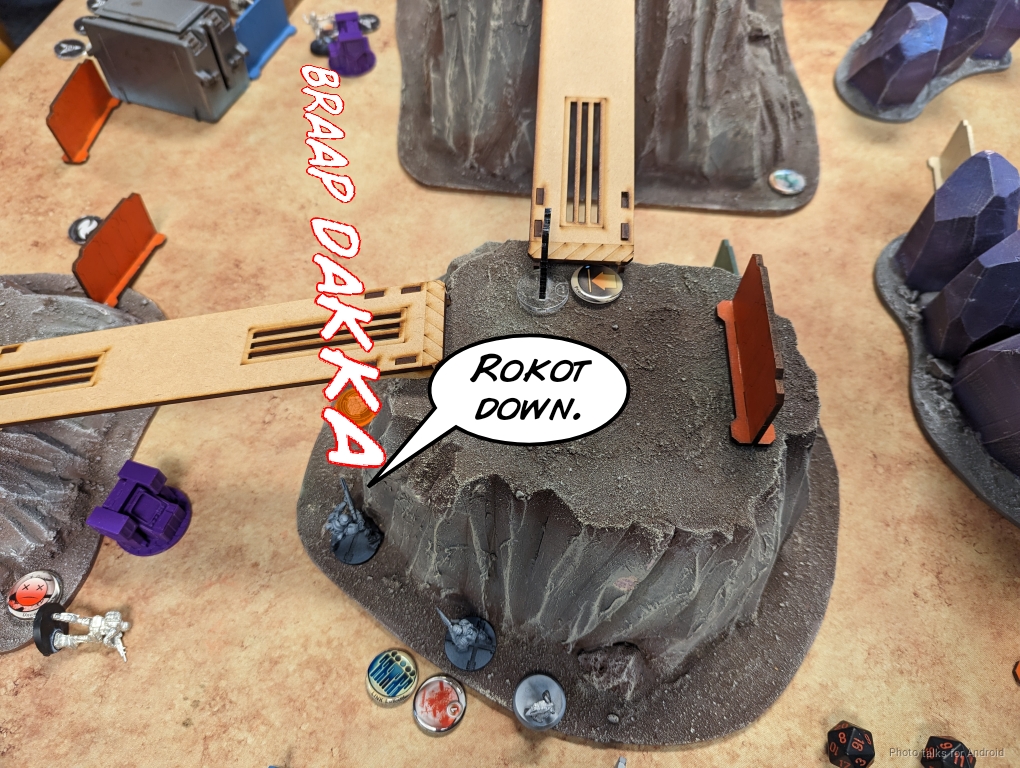
then I upload the Data Pack to the nearby console with Valerya, coup de grace the Frontovik engineer for Extreme Prejudice, and get Net Undermine with Valerya.
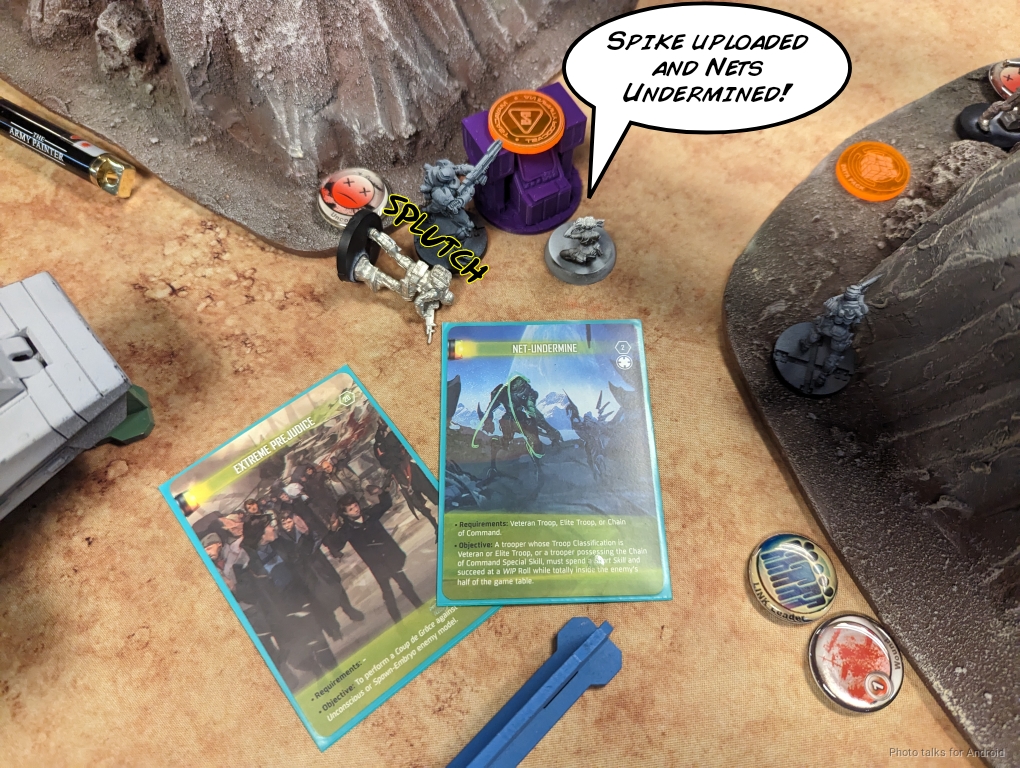
The infiltrated Hunzakut hops off its perch, snags the Frontovik’s Data Pack, and uploads it.

Bottom of 3 – Kosmoflot
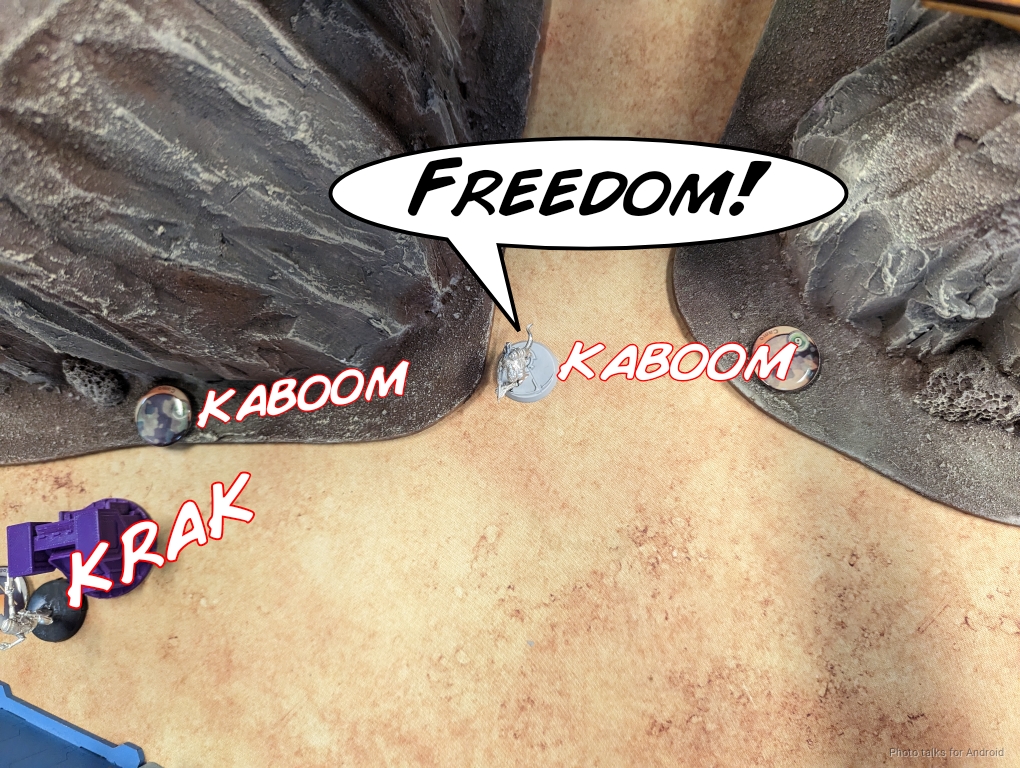
Jordan’s not in retreat, so he makes a run with Uxia. She can’t make it past the net of mines and AROs from Maggie, and that’s game.
10-0, 275-93 Dahshat Company Victory!
Post Game Analysis
I didn’t think that my list would function as well as it did. In retrospect, much of the success comes from having all of those irregular units start in the midfield is pretty powerful, as you can get significant work done with a single irregular order. Also, having that many irregular units makes coordinated orders pretty usable.
This certainly isn’t new to Haqq players who like to coordinate Daylami panzerfaust stuff, but you can get a surprising amount of efficiency doing a coordinated move on irregular units and then spend all of their irregular orders on them. This gives them a 12″ movement, basically (8″ of coordinated move, and then a 4″ move-shoot or whatever).
Maggie didn’t do much shooting other than the initial kill on Pavel. She’s almost more oppressive as a mine dispensing unit. She has plenty of movement to spread mines out everywhere, and she can get herself out of trouble pretty reasonably. I think in a scenario where I had more targets I would have used her HMG more, but having a way to “shoot around corners” with the mine dispenser is just so powerful. The secret Lu Duan really shored up the defense on the right side as well. Very fun list. Having a solid plan for the Zuyong and executing on it successfully of course contributed to the win as well.
I think Jordan was on the back foot immediately because of his choice to hide the specialists as Scots ML. In some sense I don’t really care about losing Maggie–I actually craft and play every TAG list as if I’m guaranteed to lose the TAG, potentially pretty early. Once I had revealed the ruse, I was just dictating tempo all game. He had to advance into the midfield to hope to be able to get to the objectives, and I had absolute midfield dominance with Maggie’s mine launcher and all my camo troops and Kum biker.
Basically I forced him to fight on my terms from the back foot and just made very one-sided trades all game. The Lu Duan really pulled me out of a tough situation very efficiently as well, so I think that’s a pretty important consideration for future games as well in terms of inclusion.
As far as the mission is concerned, it absolutely demands good Data Pack carriers be included at list construction. You can make do, but it really helps if you have a list crafted to take advantage of the mission’s special rules. Three mines and a turret is pretty oppressive–I think I took out the turret with Maggie? But I’m not sure. You can get around a lot of the problems with the mines with Holoechoes–neither of us thought about that. Too early to tell what needs to be tweaked, I need more reps with the mission, but I can say it’s fun and exciting. Thanks for reading.