Brute Force Kusarigama
It was only a matter of time until I could convince Adam (TheDiceAbide) to try out my crazy remote game format. I’ve come a long way since my first attempt with Obadiah (nehemiah). Now, I’ve got two webcams to show the board, a third to show the die rolls, a gimbal for my phone so it can be shaky-but-not-too-shaky webcam, and a dedicated machine to glue them all together into a coherent video stream via OBS. I then fork that stream.
One branch of that stream goes to my opponent, directly over Zoom, to minimize video lag, and the other goes to another machine in the house to do the H264 encode for Twitch with GPU acceleration to reduce the workload of the machine connected to all the webcams. I’ve had to drastically drop the video resolution and framerate on all the webcams to reduce processing load and fit within USB2 bandwidth. I’ve got USB3 ports and switches, but there’s some black magic voodoo involving chipsets and XHCI BIOS settings that I haven’t had the time or inclination to dig into further.
I suspect that if I do this more seriously, I’ll have to get full blown Core i9 rig with dedicated USB3 cards to ensure that I can do the full 30fps at 1080p that the webcams support. I’m also regretting pulling CAT5e through the walls of my home instead of CAT6 when I first moved in. Who would have thought I’d start to stress a gigabit Ethernet network! Might have to talk to my FIOS provider and also see if I can upgrade my ONT to a fancier box… anyway. You’re here for a battle report, not nerd stuff.
I’ve got a fair amount of work to do to set up for these remote games–tweaking settings, making sure the stream is humming along before my opponent settles in behind their keyboard with a beer, so I generally leave choice of mission and what factions we’re each going to play up to my opponent. Adam selected Supremacy, but he left the choice of my faction up to me.
I’ve been meaning to play Druze for awhile, and hacked up the following list. It seemed okay, but I wasn’t terribly pleased with it. For one, I had no idea what I was going to do if I went second. Adam is horrendously aggressive, so I knew I was going to get punched in the face, hard, if he goes first. I just didn’t have a coherent plan for going second with the list.
Supremacy
DRUZE Lieutenant (X Visor) Combi Rifle, Chain-colt / Viral Pistol, Knife. (0 | 23)
BRAWLER (Multispectral Visor L2) MULTI Sniper / Pistol, Knife. (1.5 | 28)
SAITO TOGAN (Specialist Operative) Combi Rifle, Smoke Grenades / Pistol, EXP CCW, Knife. (0 | 40)
PEACEMAKER Heavy Shotgun + AUXBOT_3 / Electric Pulse. (0 | 21)

VALERYA GROMOZ Hacker (Hacking Device UPGRADE: Expel) Combi Rifle + Pitcher / Pistol, Knife. (0.5 | 21)
SCARFACE & CORDELIA TURNER . (1.5 | 78)
SCARFACE Boarding Shotgun / Pistol, CCW. ()
CORDELIA TURNER Combi Rifle, Chain-colt, D-Charges / Pistol, Knife. (0 | 17)
NASMAT Electric Pulse. (0 | 3)
10 | 5.5 SWC | 298 Points | Open in Infinity Army
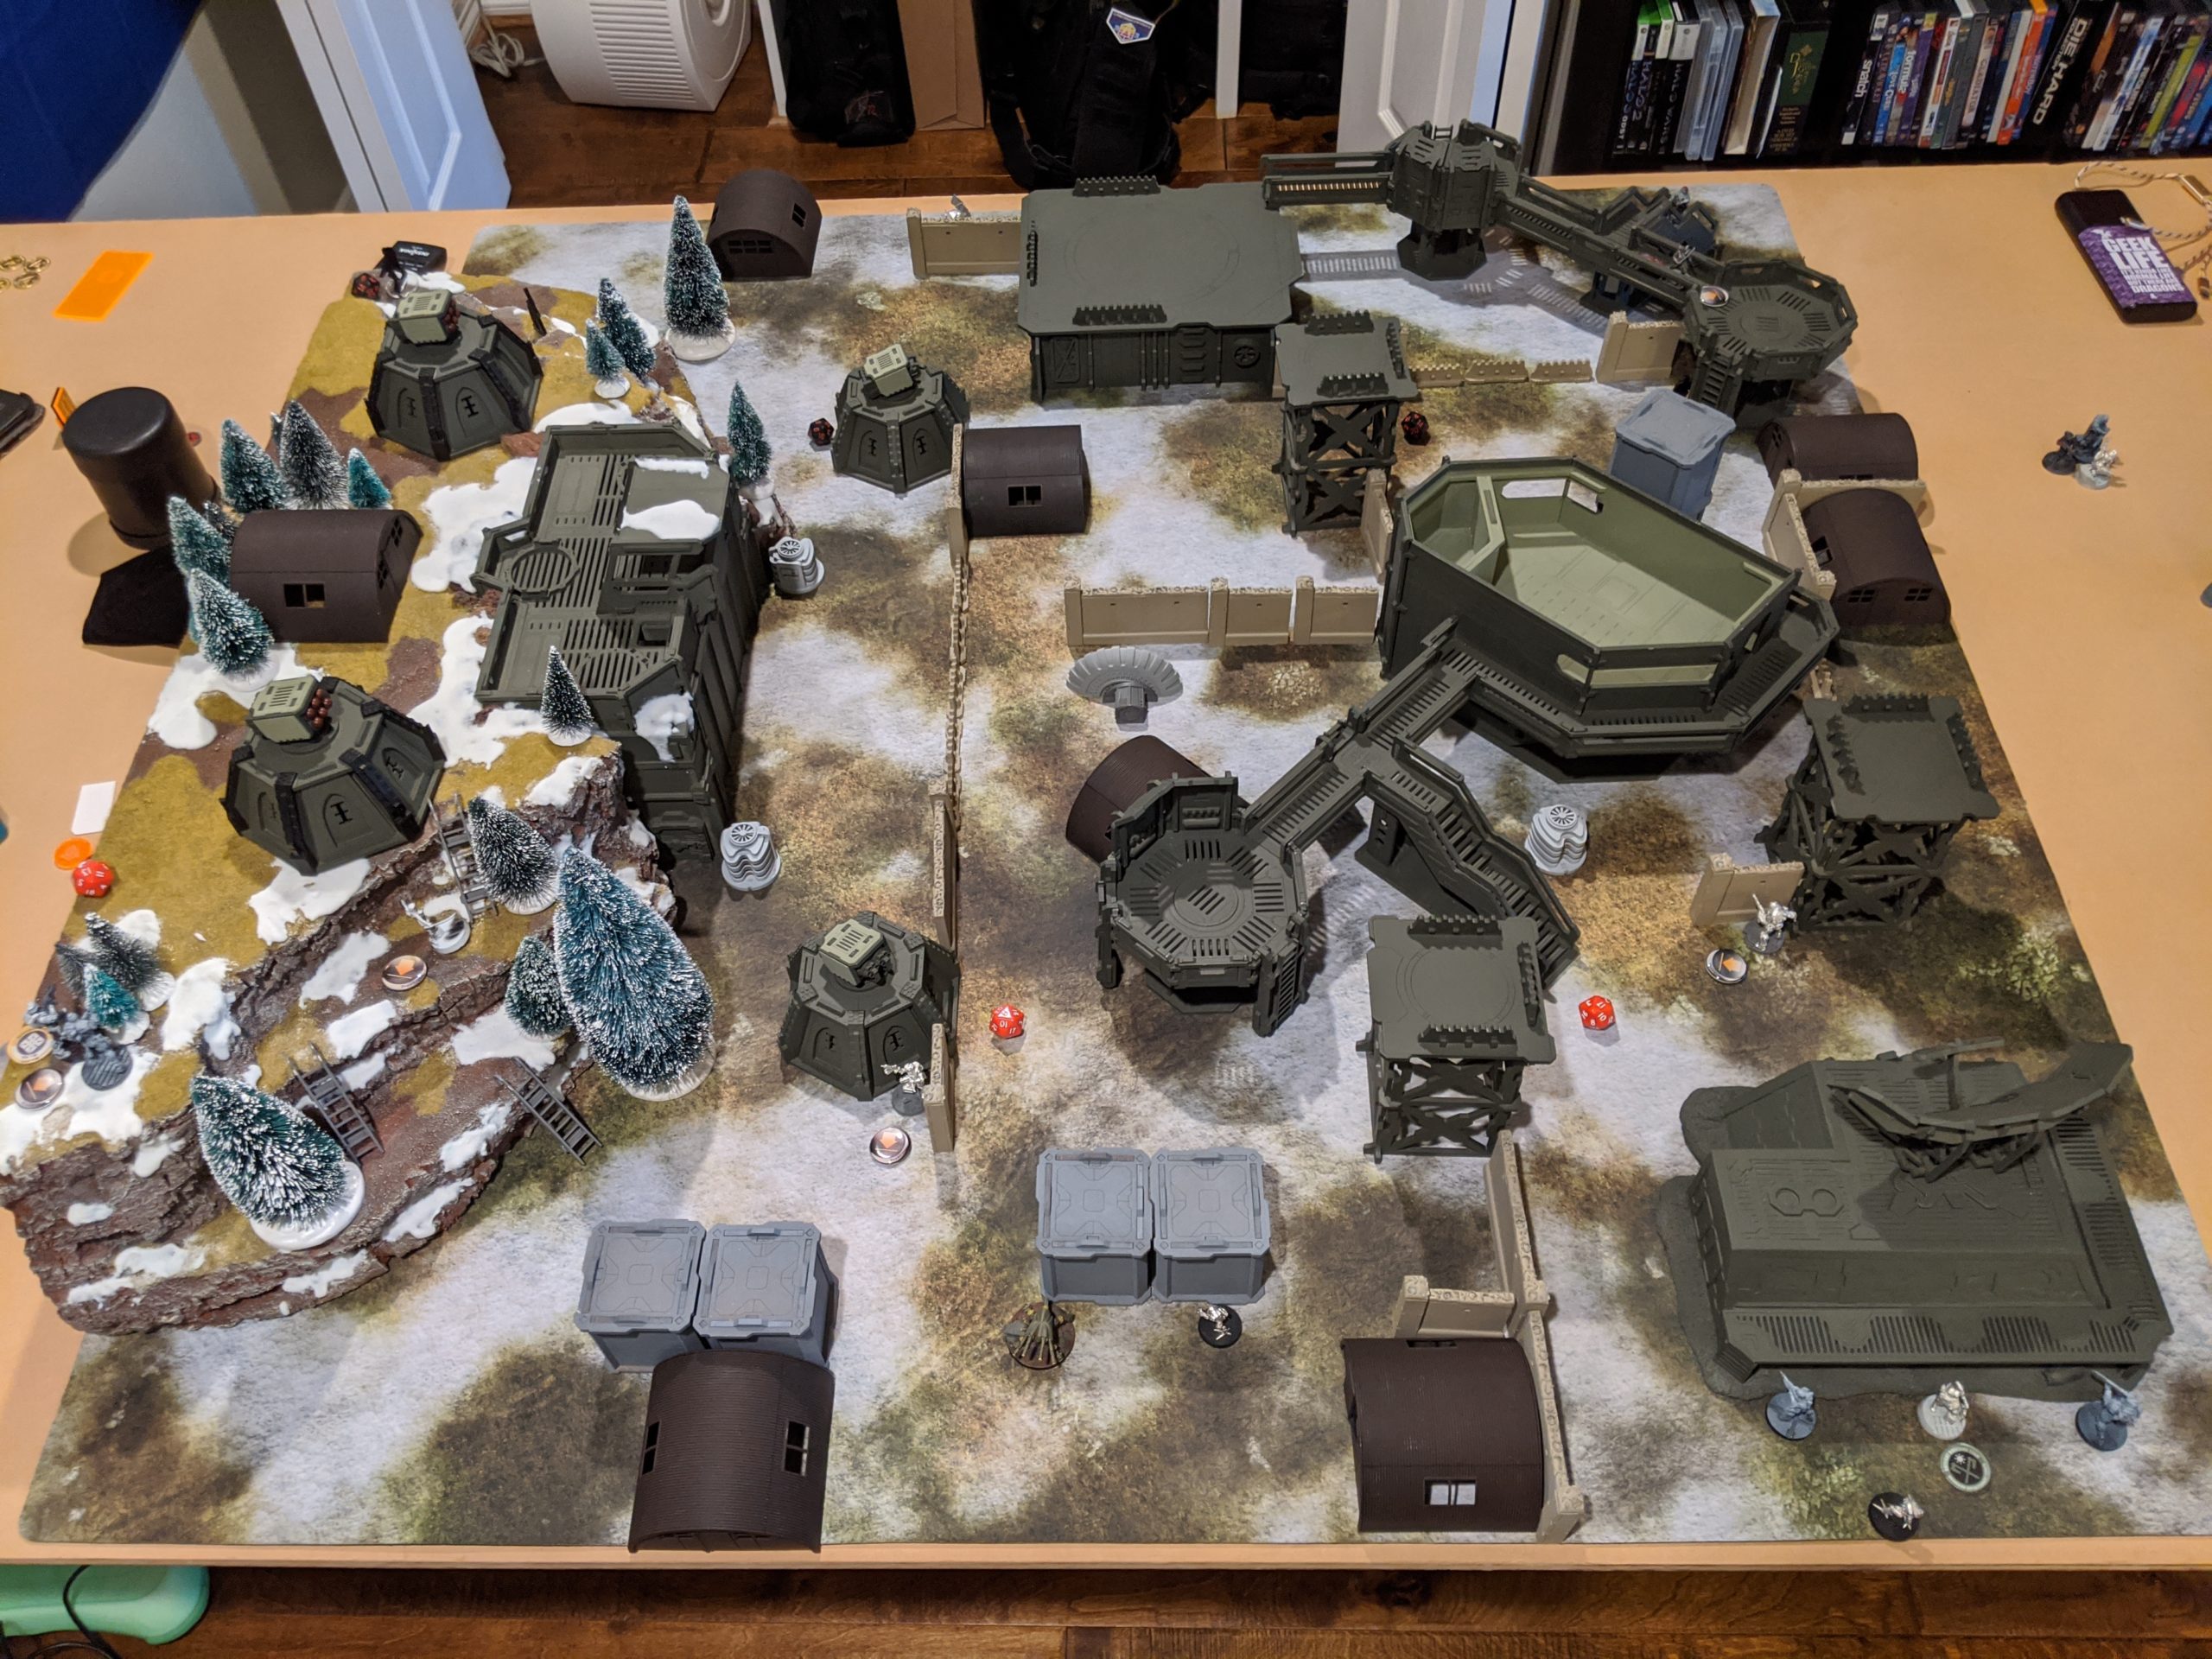
I decided to go with JSA, because I haven’t played them in awhile, and turned to Obadiah for some list discussion. We’re still playing on the same table that I played him on most recently, with basically no changes other than some terrain shuffling thanks to objective placement.
Overview
- Mission: Supremacy
- Forces: Japanese Secessionist Army versus Dahshat Company (300)
- Deploy First: Dahshat
- First Turn: Dahshat
Supremacy
KUROSHI RIDER Lieutenant Combi Rifle + Light Flamethrower / Breaker Pistol, AP + Shock CCW. (0 | 33)
DAIYŌKAI MULTI Marksman Rifle, Panzerfaust / Pistol, DA CC Weapon, AP CC Weapon. (0 | 54)
DOMARU (Fireteam: Haris) Chain Rifle, E/M Grenades / Pistol, E/M CCW, Shock CC Weapon. (0.5 | 27)
NINJA MULTI Sniper Rifle / Pistol, Shock CCW, Knife. (1.5 | 42)
YURIKO ODA Combi Rifle + E/Mitter, D-Charges, Antipersonnel Mines / Pistol, CCW. (0 | 23)
KEMPEI Spitfire / Pistol, CCW, Electric Pulse. (1 | 23)
RYŪKEN (CH: Limited Camouflage) Heavy Rocket Launcher, Antipersonnel Mines / Heavy Pistol, Knife. (1.5 | 23)
TOKUSETSU EISEI Doctor (MediKit) Combi Rifle / Pistol, Knife. (0 | 14)
YÁOZĂO Electric Pulse. (0 | 3)
1 | 4.5 SWC | 299 Points | Open in Infinity Army
Kuroshi Rider is a real staple of my limited insertion JSA lists. She’s such a great do-everything toolbox for Turns 2 and 3. Yuriko and the Kempetai BSG were then a must-take, with the Kempetai Spitfire as the third member of the core link. I chose the spitfire over the shock marksman because I ran out of points.
Obi talked up the Daiyokai/Domaru Haris enough that he convinced me to try it. His preferred Haris has two regular chain rifle Domaru (one with the Haris skill), but I elected to find points to upgrade one to Forward Observer so I could push some buttons with the Haris if need be. I’ve been trying to master the Ryuken-9 HRL–I feel like I’ve really got a handle on the ODD Ryuken-9 so I wanted a different challenge. That, and I needed more long-range firepower.
Speaking of which, I made a “hipster” choice of taking an Ninja MSR. I don’t think that’s particularly hipster in this scenario because of the mountain. Cross-table shots getting things out of cover helps immensely with the Ninja’s BS11, and TO helps it stay alive and get to where it needs to go. I threw in a Doctor and ‘bot because that’s what fit in the remaining points.
Dahshat Company
ZÚYǑNG Lieutenant (AutomediKit) HMG / 2 Breaker Pistols, Knife. (1 | 39)
VALERYA GROMOZ Hacker (Hacking Device UPGRADE: Expel) Combi Rifle + Pitcher / Pistol, Knife. (0.5 | 21)
BOUNTY HUNTER Submachine Gun, Akrylat-Kanone / Breaker Pistol, Knife. (0 | 12)
ZHĒNCHÁ (Forward Observer) Submachine Gun, D.E.P., Antipersonnel Mines / Pistol, Knife. (0 | 34)
HÚLÁNG Combi Rifle + Light Flamethrower, E/M Grenades, D-Charges / Pistol, Monofilament CC Weapon, Knife. (0 | 44)
SHIHAB REMOTE HMG / Electric Pulse. (1 | 25)
DOZER Rifle, D-Charges / Pistol, Knife. (0 | 13)
NASMAT Electric Pulse. (0 | 3)
As soon as I heard Adam was going to play Dahshat, I knew I was going to be facing two Zuyong links with HMG and Tac Aware Haris guys. I didn’t know what else he was going to bring, but I knew it was going to be ugly. He chose to take Valerya, which works really well with the Tinbot B,and also found room for a TR bot along with some other nasty toys like a Zhencha and Hulang.
If you’d like to watch the whole thing, here you go!
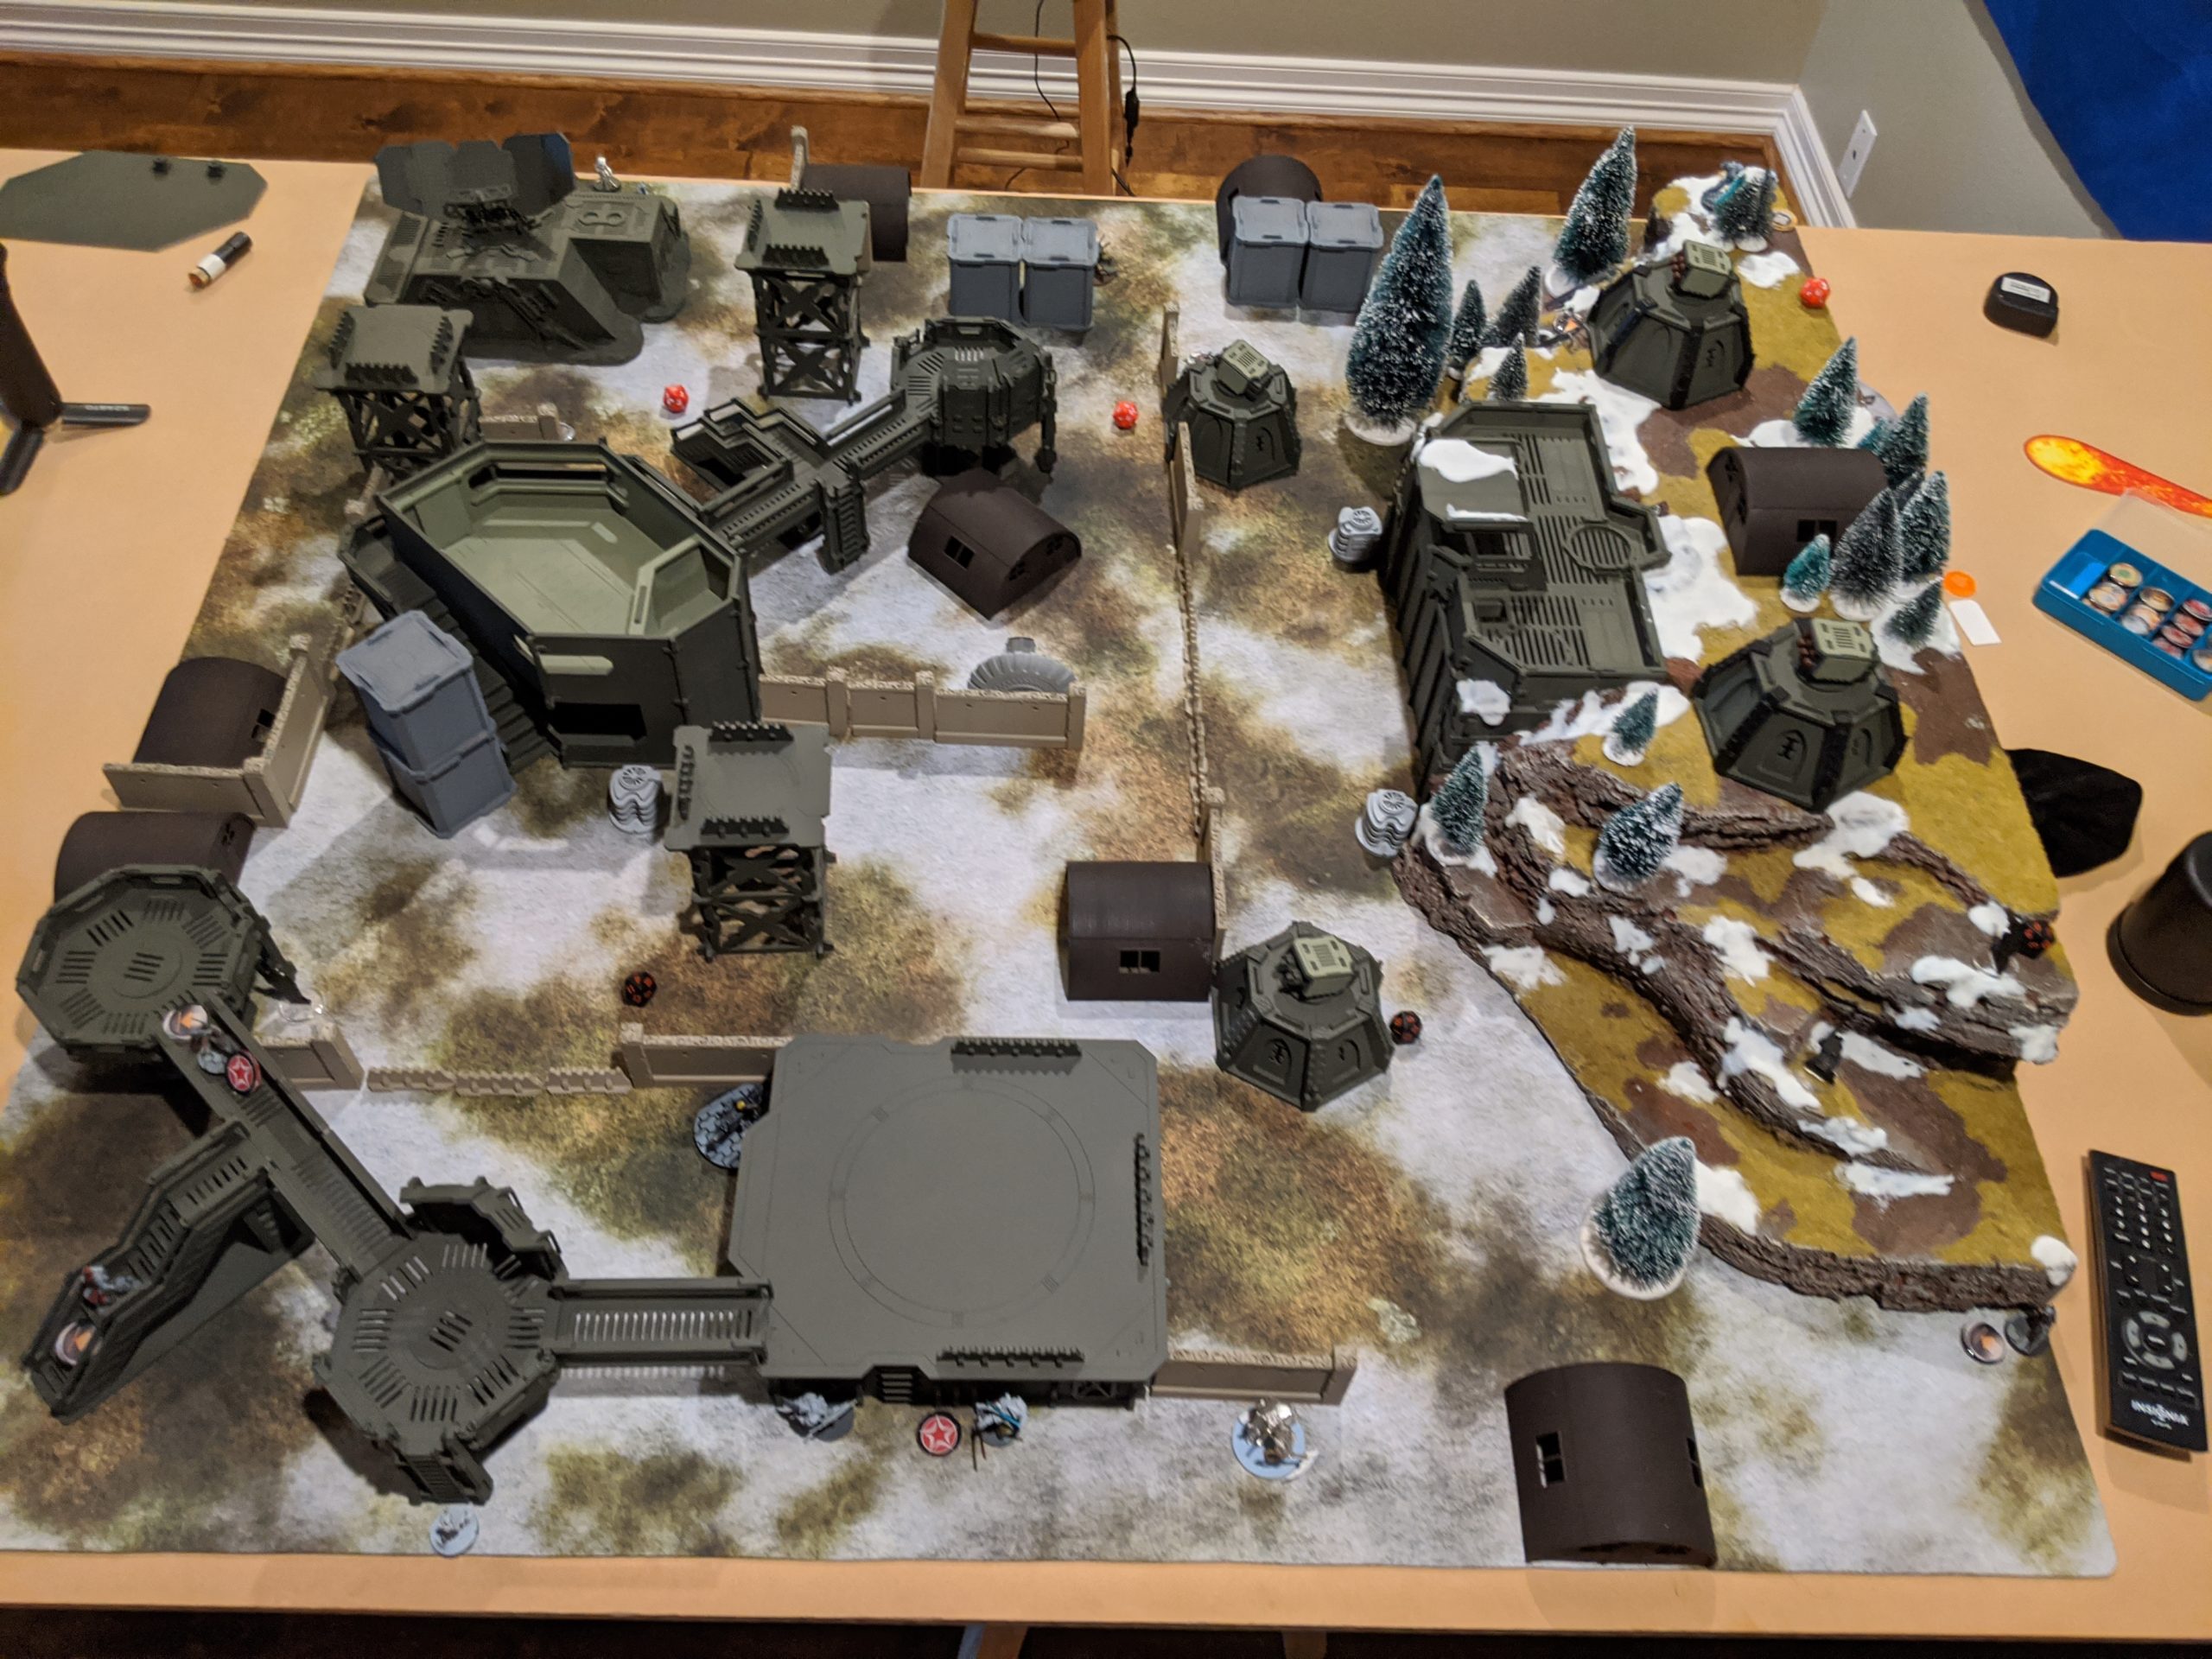
Deployment
Adam won the rolloff and elected to go first for two reasons: 1) it’s really hard to evaluate table edge remotely, and 2) his list is really good at punching things in the face.
His deployment was straightforward, even predictable. I wouldn’t call it weak by any means though. He basically stuck a Zuyong link on either flank of the table, one on the mountain, one clustered around the radar station. His center was anchored by the Shibab TR bot and Dozer, with the Hulang on the right to screen his Lieutenant.
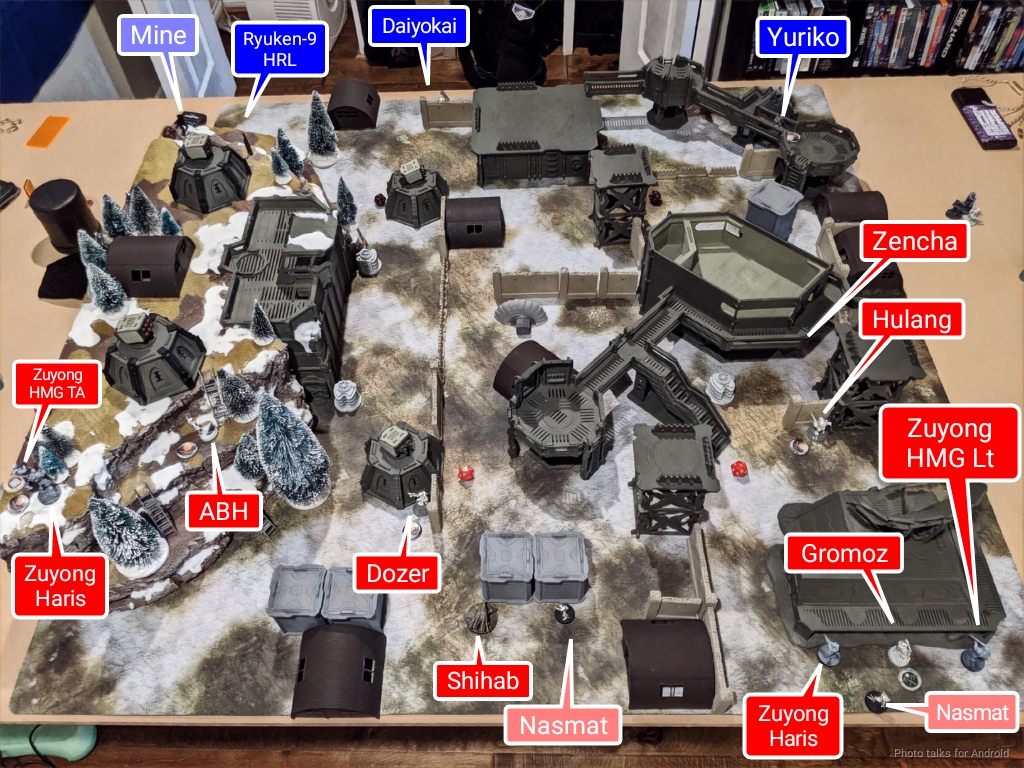
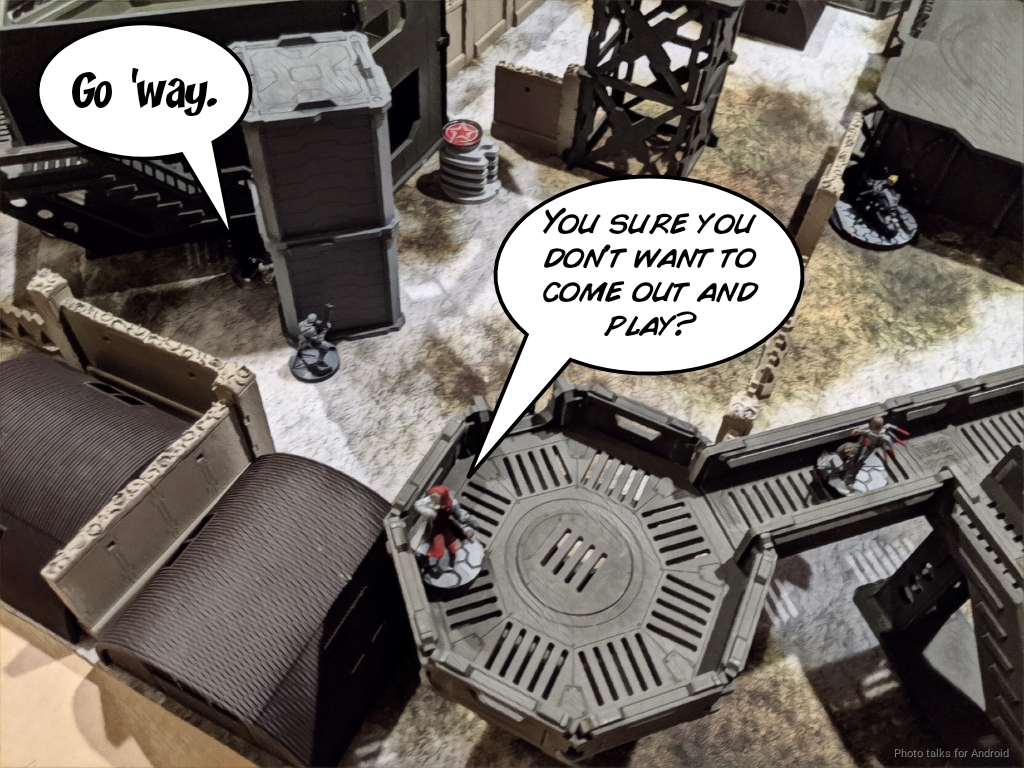
I did a similar deployment, putting my weaker Yuriko/Kempetai link on the left nestled on and under the catwalks. This would help me protect them as they moved up to secure quadrants. I could even do it by crawling in complete safety. Kuroshi hung out nearby, ready to do her think on turns 2 and 3.
My other link, the Domaru/Daiyokai link, went all the way in the back, far away from the Hulang and its E/M Grenades. I left the Daiyokai out to fight things on the mountain, figuring I could go prone to protect it once it started taking wounds. My Doctor and her bot went on opposite sides of the table, and I stuck my Ninja as far up as I could on the right without risking an infiltration roll.
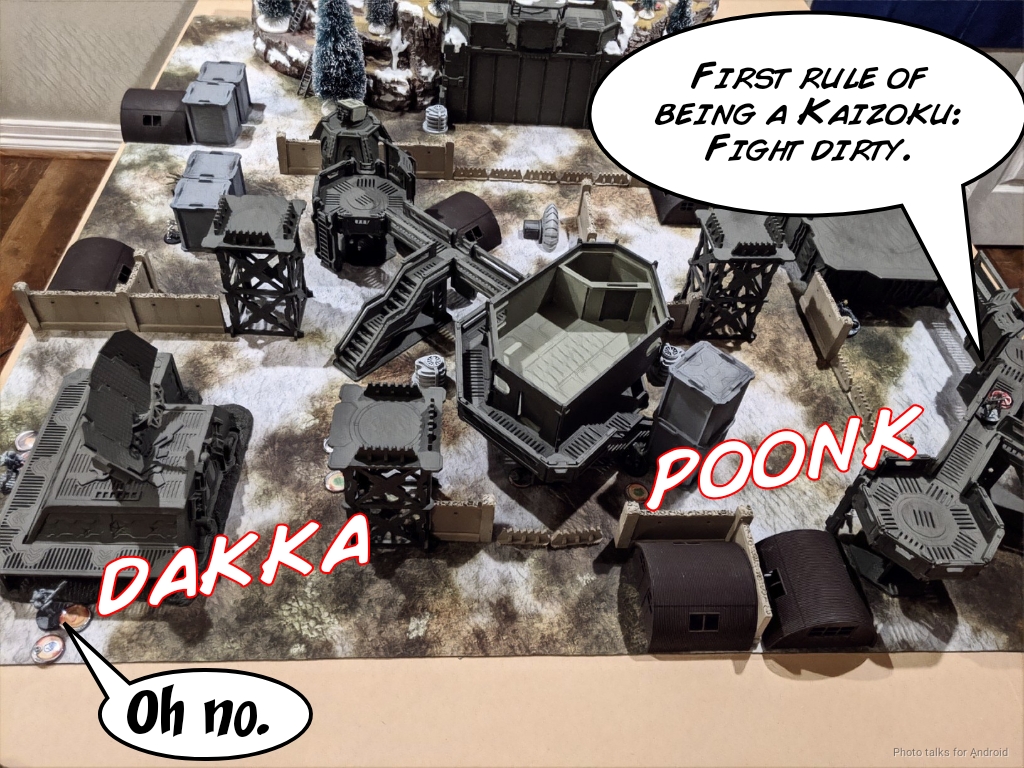
We both forgot entirely about HVTs and classifieds. Oh well. In any case, Adam stuck his Zhencha on his right, as he was worried about a suicide run from Kuroshi on his Lieutenant. Wise. I set up my Ryuken-9 and its mine on the mountain. The mine covered the areas where you’d need to be to attack my Daiyokai, and the Ryuken-9 itself covered the advance of the Zuyong HMG Lieuteant on the opposite corner of the table as well as one path forward for the Hulang–it could move safely up the table edge, just not towards the nearby console. With that, we were off.
Turn 1
Top of 1 – Dahshat
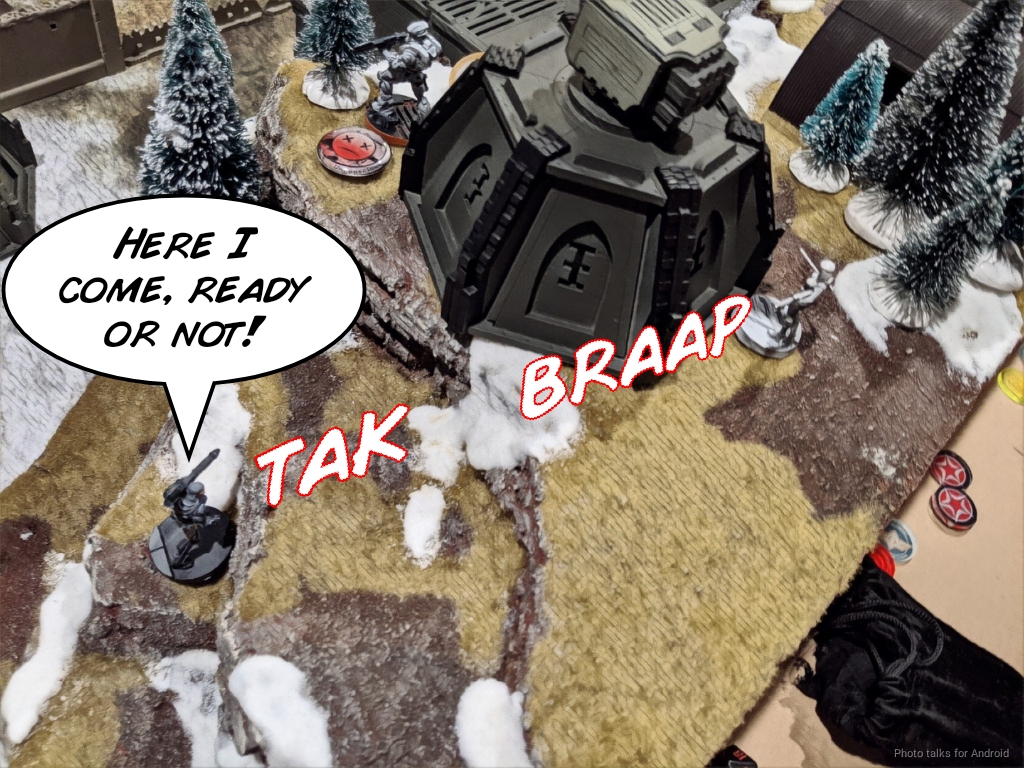
After I explained the situation to Adam, flying him around the table with my phone-turned-webcam, he decided that the Ryuken-9 needed to go and sent his Zuyong link on the mountain into action, burning tactical awareness orders for “free” movement.
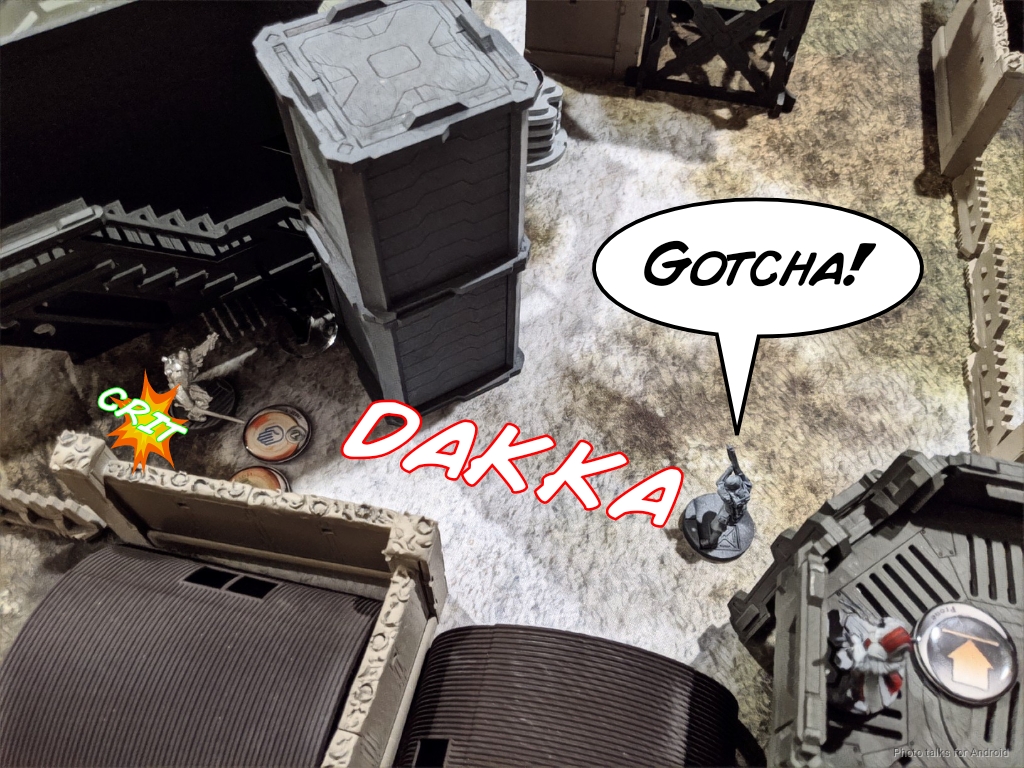
The Zuyong took cover behind a tree and started blasting away at my Daiyokai. Unfortunately for Adam, I had judged the distance right and the mine went off and did a wound.
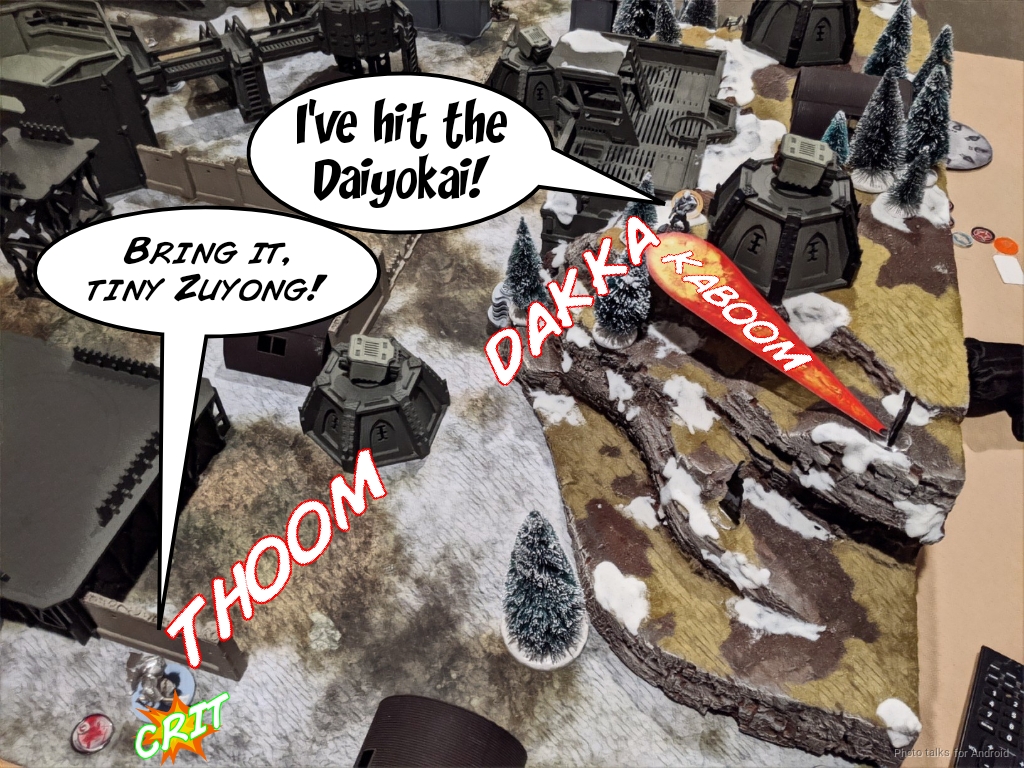
Unfortunately for my Daiyokai, Adam’s Zuyong HMG snuck a crit through against my Panzerfaust ARO and did a wound to my Daiyokai as well! Adam spends another order and we both crit each other, so nothing happens. One more order sees some rounds harmlessly bounce off the Daiyokai’s armor.
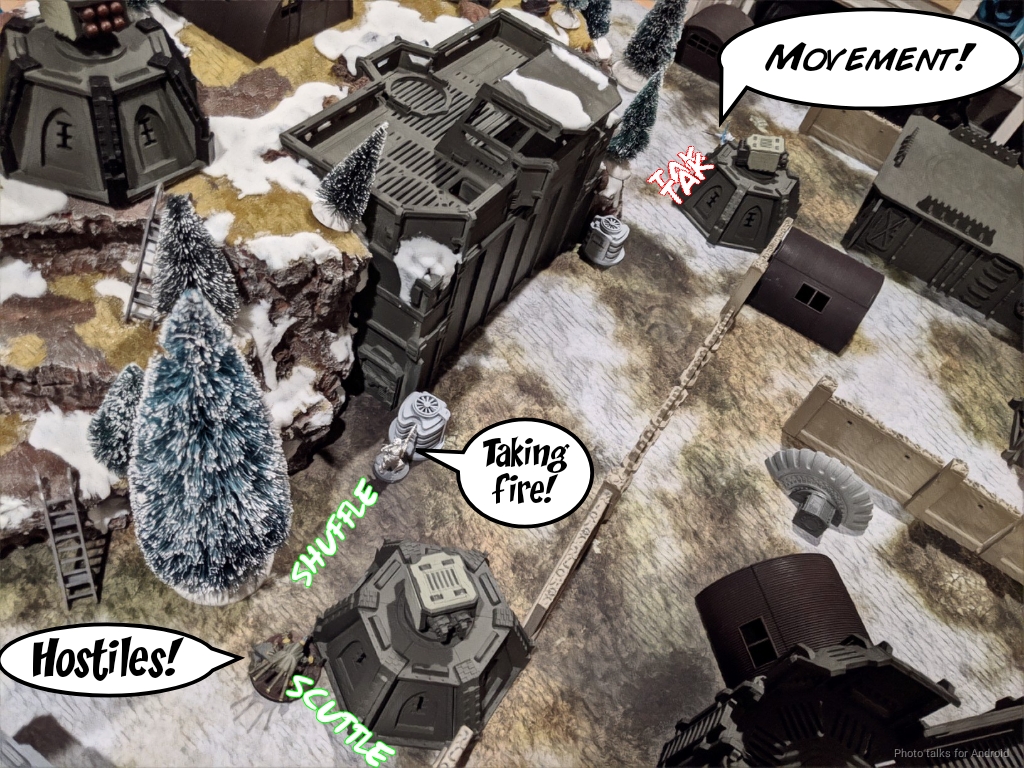
Understandably frustrated, Adam decides to focus on other things and sets up a mine on Kuroshi Rider’s path to his Lieutenant with his Zencha, moving the Zencha forward to serve as an additional speedbump.
Adam then returns his attention to the situation on the mountain, scooting the ABH forward and pushing his Zuyong Haris into the pillbox on top of the mountain.
| 46.99 | 33.97 | 19.04 |
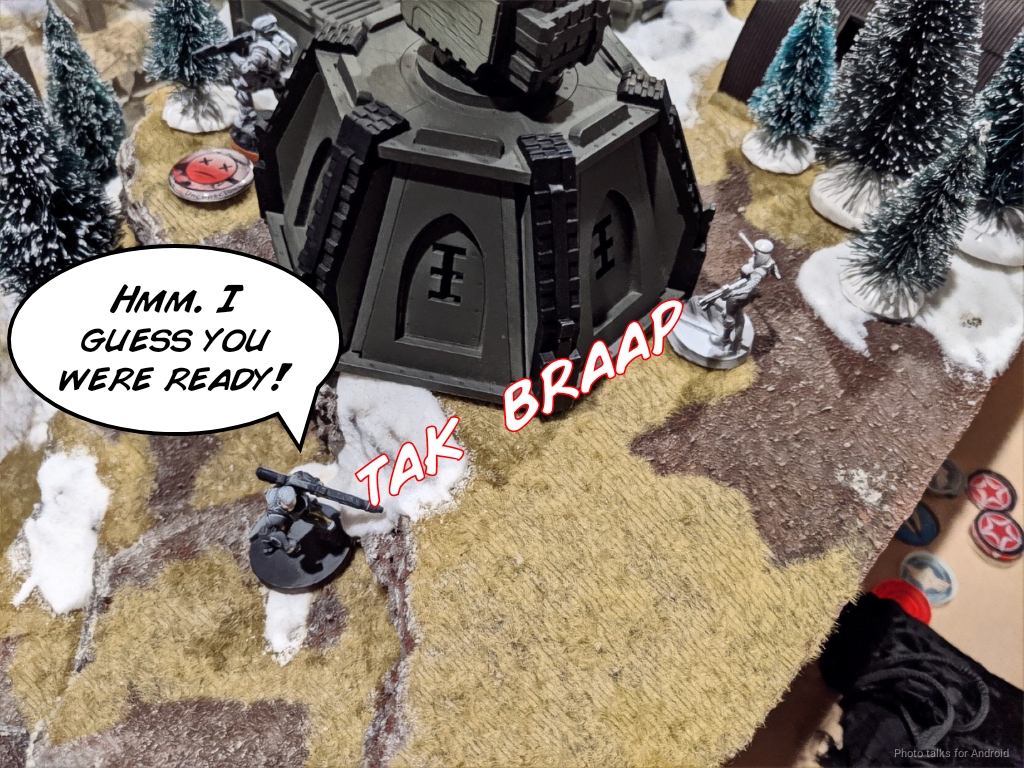
Unfortunately for Adam, I sneak a DA round through this time against the Zuyong’s fire and knock it out. ~50% odds is pretty good, but ~20% odds is also pretty good.
Adam decides to bait out my Ryuken HRL and sends in the other Zuyong from across the table. I bite, figuring the X-Visor will help me in this scenario.
| 52.34 | 34.36 | 13.30 |
Not as great odds as before, but I win the face to face! Adam rolls a 15 on his ARM save and his Zuyong Lieutenant retreats to safety and breathes a sigh of relief as the flames fade away.

After throwing the ABH, Zuyong Haris on the mountain, the Zencha, and the Hulang into suppression, Adam passes turn.
Bottom of 1 – JSA
I choose to not spend Kuroshi’s impetuous order, because she’ll run out in front of the Zuyong in suppression and instead reveal my Ninja to take a shot at the ABH and Zuyong in suppression from behind. The ABH successfully dodge-change-faces, but the Zuyong elects to not do anything in hopes of being able to turn around after passing ARM and guts.
I crit the Zuyong with DA ammo, it passes the second save and its guts check and turns around, in suppression. Well that’s POOP. I send in the Ryuken-9 in an attempt to extricate the Ninja from its predicament, as I’ve got shots on the Zuyong Haris on the other side of the table if this all goes well with the Ninja. Mr. Batou starts making his way up the mountain, his heavy pistol barking in his hand as he and the ABH trade fire.
It takes a few orders but I finally plant a shot between the ABH’s eyes and she’s down for the count.
This lets me coordinate an order between the Ryuken and the Ninja to try and take out the Zuyong. Adam decides to face to face the Ryuken because of the Ninja’s TO and wins that fight, blasting it off the table, but I choose to stun the Zuyong with the Ninja’s sniper rifle, forgetting that I had already done a wound to it earlier–one downside to this remote play stuff is there’s more mental overhead so you really need to be diligent about placing wound tokens and the like.
In any case, I need to spend another order shooting the Zuyong as it dances around trying to dodge while stunned. It fails enough ARM saves and is taken off the board.
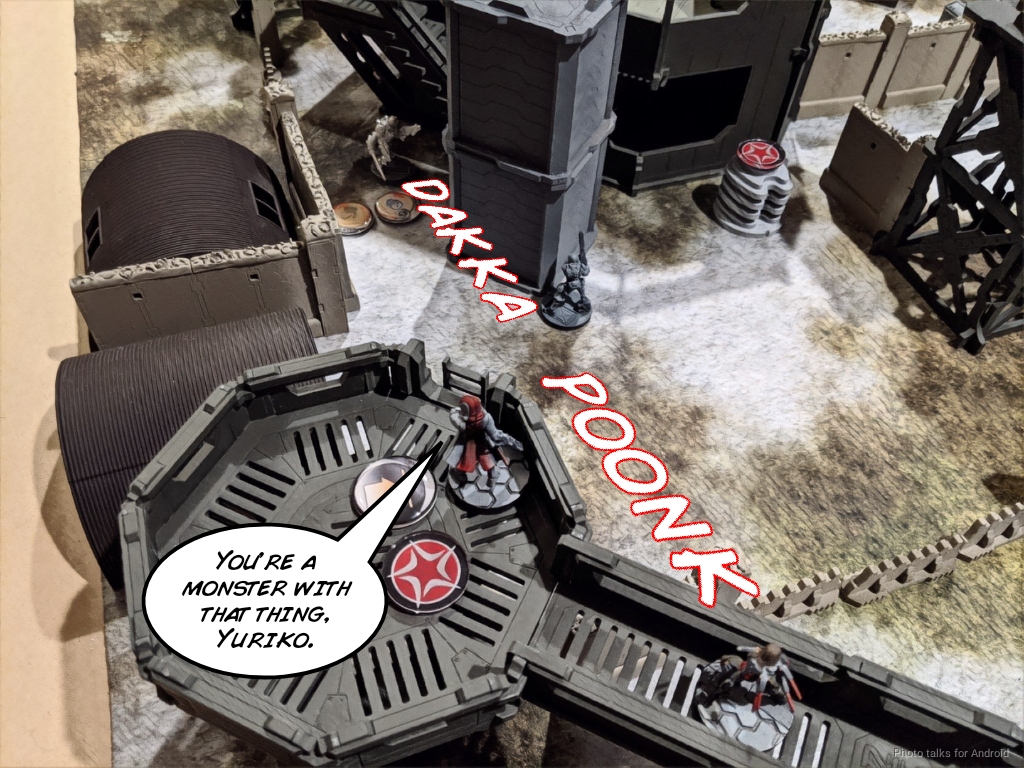
The Ninja plinks a wound off the other Zuyong Haris guy on the other side of the table, forcing it prone. I could go after Valerya, but I’d have to expose myself to the TR bot if I do that, so I decide not to. Instead, I spend an order standing Yuriko up to take an E/Mitter shot at Adam’s “What? That’s totally not my lieutenant” Lieutenant Zuyong HMG.
| 14.67 | 34.53 | 50.80 |
My odds aren’t terribly good. They’re bad, even… but Yuriko comes through for me and turns Adam’s lieutenant into a statue.
I then move the Daiyokai’s haris forward making use of the “new” NCO ability, but run out of orders to tuck the two Domaru into cover.

Turn 2
Adam’s actually got my near left quadrant, but I’ve stolen his near left quadrant thanks to the stupidly expensive Ninja MSR, so the score is currently tied at 0-0.
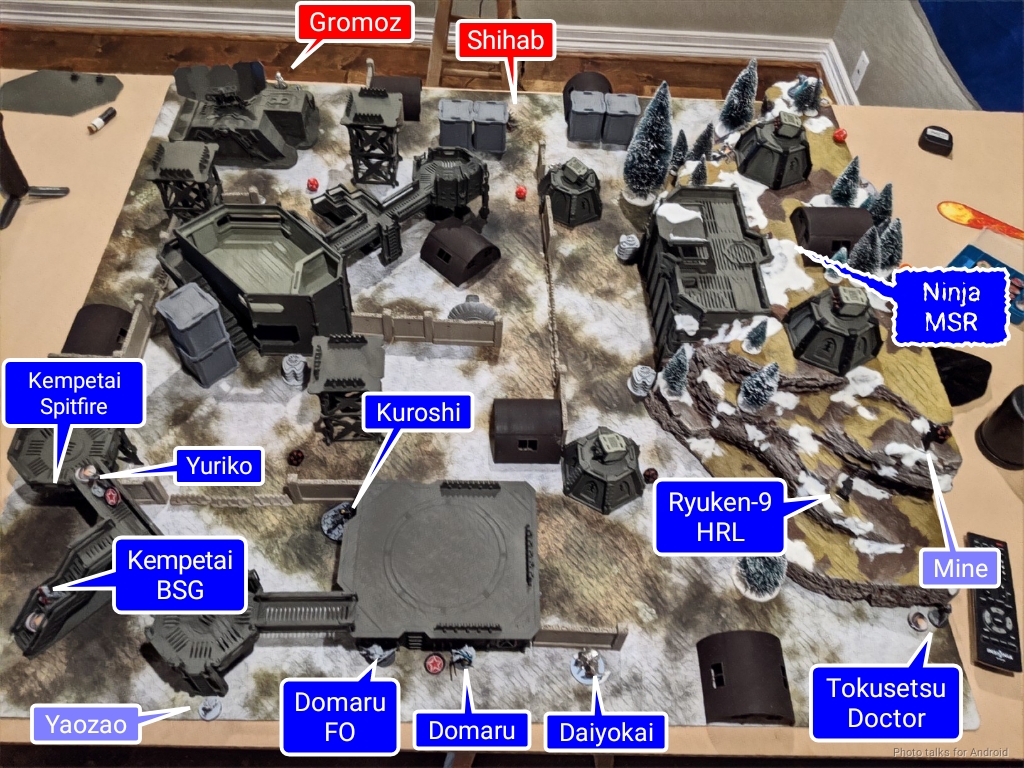
Top of 2 – Dahshat
Adam’s in loss of lieutenant now, so he starts taking some risks to speed his recovery. First, he moves his Dozer into base to base with the nearest console and moves the Nasmat towards his immobilized Lieutenant. The Dozer takes a pistol hit from my visible Domaru but tanks the round. the Nasmat isn’t so lucky and it eats a sniper round from my Ninja and fails both saves, sending it into unconscious level 2.
The Shihab TR bot move-moves into view to contest that firelane and pin my Haris and the Domaru flubs his pistol shots.
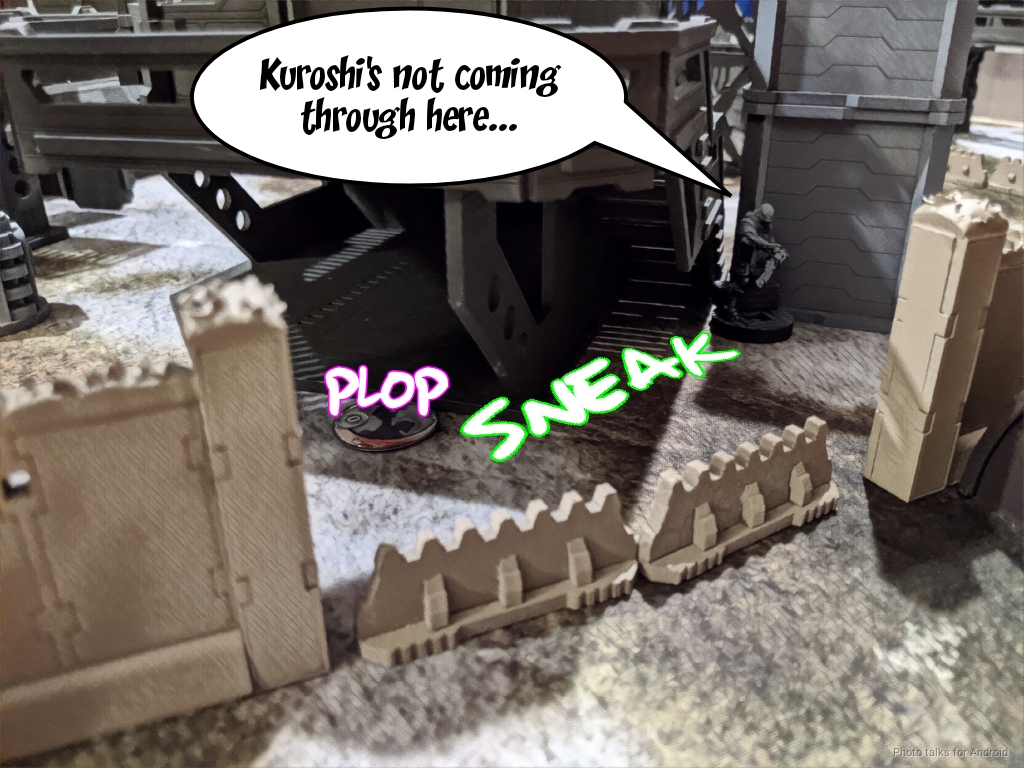
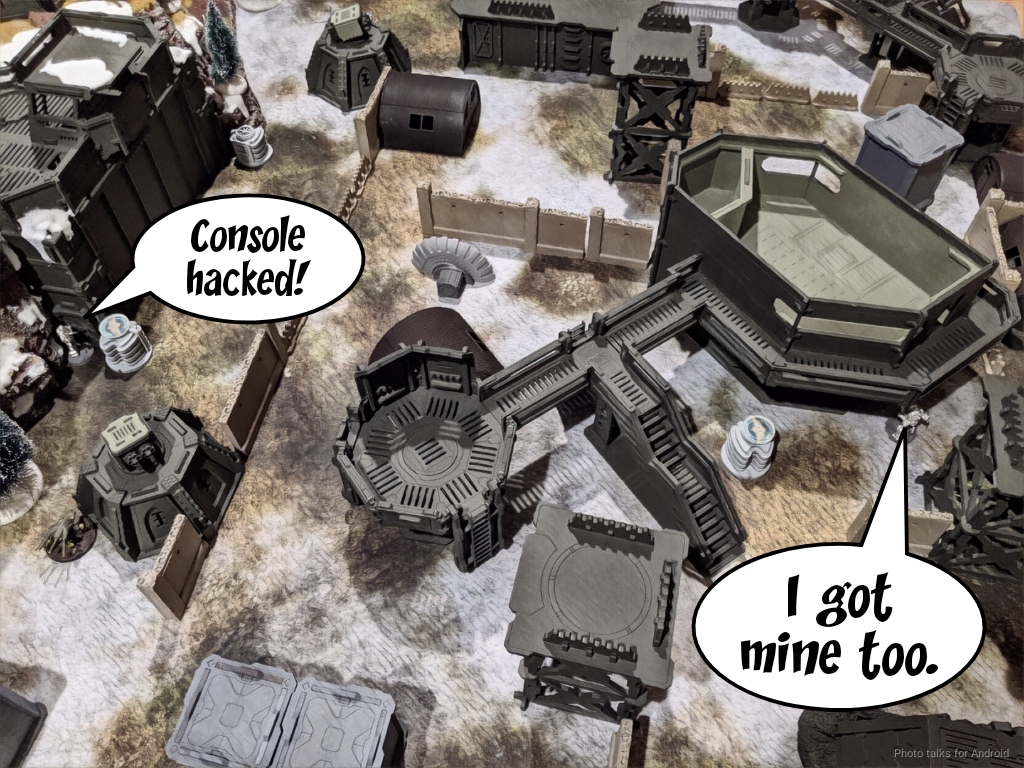
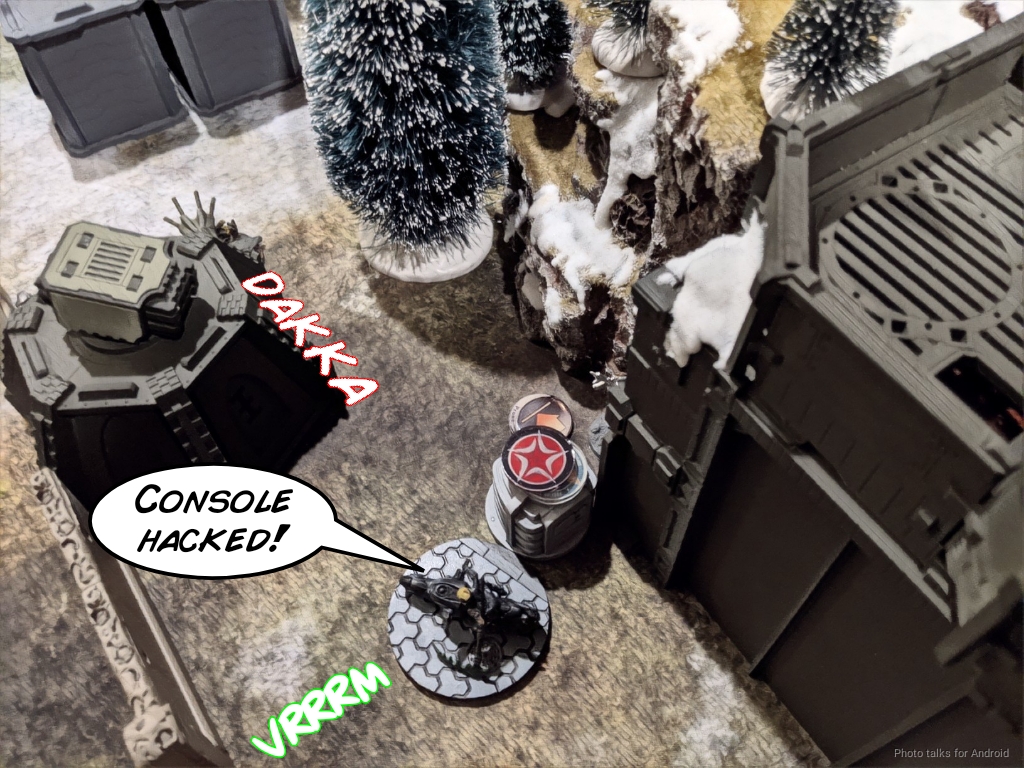
After some shuffling about with the Hulang, Adam manages to hack both of the consoles on his side and recamo his Zencha before passing turn.
Bottom of 2 – JSA
It’s time to use Kuroshi, so I get some free movement with her impetuous order and snag the nearest console. I then do some fancy footwork with my Yuriko/Kempetai link and fail to discover the Zhencha with Yuriko or the Kempetai Spitfire.
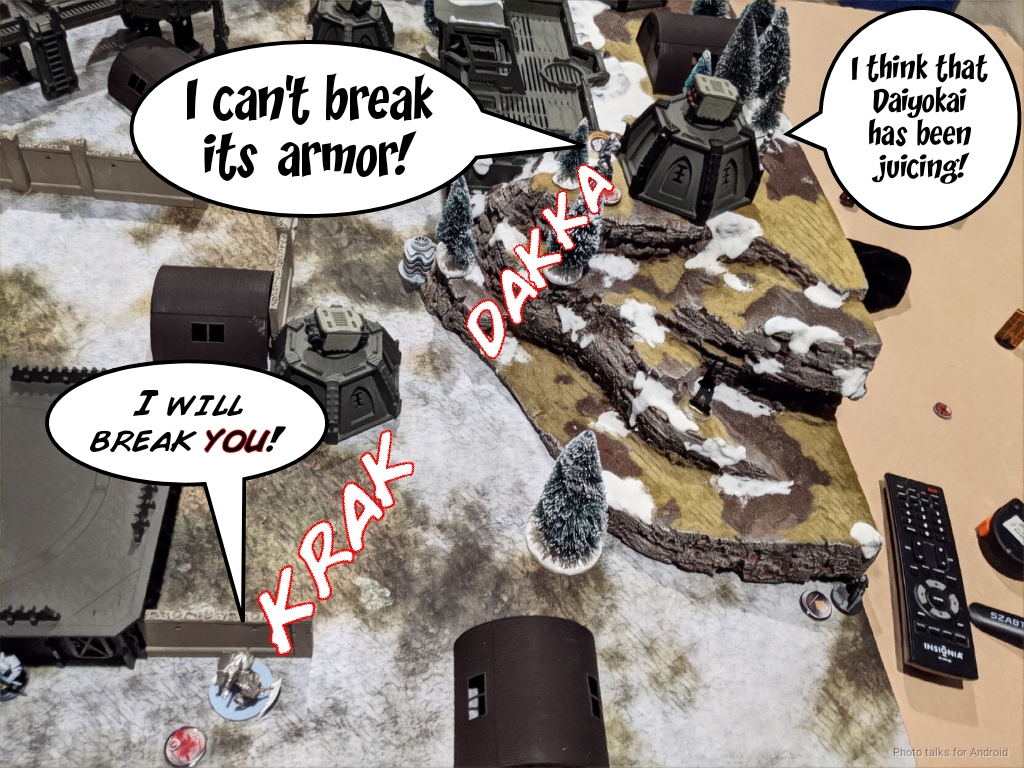
Frustrated, I decide to move on to something else and climb the Daiyokai up the mountain after breaking the link so the Domaru aren’t shot up by the TR bot. The Daiyokai is at least protected from the TR bot on the way up, so when I finally get into view of the ‘bot I’m within 16″. I spend entirely too many orders failing to do any damage to this thing, and decide to retreat the Daiyokai into my near right quadrant to keep that quadrant.

I do it with a coordinated order, exposing both Domaru to the TR bot as well as tucking Kuroshi rider back into her starting position to keep her safe. The TR bot decides to fight it out with my Daiyokai, who’s the spearhead, and nothing happens there.. but my Domaru chain rifle manages to crit the TR bot at max pistol range!

I shift my Kempetai BSG forward and move my Kempetai Spitfire away from the Zencha and attempt one last discover, but fail.
Turn 3
It turns out that two Kempetai outweigh one Zencha, so I’ve got three quadrants to Adam’s two now, bringing the score to 3-2 thanks to me having one console to Adam’s 2.
Top of 3 – Dahshat
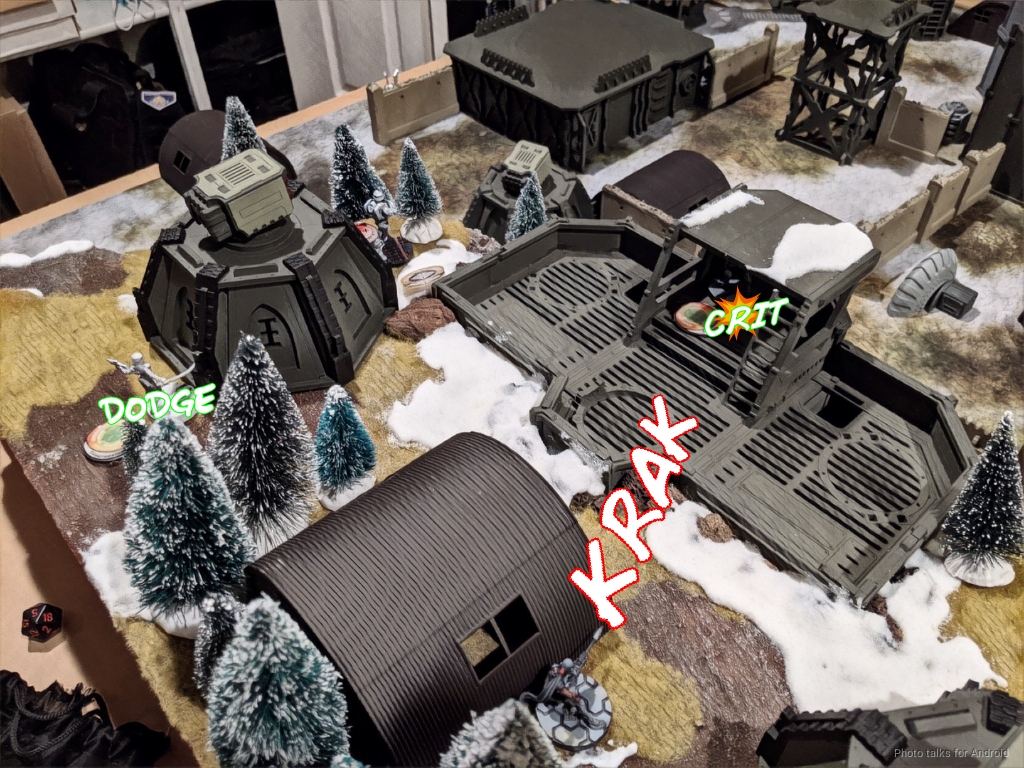
Adam sends in the Hulang and forces my Kempetai BSG prone.

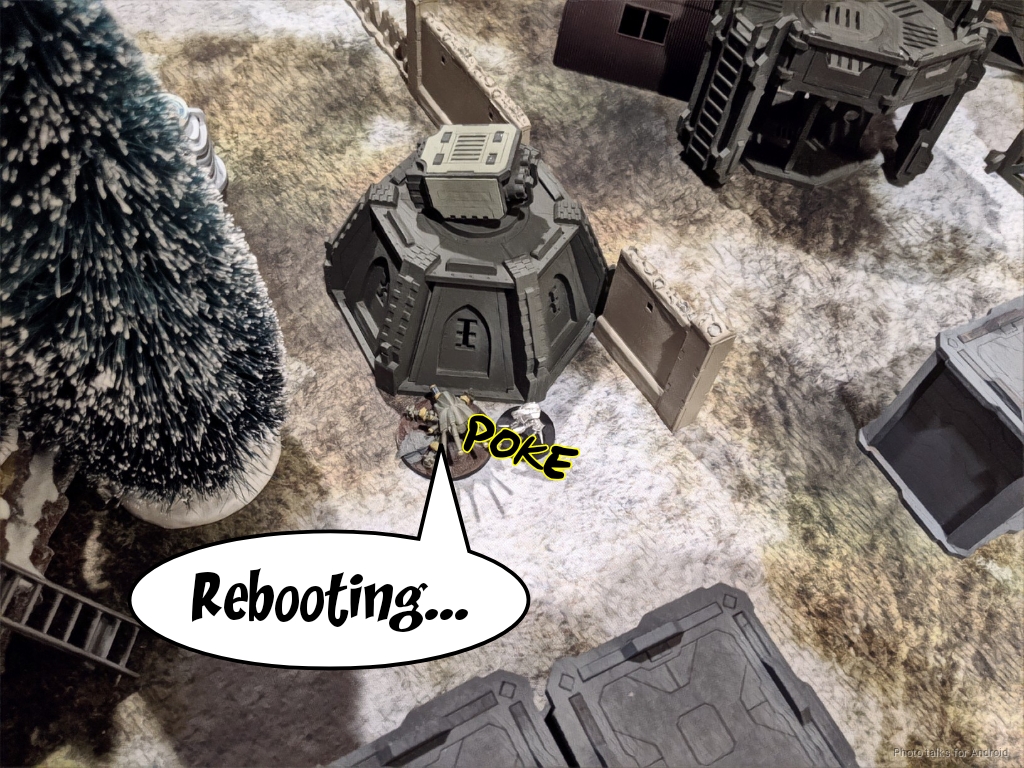
The Hulang then decides to challenge Yuriko within 16″ and in the open on the way to taking my console, but I put a stop to that with a well-placed E/Mitter shot. I love that gun. It’s worth noting that Adam took a Dozer instead of a Ghulam Doctor specifically because he knew that whatever faction I was going to be playing, I was going to find a way to work in E/M or Adhesive ammo.
He makes use of that Dozer next to repair the downed TR bot…
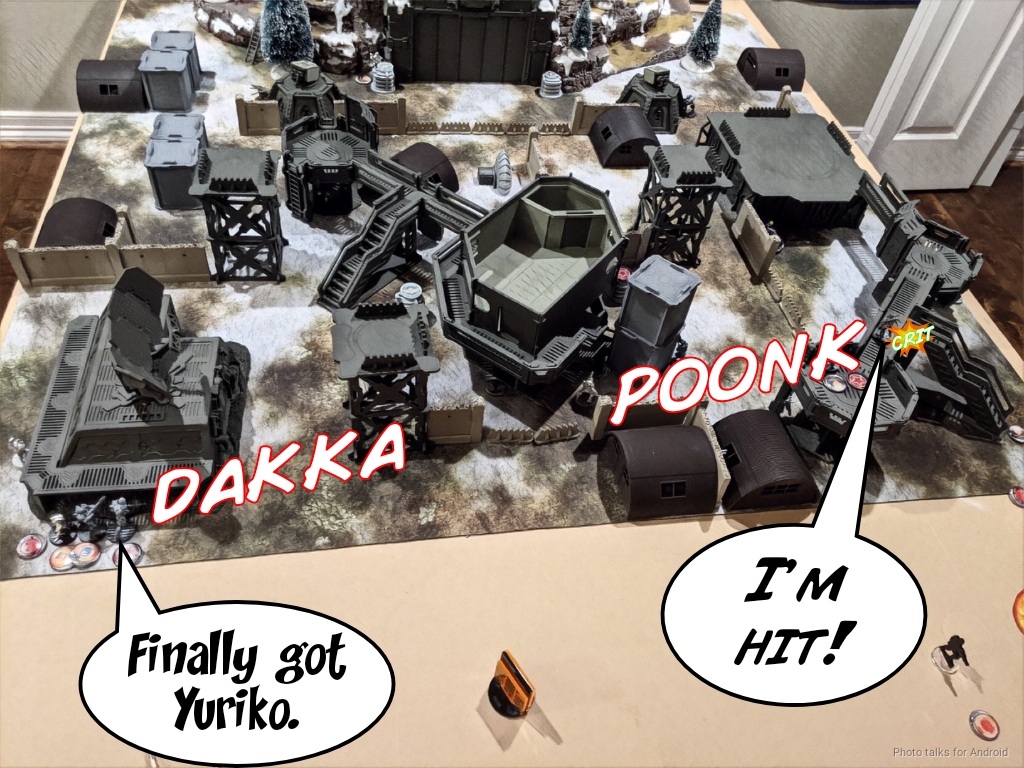
and then exacts vengeance on Yuriko by taking her out with a long range shot from his remaining Zuyong Haris guy, who is his new lieutenant.
His last few orders are spent getting that Zuyong and Valerya into his near-right quadrant to secure it.
Bottom of 3 – JSA
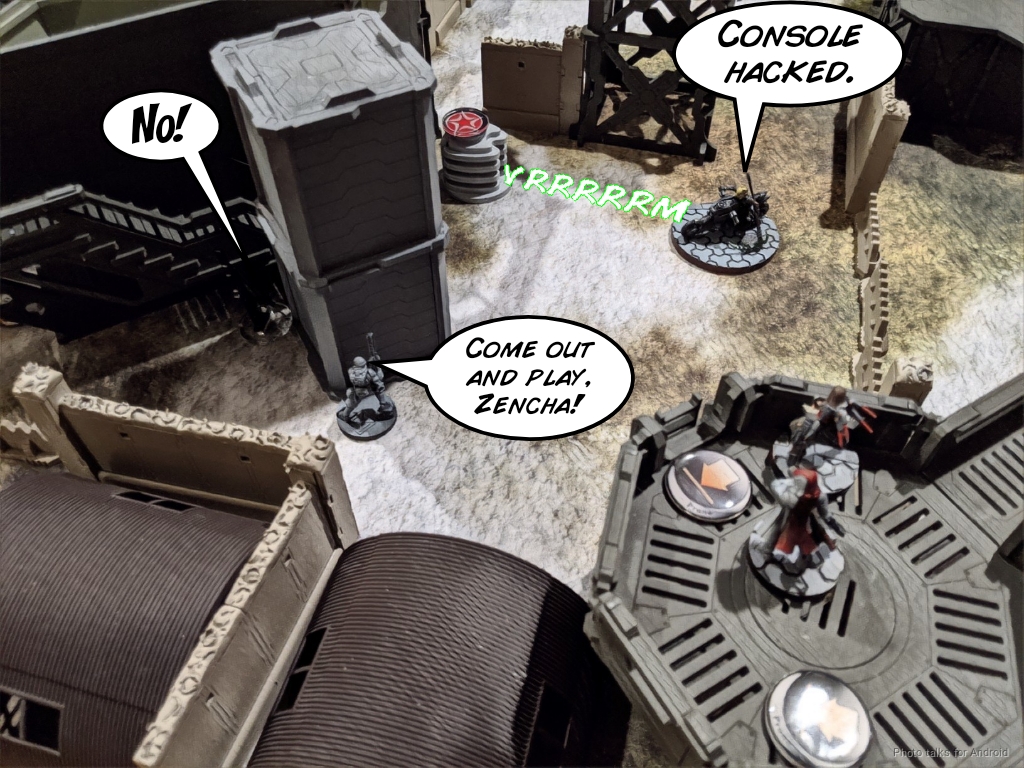
After getting some free movement with Kuroshi’s impetuous order, I roll her all the way to Adam’s side of the table and flip the console that the Hulang flipped earlier.
Speaking of which, I need to get rid of the Hulang, so I crit it off the table with the Kempetai spitfire. This means I can out-point Adam again in my near-left quadrant as I only have to deal with the Zhencha.
I’ve still got 3 quadrants, but I figure I should try to max out points so I send Kuroshi across the table to take last console. She does so but is gunned down by the TR bot guarding the console.
I’ve got more quadrants and 3 consoles to Adam’s 2, making it an
7-2 Japanese Secessionist Army Victory!
Post Game Analysis
Man I love playing JSA. As I’ve said in a ton of other places, it is a finesse army that requires some careful attention to positioning. I was pleasantly surprised by the Ninja MSR’s performance. I’m particularly pleased with my use of stun ammo–I had assumed that the Zuyong was at full health, so this was a one-shot stop to it being in suppression, and it would have to make two saves. Then I could’ve shot it at my leisure, which is exactly what I did. The Ninja MSR really shines when you can take full advantage of its infiltration, which the mountain is perfect for. I expect similar lulzy moments from the Tiger Soldier MSR and Paracommando sniper, both profiles that I’m very excited to play with more.
The Daiyokai did alright. This was my first time trying the MULTI Marksman rifle, and I wasn’t disappointed. I think taking the MULTI Marksman changes the math on whether or not you take the Domaru/Daiyokai Haris or not. I’m inclined to run the Daiyokai solo with the Red Fury and in the haris with the Marksman rifle. I was in a bit of weird position with the haris this game–Adam did an excellent job forcing me to break the Haris at the bottom of two due to the positioning of the Shihab. I don’t generally play heavy metal JSA lists, but I’m thinking I might start soon, especially since Limited Insertion is such a good format for these remote games.
I definitely got a little lucky with the Daiyokai on the first turn versus Adam’s Zuyong, but I don’t think it was egregious. The Ryuken got a little more lucky, as did Yuriko. But hey, 10% is still 10%! I think what this game boiled down to was some bad dice luck for Adam on both of our first turns, and then it being very difficult to recover thanks to the handicap of remote play. All things considered, Adam did basically everything he could and played the quadrants very carefully, I just had taken the high ground and at that point it was basically impossible to uproot me unless I made some bad decisions. I think Adam played very well given the handicap.
I think I’ve finally optimized the remote play infrastructure to a point where it’s about as good as it’s going to get with old gear that I just had lying around, and I’m pretty happy with the results. Any additional improvement would require significant investment in new gear and I’m not sure I want to do that just yet. If anything, I might attempt to tweak a portable streaming setup so we could stream the Rose City Raid or something.
Adam did voice a concern about this table though, in the context of remote play. It’s too hard. It’s extremely challenging in person where both people have complete situational awareness, so the additional handicap makes for a pretty unfair advantage for me. I chose specifically this table over the other ones I have because I’ve been looking forward to working on this table to address some of the concerns we’ve had about it at previous tournaments, so I’m thankful to all of my opponents for helping me collect data about it.
Adam’s a UX designer by trade, and he thinks that a more “traditional” Infinity table with boxy buildings, no overhanging geometry, and less ridiculous sight lines would go a long way towards streamlining the play experience for my opponents. I’m going to see about setting my Strompost Alpha table to try and address this concern… but I’m going to add a twist… stay tuned. Thanks for reading. Stay safe, stay sane!
Hauke Ahm
Great report, as always. Interesting to see, how easy two link-teams can be stopped sometimes.
What are your thoughts around the small core-links? I am thinking a bit about this in my current Druze-lists, but the +3 BS seems to good to drop. So I really would be interested in your idea, rationale and plan behind it. Maybe even Adam has an idea here?
WiseKensai
Hi Hauke Ahm! Good to hear from you again. I’ve written about this off and on across all my battle reports, but I attempted to tie it all together here: Bromad Academy Mission 11.
But, to give a succinct sketch of my opinion:
1. The most important link bonus is shared movement, because Infinity is a game of positioning.
2. The second most important link bonus is the burst bonus, because of its benefit in ARO and its ability to give scary ammo types an extra burst (E/Mitter, Missile, any of the Panzerfaust types, e.g. Blitzen).
3. 3 members is about what my brain/geometry can handle in terms of efficiently, safely, and easily moving around a table. In other words I have a hard time moving the 4th and 5th member of the fireteam into a safe spot without spending another order to fix positioning.
So, basically what this amounts to is the following: by spending 1 more model’s worth of points to get 2x 3-man fireteams as opposed to having a single 5-man, you can be in two places at once, have 1-2 competent gunfighters that cover multiple rangebands, and carry along some sort of specialist or support unit.
Perhaps this view comes from playing a bunch of vanilla. I would be more than happy to use a Druze HMG in vanilla Haqq solo. If I’m now allowed to drag a Druze KHD and a Druze with DEP along with me, so much the better. I’ve made plenty of use of Druze Duos as well, you can see some other duos here: Bromad Academy Mission 18
This particular plan is a little weaker out of Druze specifically, as the Haris profile is SWC-expensive, and Druze really benefits from being a link-team hydra/gelatinous blob sort of faction–you scatter single Druze all over the table and pick up/drop off members from a constantly changing core as you move around the table. Here’s a (sort of bad) example of me doing that: Mukhtar Mama Jama
Out of Druze specifically I’d consider running a Brawler Haris, a Druze 3-man core, and a Druze duo. That gives you a lot of board presence, and you can form the Druze 5-man core out of what’s left after you get alpha-striked or something. I’ve toyed with that idea a few times and been pretty happy with it.
Adam’s list in particular is truly obnoxious, because of all the Tac Aware orders he had, which really frees the Hulang and Zhencha up to do some work. I think his plan was solid. Two BS13, Burst 5 HMGs, one on each flank, pushing forward and choosing the right engagement range to attack me is really good, then the the rest of his force accomplishes the mission or the links slingshot Valerya into an objective.
It just went really poorly for him thanks to some excellent dice on my end, and then it all crumbled after that. Hope this clarifies.
Adam
Yeah for Druze specifically I usually go with a 5-man, just because of how flexible they are with links. That said I’ve been toying with the 3-man Druze core plus brawler Haris, but haven’t had a chance to use it.
Hauke Ahm thank you very much for your detailed response!! While I will check your reports, my first try with your attempt was quite nice, since it adds a lot of space to your play. I have the same problem with more than three members of a link-team, so that suits well.
My problem with the Brawler-haris is their low burst. I can have a Druze HMG and a Brawler MSR in a core and have enough SWC left to get the haris with SMR as gun to go. But this needs to be further tested.
But again, thank you for your recommendations and new ideas!