Foreign Time’s the Charm
Well, I’m gonna keep trying this Foreign Company in Looting and Sabotaging thing. Third time’s the charm, right? I set up a game with Adam for game night. It’s been awhile since we’ve played each other and we both wanted some Looting and Sabotaging practice. I changed up my list from the last two games to hopefully give me a few more options and better board control.
Overview
- Mission: Looting and Sabotaging
- Forces: Foreign Company versus Dashat Company (300)
- Deploy First: ForCo
- First Turn: ForCo
L&S
KRIZA BORAC Lieutenant HMG / Heavy Pistol, CC Weapon. (2 | 54)
ORC HMG / Pistol, Knife. (2 | 44)
VALKYRIE MULTI Rifle, Grenades / Heavy Pistol, EXP CC Weapon. (0 | 39)
AVICENNA Combi Rifle, Flash Pulse / Pistol, Knife. (0 | 27)
ZERO (Minelayer) Combi Rifle, Antipersonnel Mines / Pistol, Knife. (0.5 | 19)
BOLT (Chain of Command) Combi Rifle + Light Shotgun, Drop Bears / Pistol, Knife. (0 | 27)
BAKUNIN ÜBERFALLKOMMANDO . (0 | 24)

x3 PUPNIK DA CCW. (0 | 3)
SIERRA DRONBOT HMG / Electric Pulse. (1 | 25)
9
1
1 | 6 SWC | 299 Points | Open in Infinity Army
I dropped the Bolt Haris. It was just getting shot to pieces anyway, and it doesn’t really help me accomplish the mission. I took a Bolt KHD to unlock the Sierra, and double Zero Minelayers. My plan was to rambo the Kriza on turn 1, possibly getting him killed, and then fall back onto the Bolt CoC. AC2 smashing plan remains the same: Valkyrie and the Uberfall.
Dahshat Company
GROUP 1 |
ZÚYǑNG Lieutenant (AutomediKit) HMG / 2 Breaker Pistols, Knife. (1 | 39)
VALERYA GROMOZ Hacker (Hacking Device UPGRADE: Expel) Combi Rifle + Pitcher / Pistol, Knife. (0.5 | 21)
BOUNTY HUNTER Submachine Gun, Akrylat-Kanone / Breaker Pistol, Knife. (0 | 12)
GROUP 2 |
SAITO TOGAN Combi Rifle, Smoke Grenades / Pistol, EXP CCW, Knife. (0 | 39)
LIBERTO (CH: Mimetism, Minelayer) Light Shotgun, Chain-colt, Antipersonnel Mines / Pistol, Knife. (1 | 11)
SHIHAB REMOTE HMG / Electric Pulse. (1 | 25)
FANOUS REMOTE Flash Pulse, Sniffer / Electric Pulse. (0 | 8)
DOZER (Traktor Mul Control Device) Rifle, D-Charges / Pistol, Knife. (0 | 14)
NASMAT Electric Pulse. (0 | 3)
TRAKTOR MUL (Minesweeper) Electric Pulse. (0 | 5)
McMURROUGH 2 Chain Rifles, Grenades, Smoke Grenades / Templar CCW (AP + DA). (0 | 32)
6 SWC | 300 Points | Open in Infinity Army
Well, it turns out that Dashat is stupidly good at Looting and Sabotaging. Look at this nonsense! 9 Orders just to power McMurrough, and 6 for Saito. If that weren’t enough, you can Zuyong HMG things out of your way too! It does rely heavily on the flash pulse bots to protect the AC2 though.
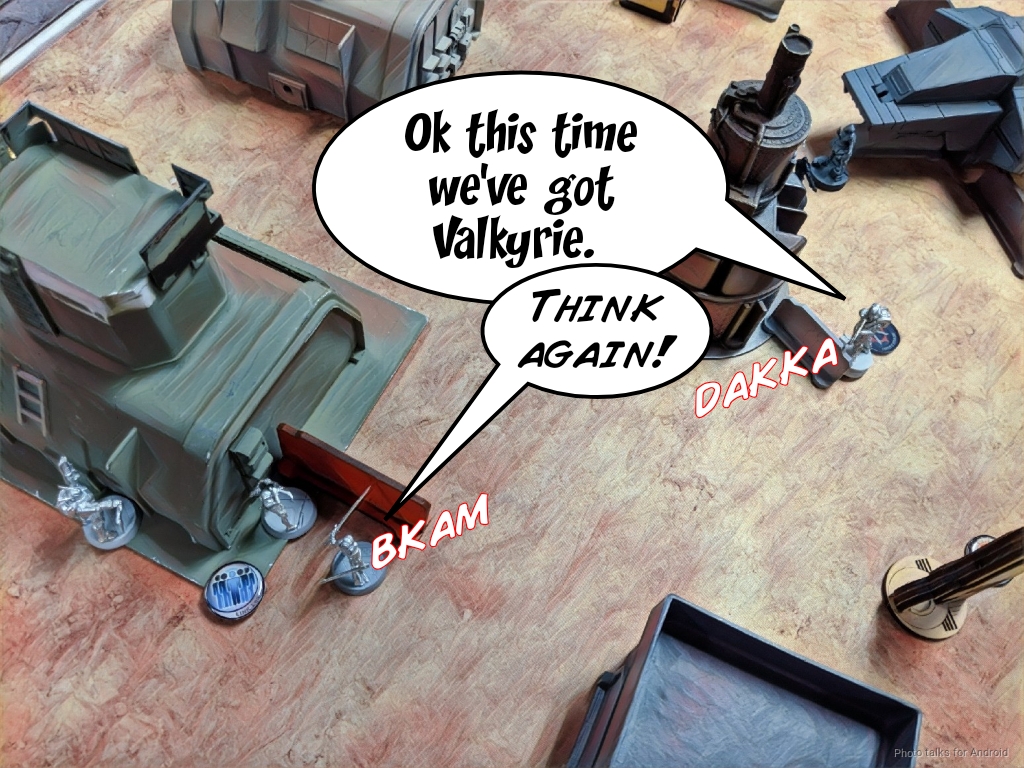
Deployment
I was on the Kriza plan, so I held him back. I put Valkyrie and gang on the left and the Uberfall on the right. It looks pretty open but there’s actually a fair amount of LoF blocking stuff around. The ORC can diagonally fight stuff on its way up the board and the Uberfall had plenty of places to smoke up key openings.
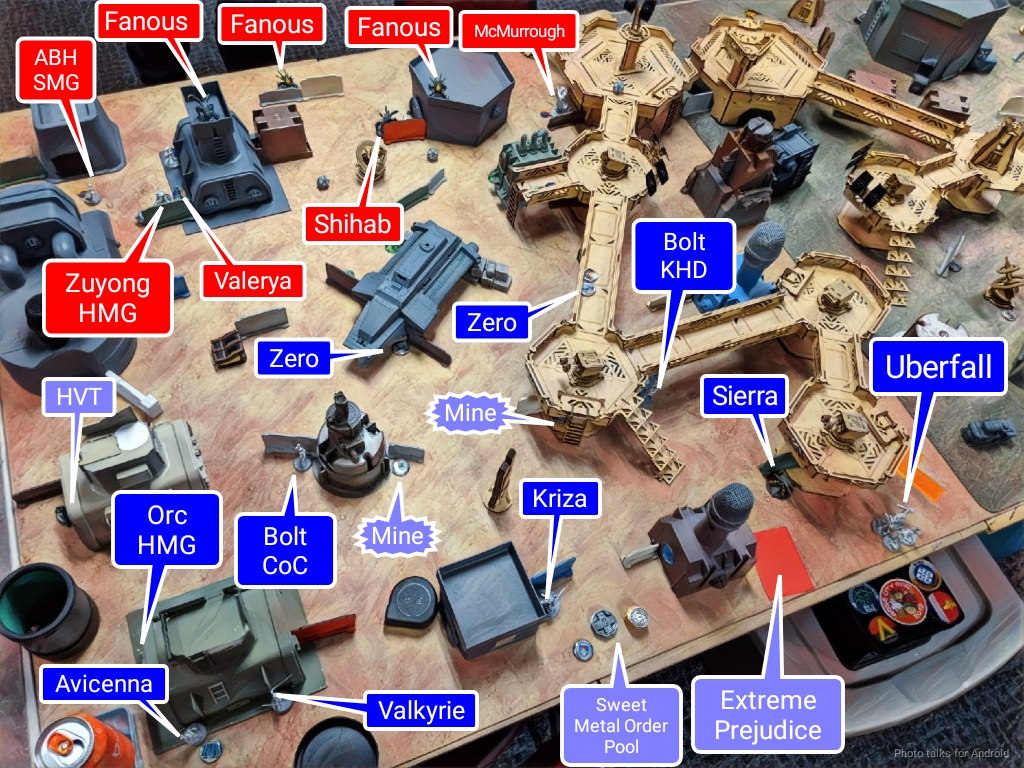
The Zeros went in the midfield, with their mines watching the central “gate” towards to the AC2. I put a Bolt on each flank, figuring that I could grab things out of the Panoply with them. The CoC Bolt was sort of watching the AC2 and could throw drop bears if necessary. I covered the AC2 with the Sierra as well as the Uberfall’s approach on the right.
Adam covered the whole board with flash pulse bot AROs and hid his link on his right. McMurrough went on the left, protected by a Uragan in case I wanted to get really close. The other TR bot, the Shihab, watched the AC2 itself. Adam stuck Saito in the midfield, not too far up, but ready to charge up the center.
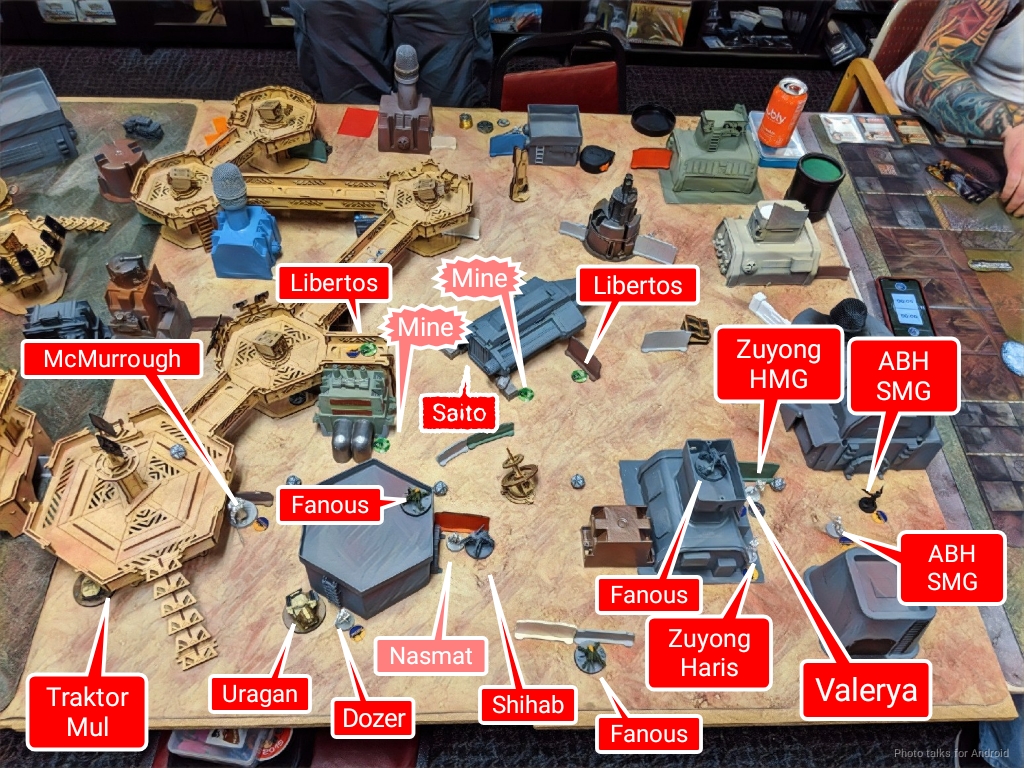
The Dozer and the Nasmat hung out near the TR bots to undo any hard work I might do, and then he put a Libertos in the midfield. I dropped a Kriza in the center to go after the flash pulse bots, and then Adam put down a second Libertos.
Turn 1
Top of 1 – ForCo
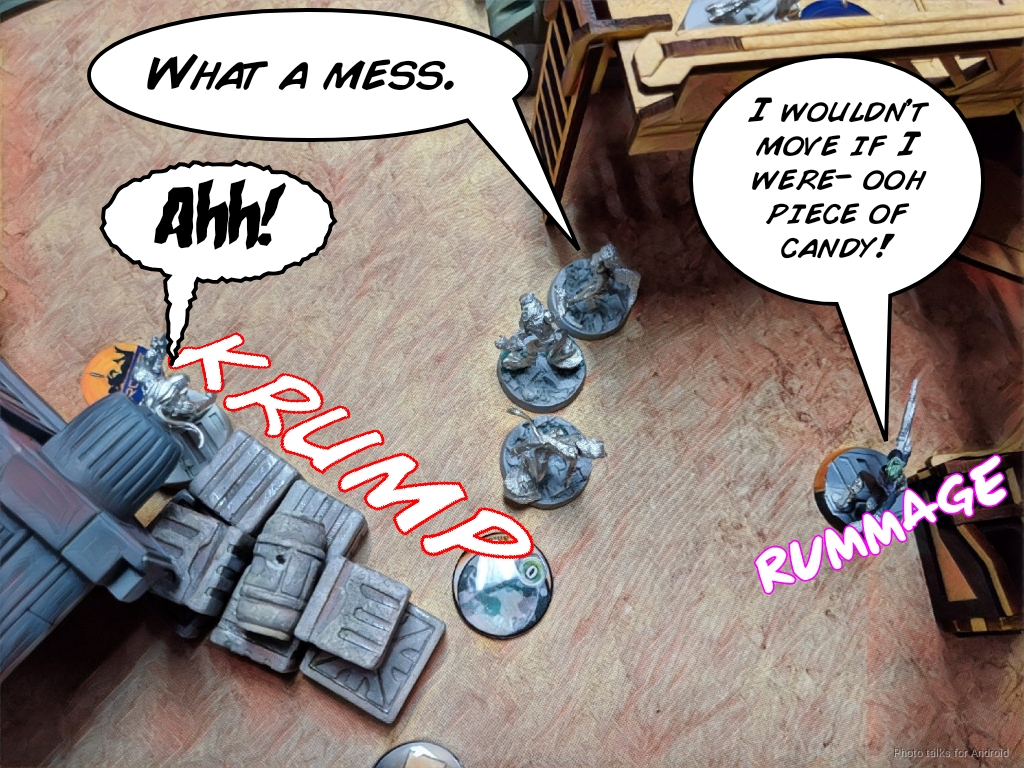
I had originally planned to go after the flash pulse bots, but I looked at the board and saw no AROs except for the flash pulse bots until I got to Adam’s half of the table. There were some mines along the way, but it looked like I could trigger both of them simultaneously and a single smoke grenade would easily handle the TR bot and the Libertos.
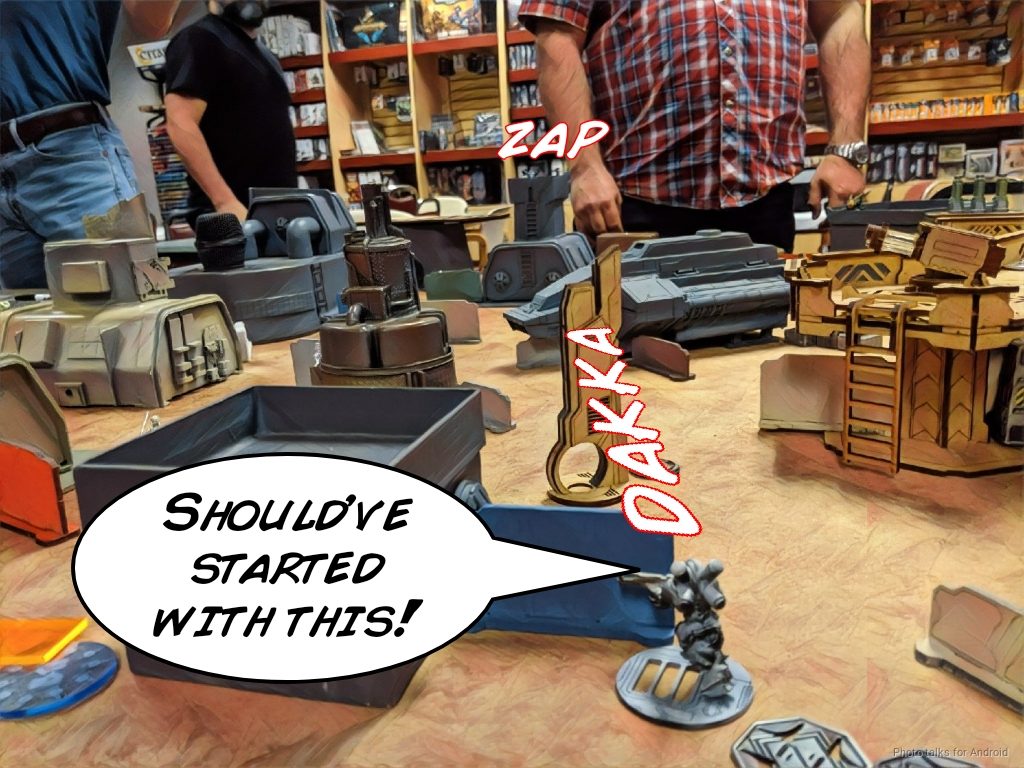
Since the Uberfall all have total immunity and therefore ignore flash pulses, I thought it would be a good idea to just make a run for it with the Uberfall before Adam had a chance to set up. I’ve historically had trouble dealing with the AC2 once my order pool is damaged, so this seemed like a good window to break away from my “Kriza all the things” plan. If I could keep Adam off the AC2 in the reactive, I’d have enough orders to mount a defense on turn 2.
Realistically, with all the orders that Adam had on the table, I figured that the more reasonable scenario would be for both of us to destroy each other’s AC2 and then look for the rest of the points to win out. I had hard mode Extreme Prejudice so it seemed reasonably likely that I could get my classified. Given this opportunity, I went all in on the Uberfall plan.
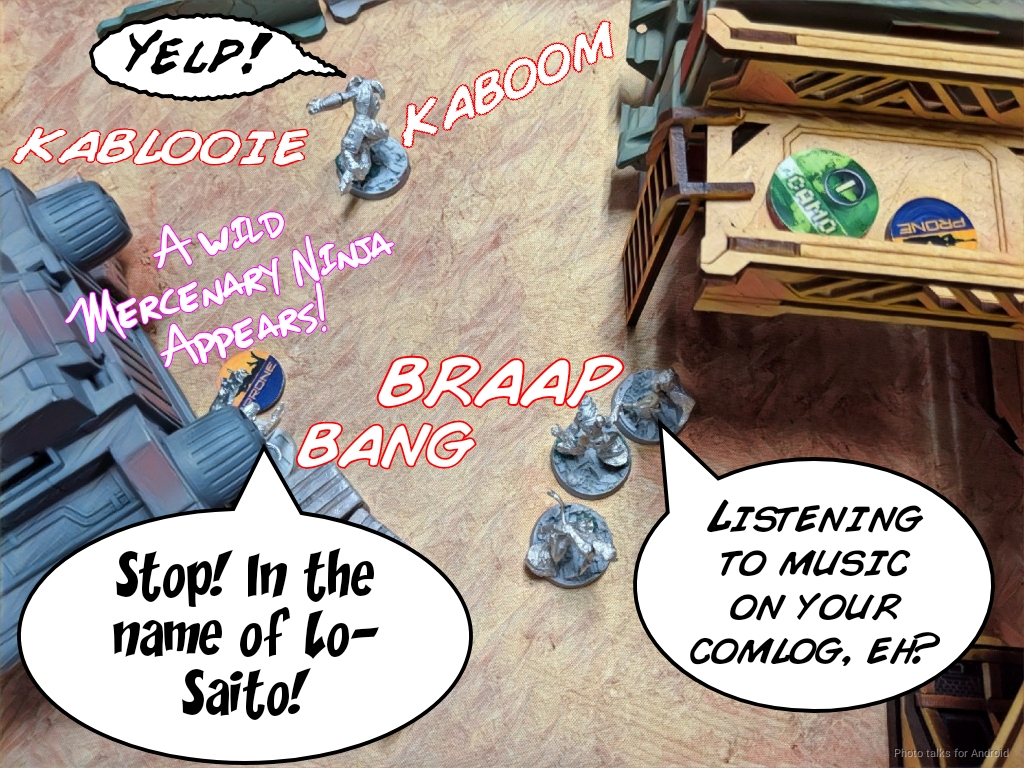
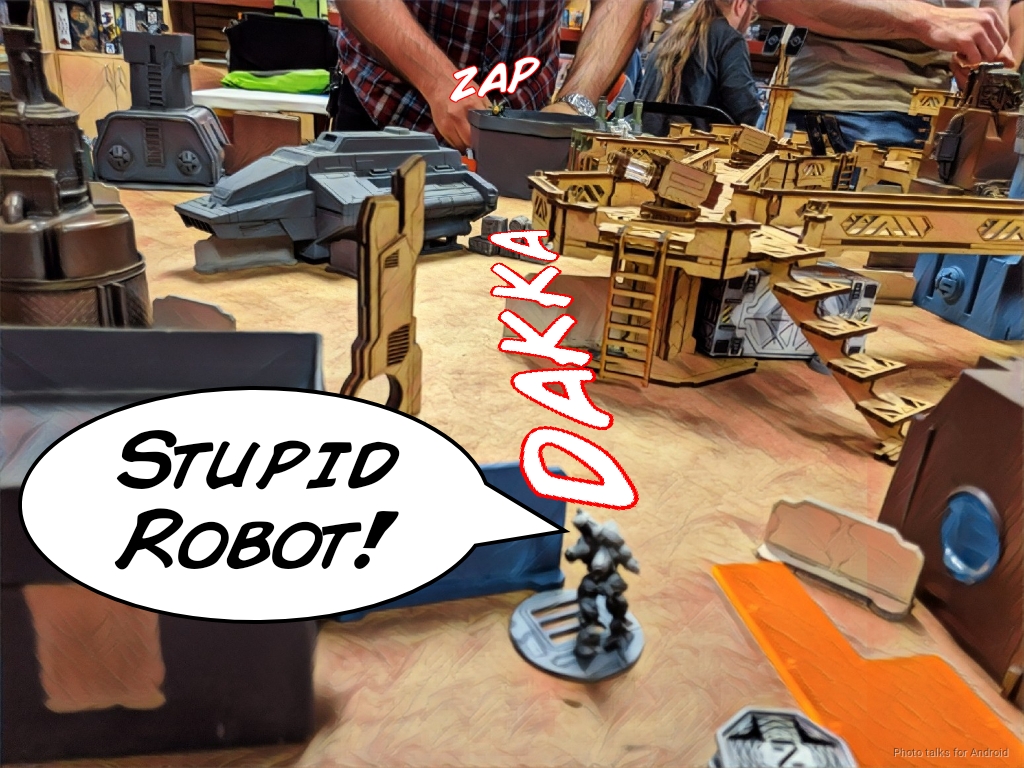
The Uberfall went straight up with their impetuous order and just kept moving while the Fanous ‘bots pew pewed their flash pulses ineffectually. While the flash pulses can’t actually do anything, they can at least face to face a eclipse grenade if I wanted to throw one. I managed to get all the way up to the two mines, and just as I moved a single Pupnik into LoF of the mines, Adam revealed Saito to take a shot at the Chimera.
I waffled a bit about what to do. My options were to dodge to potentially save the Pupnik, shoot Saito, or throw an eclipse grenade at him.
| Combi | 34.53 | 36.41 | 23.24 |
| Dodge | 39.25 | 30.65 | 30.10 |
| Eclipse | 53.25 | 22.50 | 24.25 |
I didn’t want to overthink it so I went for max burst and combi-rifled Saito. Unsurprisingly, given the odds above, I lost the face to face but passed ARM.
I definitely didn’t want to deal with moving the Uberfall again, so I decided to leverage my new midfield control stuff, the Zero! I moved the Zero that was on the ground nearby forward, eliciting a reveal and a discover from the Libertos on the catwalk. Thankfully, it failed its WIP roll and I was able to move forward safely.
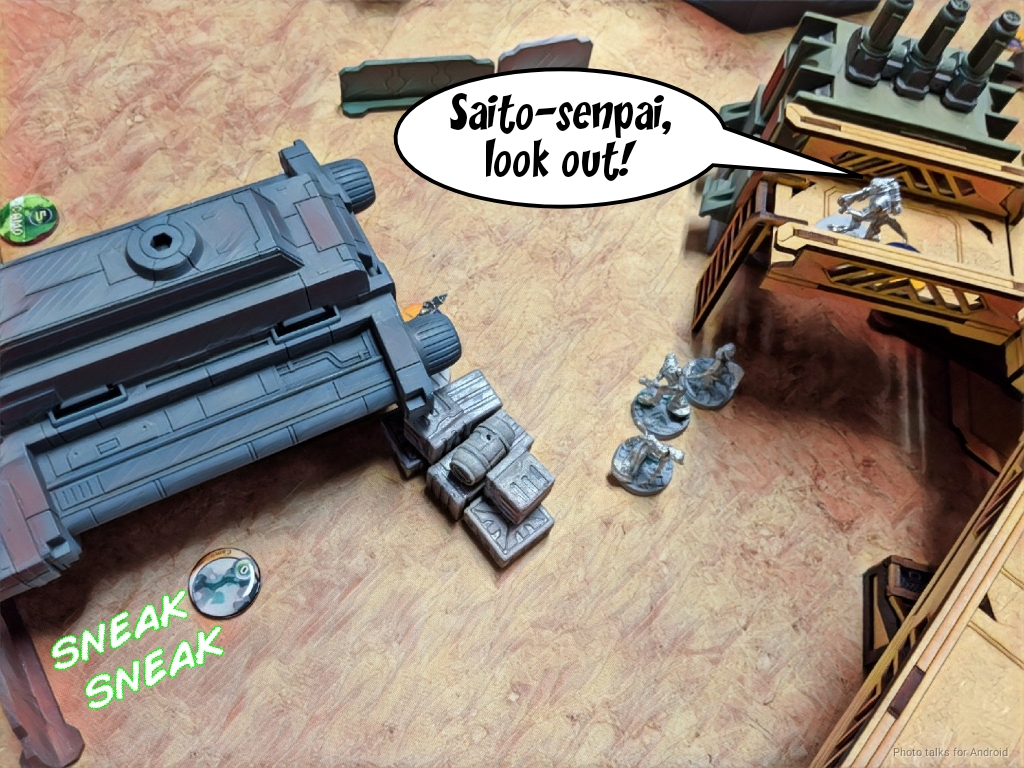
I dropped a mine covering Saito after I moved out of LoF of the Libertos…
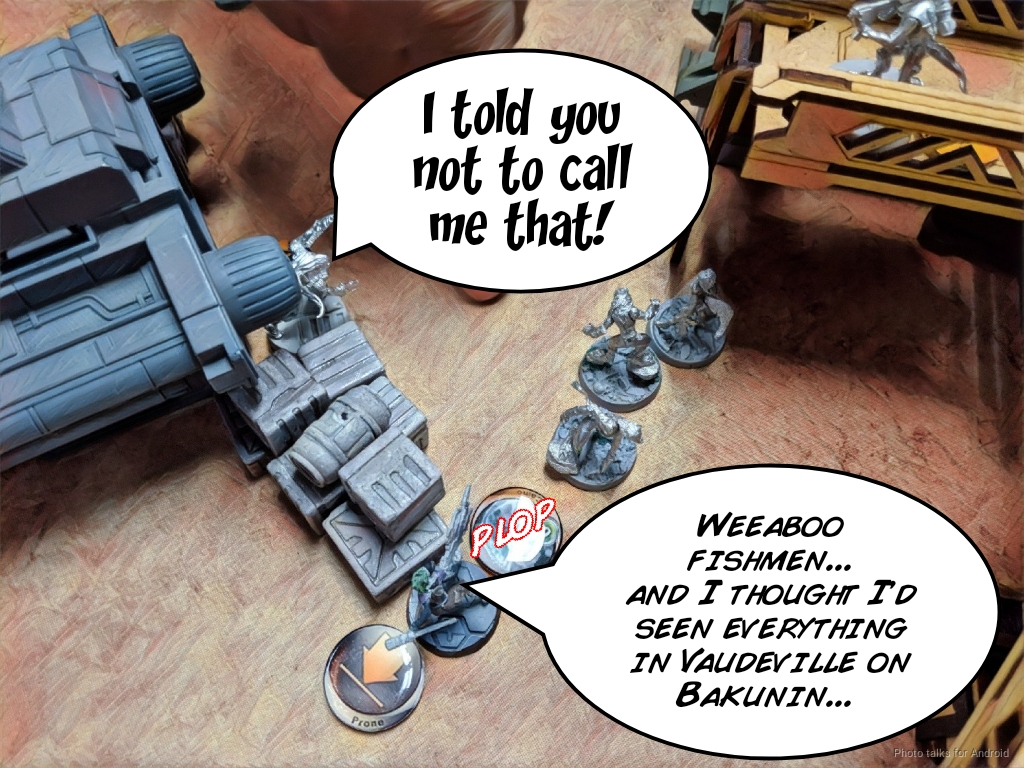
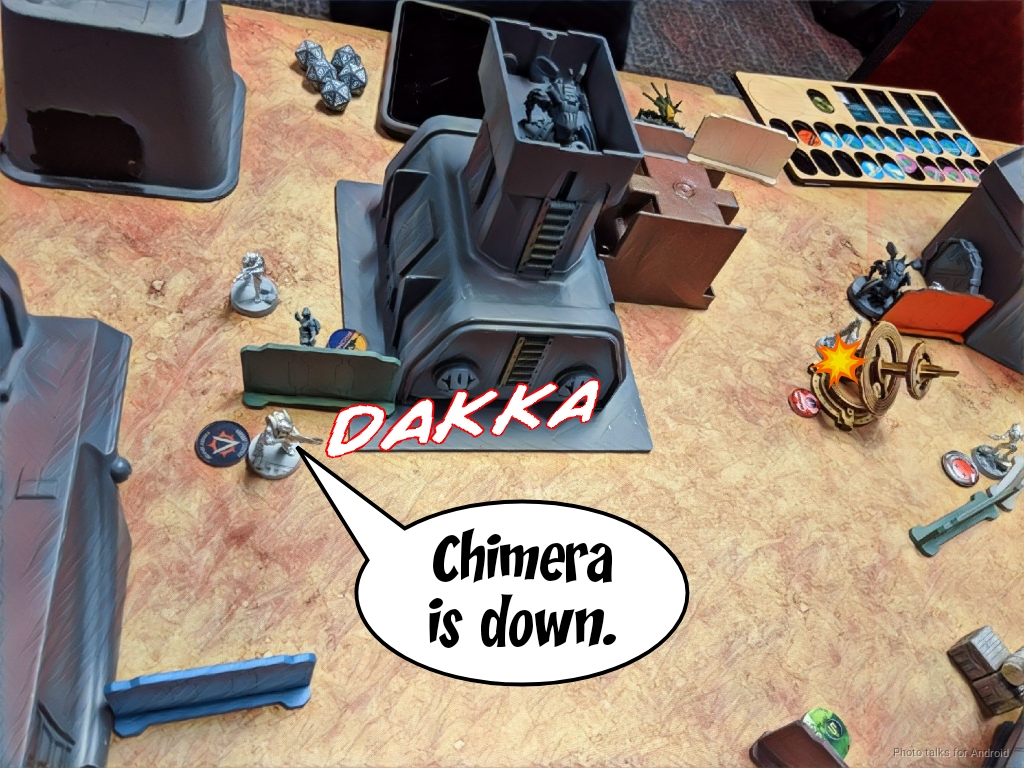
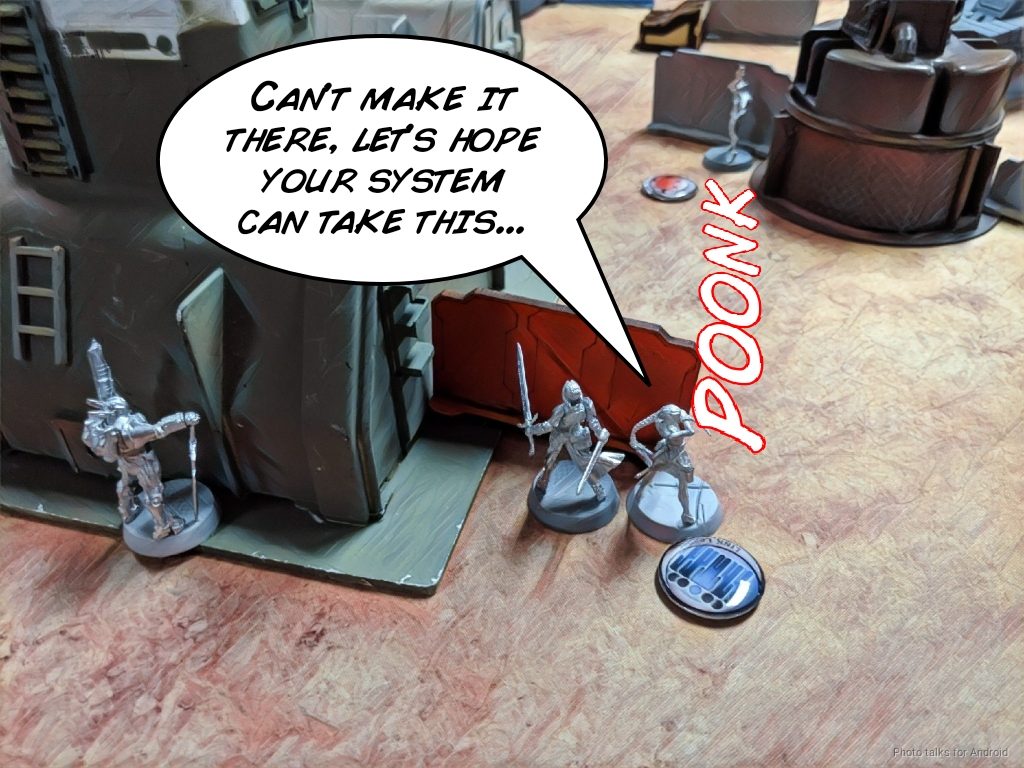
and then moved into base to base with the Panoply that was nearby. Unfortunately for me, Saito was in cover from this angle, so I was looking for 5’s. Adam thought carefully about what to do and then decided to dodge, assuming I would shoot. I opted instead to just rummage through the panoply and was rewarded with a MULTI Sniper Rifle, a failed dodge from Saito, and a failed ARM roll, taking him out.
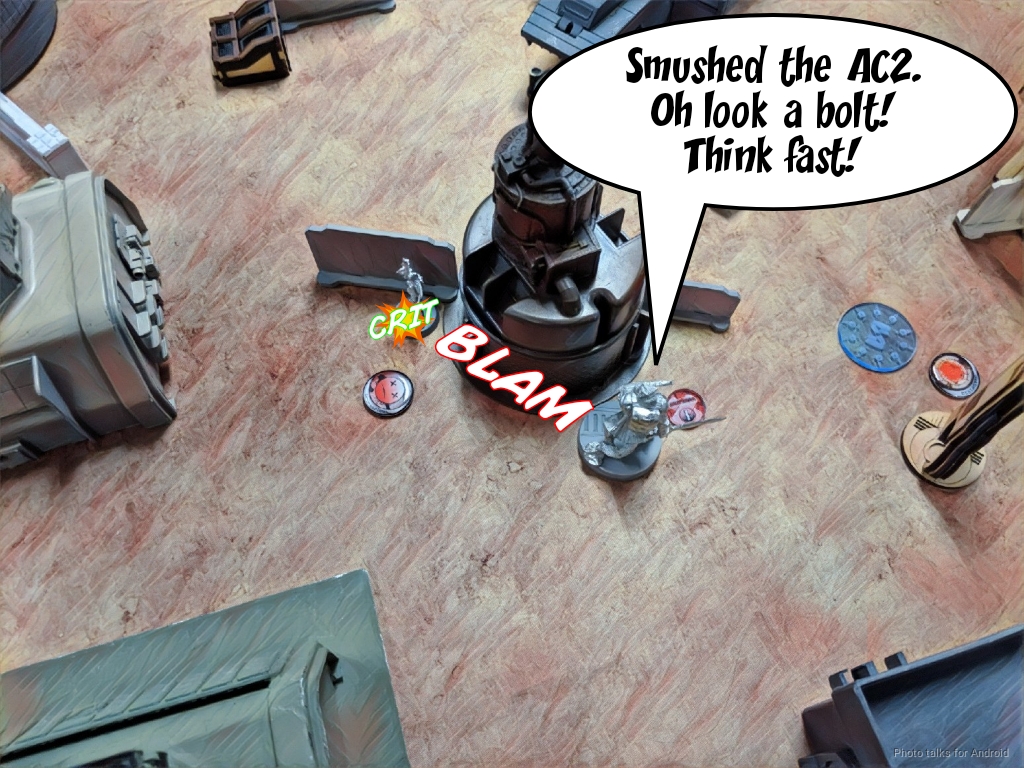
I was pretty low on orders at this point, so after setting up some smoke to block LoF to Adam’s link team and the nearby Libertos, I moved forward into view of McMurrough. We ruled that the TR bot couldn’t see until I got all the way to the AC2, modeled by the MDF satellite dish thing. I fully assumed McMurrough would throw smoke to protect himself, but was surprised when Adam threw a grenade at me instead. Since we were outside of 8″, the grenade missed, and my combi rifle in return crit McMurrough. I actually landed a second hit, but McMurrough passed his ARM save.
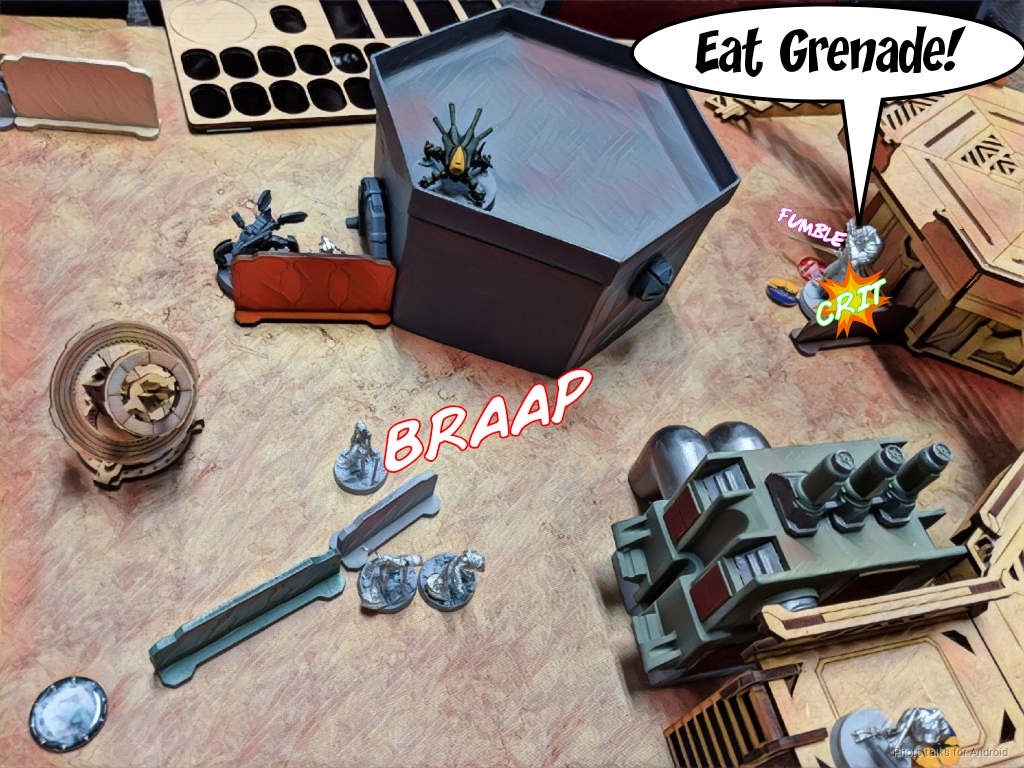
I was basically stuck here, since I had made a bad assumption about what Adam would do, so I just opted to sacrifice the Uberfall to take out McMurrough. Since Saito was already dead, and I saw no medics on the board, if I took out McMurrough Adam would have a really hard time dealing with my AC2. I kept throwing combi-fire at him, losing Pupniks to grenade splash as I went.
| 31.90 | 41.62 | 26.48 |
As it turned out, the odds of actually doing anything to McMurrough weren’t all that great, which was reflected in what actually happened.
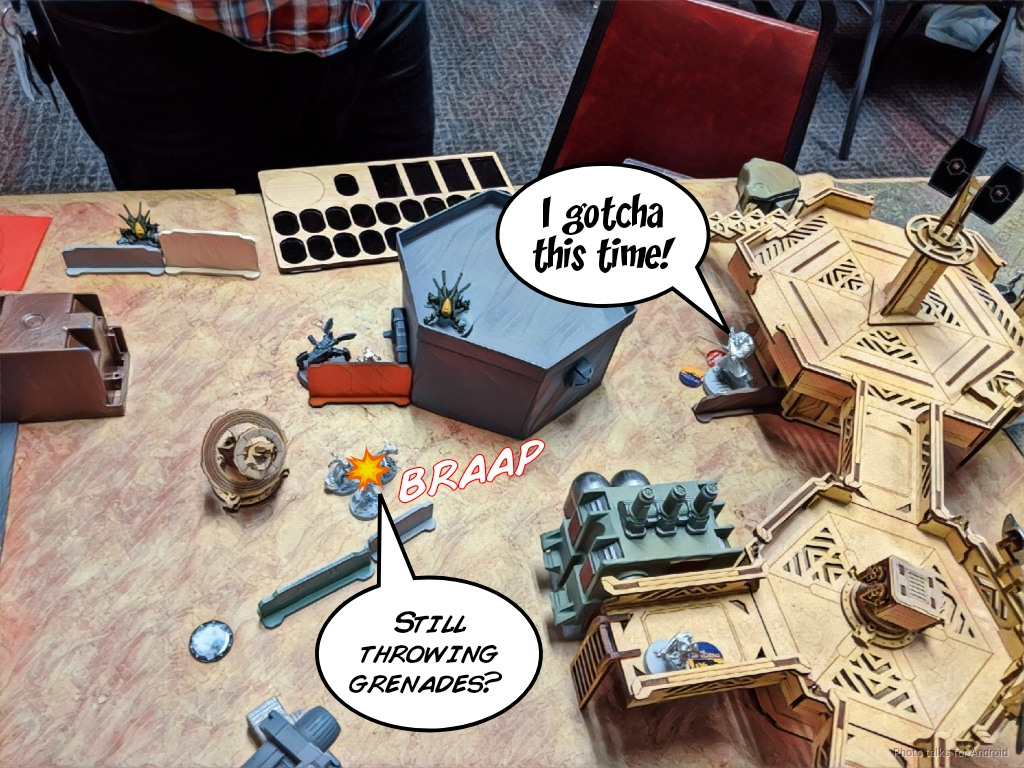
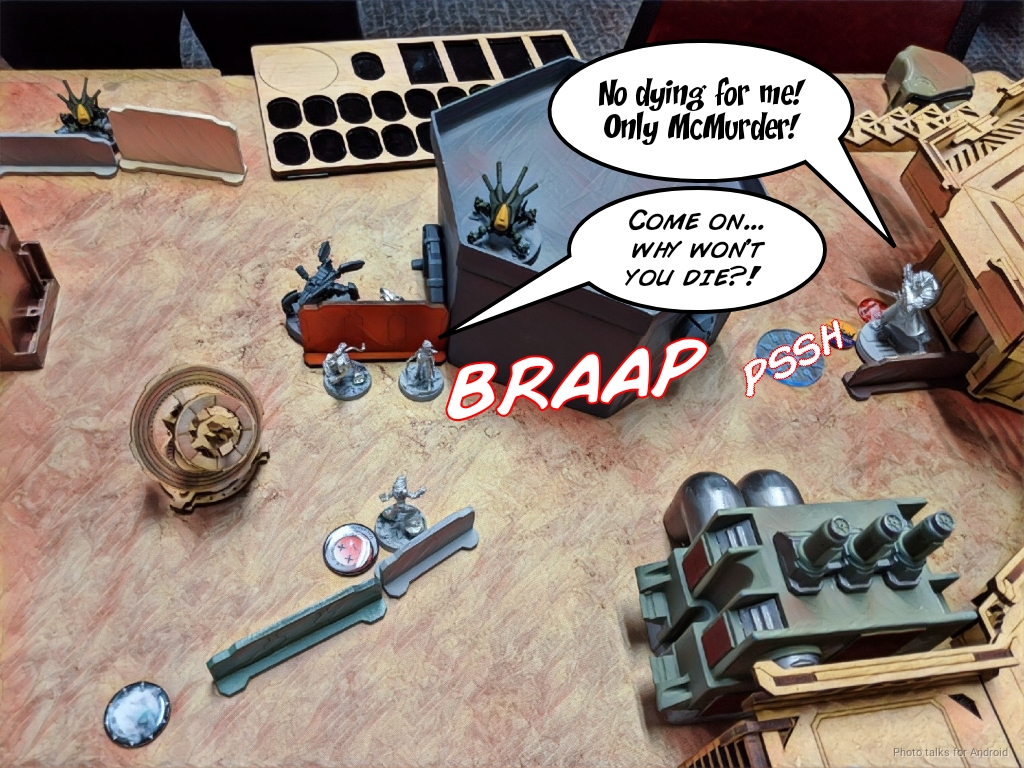
In spite of landing at least one hit on every subsequent order, McMurrough refused to die, eventually throwing smoke on my last order as I pushed the Uberfall into base to base with the antenna. Rather than face McMurrough’s 19 target number, I just swung on the AC2 and managed to shave off a wound.
I spent my Lt order trying to take out a Fanous and failed.
Bottom of 1 – Dashat
McMurrough is regular impetuous now, so rather than let himself get shot by the Chimera on the way forward, he forfeits the order. Adam then uses his first order pool to clear the way for McMurrough. His tool of choice? The Zuyong HMG. Since the Chimera is so far forward, I can’t possibly cover all the angles from all the threats by facing her properly, so the Zuyong shoots her in the back.
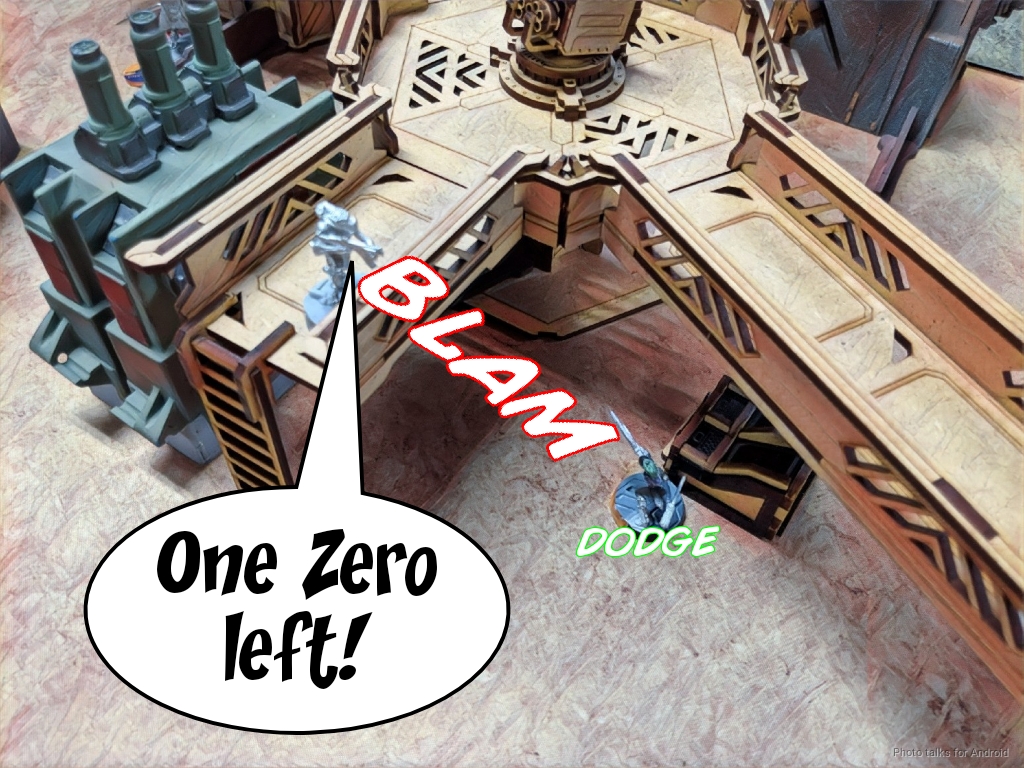
My Zero is poised to take shots at McMurrough as he passes by, so Adam just uses his Libertos to take her out.
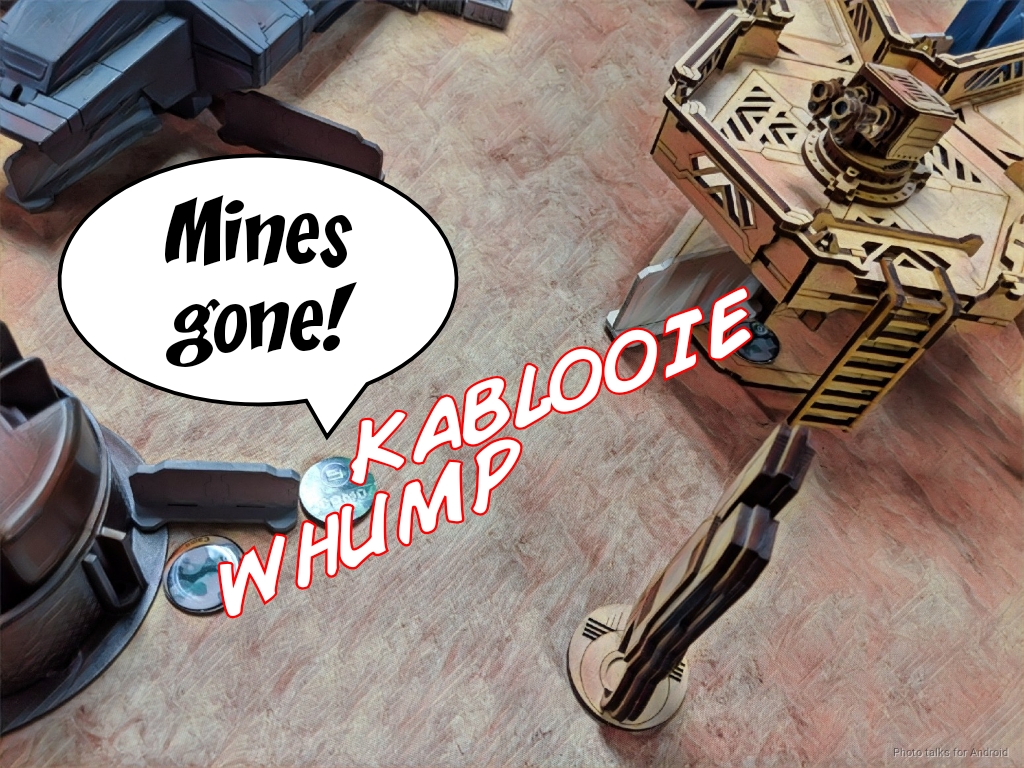
The second Libertos clears the mines with its face, dying to the mines but clearing them out
Finally, the Zuyong HMG takes out my Sierra with superior target numbers.
| 65.53 | 18.01 | 16.46 |
Now that the way is clear, the Zuyong and link retreat to defensive positions. McMurrough has a whopping eight orders to get himself across the field without any ARO. He easily smokes up the AC2 against Valkyrie’s AROs and smashes it to scrap in a few orders. He’s even got enough orders to roll a grenade crit on my Bolt Chain of Command…
and try to double chain rifle Valkyrie, who thankfully makes her dodge.
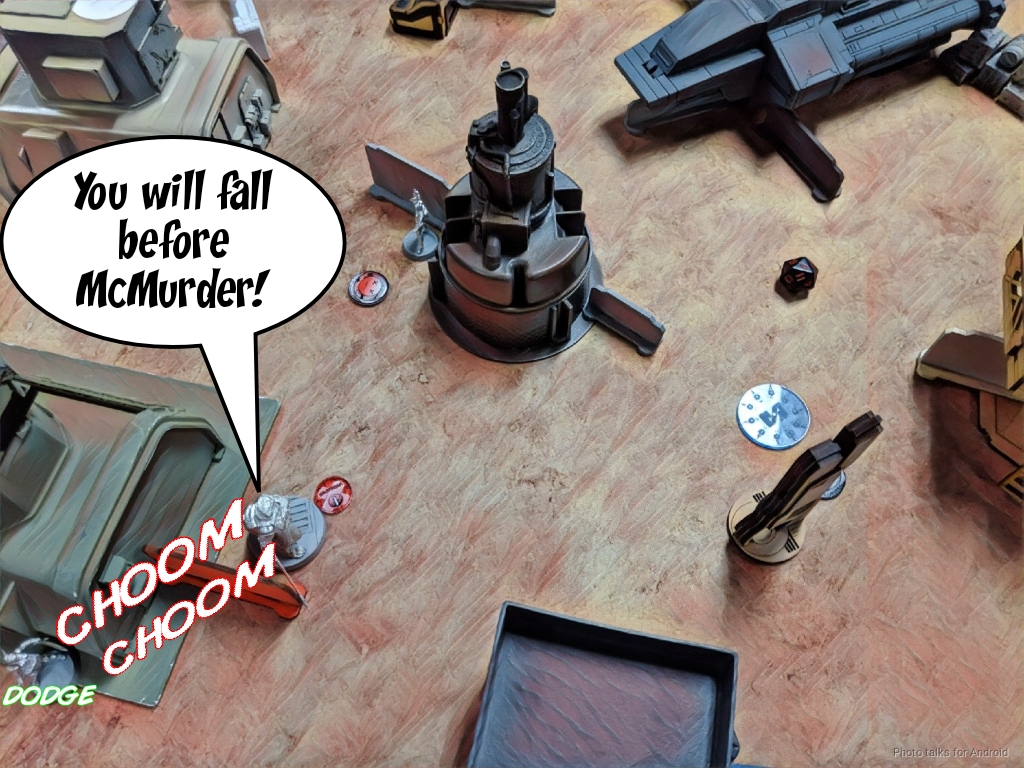
Adam has the same problem that I did with McMurrough being too close to my DZ, so he elects to put his back to Valkyrie to make it difficult for me to get either the Kriza or ORC around the corner without taking a chain rifle to the face.
Turn 2
Top of 2 – ForCo
My Kriza tries to take out McMurrough with his HMG just out of 8″, which is actually pretty reasonable odds for me since McMurrough is only on 1 wound.
| 59.26 | 14.88 | 25.86 |
Of course, everything goes pear shaped and I’m forced to shoot McMurrough in the back with Valkyrie instead, since the Kriza is now blocked with smoke.
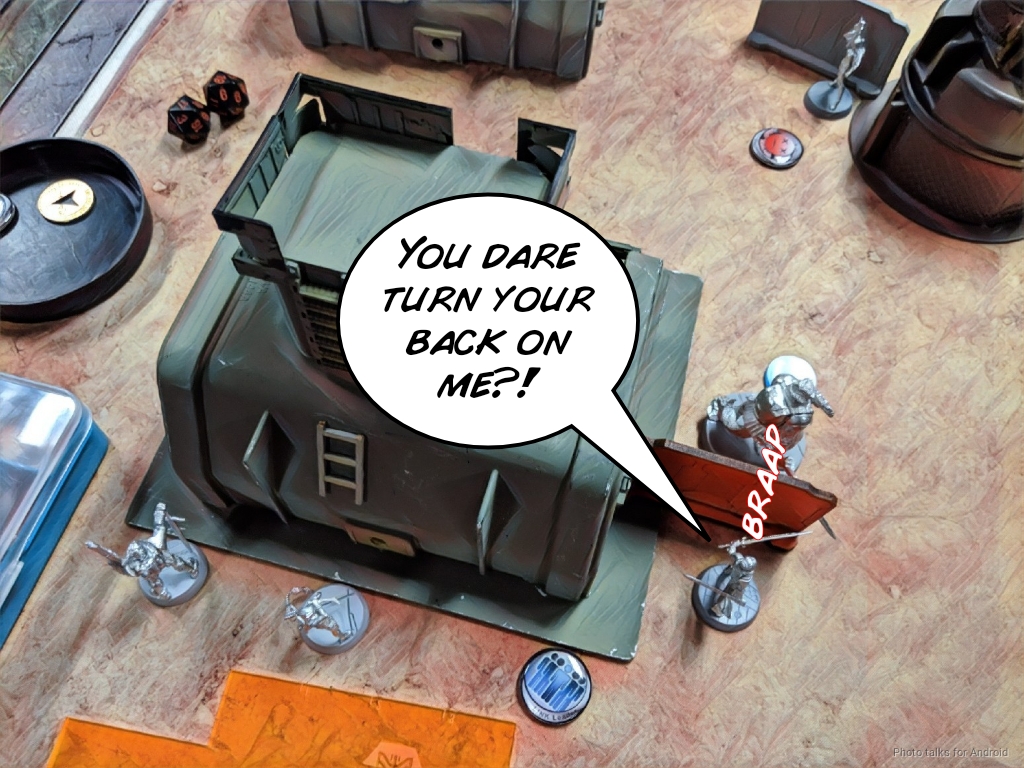
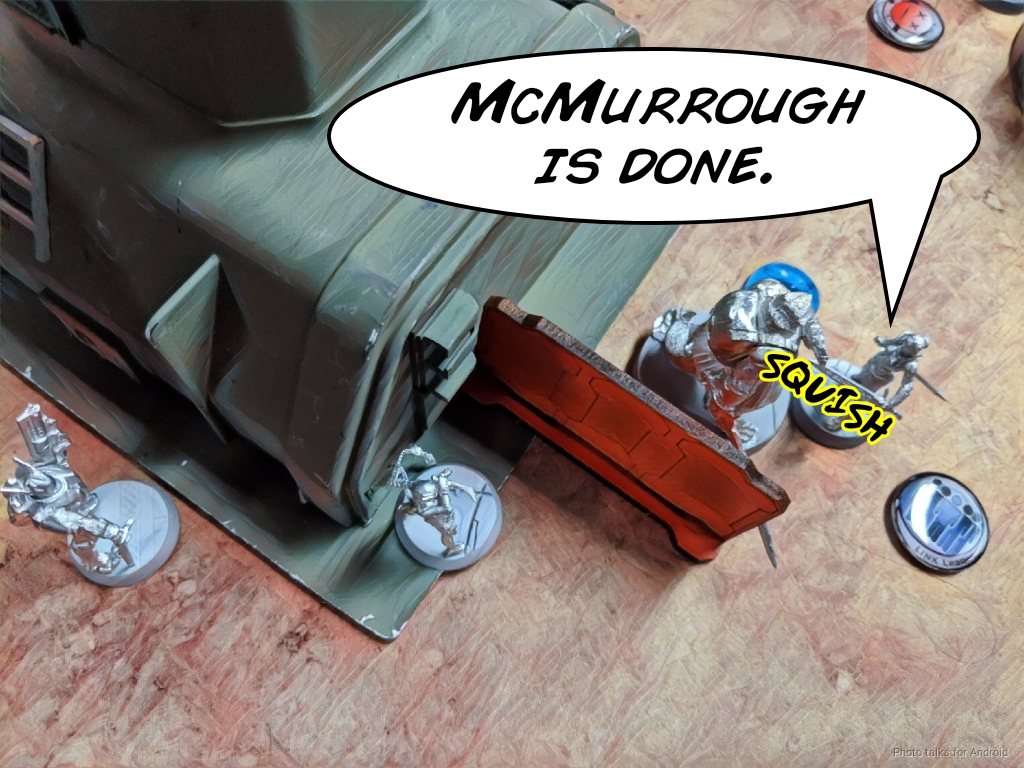
After we lament this golden opportunity to get a real-world example of Valkyrie making use of her skillset to kill a CC monster in close combat while walking away, I get halfway to accomplishing Extreme Prejudice by coup de graceing McMurrough.
I don’t have enough orders to take on the AC2 this turn, so I start setting up for a turn 3 run on it with Valkyrie. The Kriza starts blasting away, taking out one flash pulse bot…

then another.
It takes a few more orders than I’d like, especially since I’m dancing on wrong side of 32″. I’ve got to reset the link team into a not stupid position, and I don’t have enough orders to advance them safely. I opt to shuffle them back and into cover, poking Avicenna out to see if she can’t MediKit the Bolt CoC back up.
Maybe it’s not the fact that PanO issues pistols instead of MediKits to their medics, and it’s more the sub-par PH of PanO models in general… but whatever the reason is, I miss my PH -3 roll by 1 and the Bolt dies horribly, foaming at the mouth and cursing PanO medical technology.

Things are not looking great for ForCo at this point–I haven’t made any serious progress forward, and Adam is well ahead in points.
Bottom of 2 – Dashat
A few orders sees the Libertos take out my Zero. That +1 point for Mimetism is really gross and absolutely worth it in Dashat.
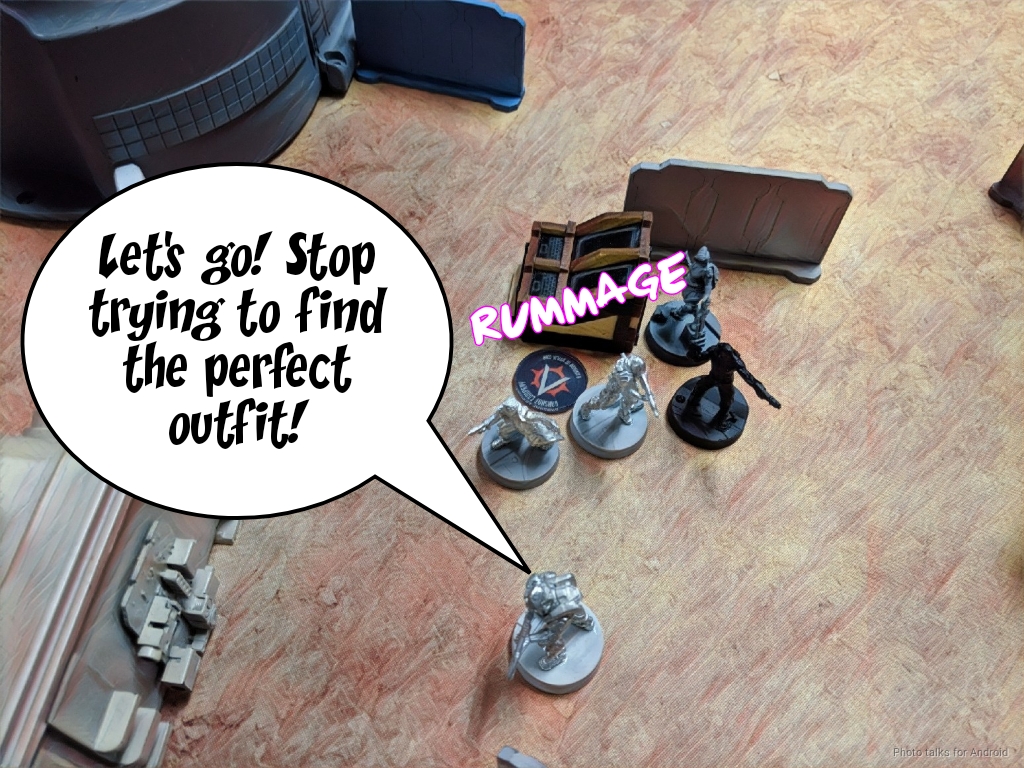
The link shuffles forward and grabs enough stuff out of the panoplies to deny me the point and put another point on Adam’s side of the scoreboard.
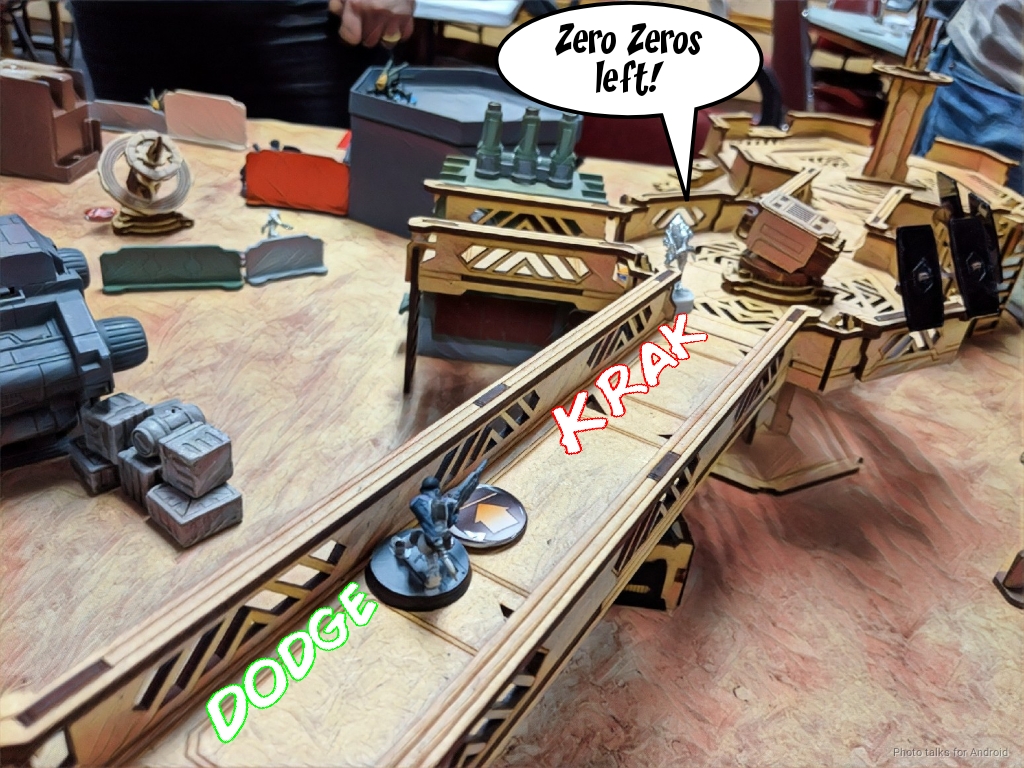
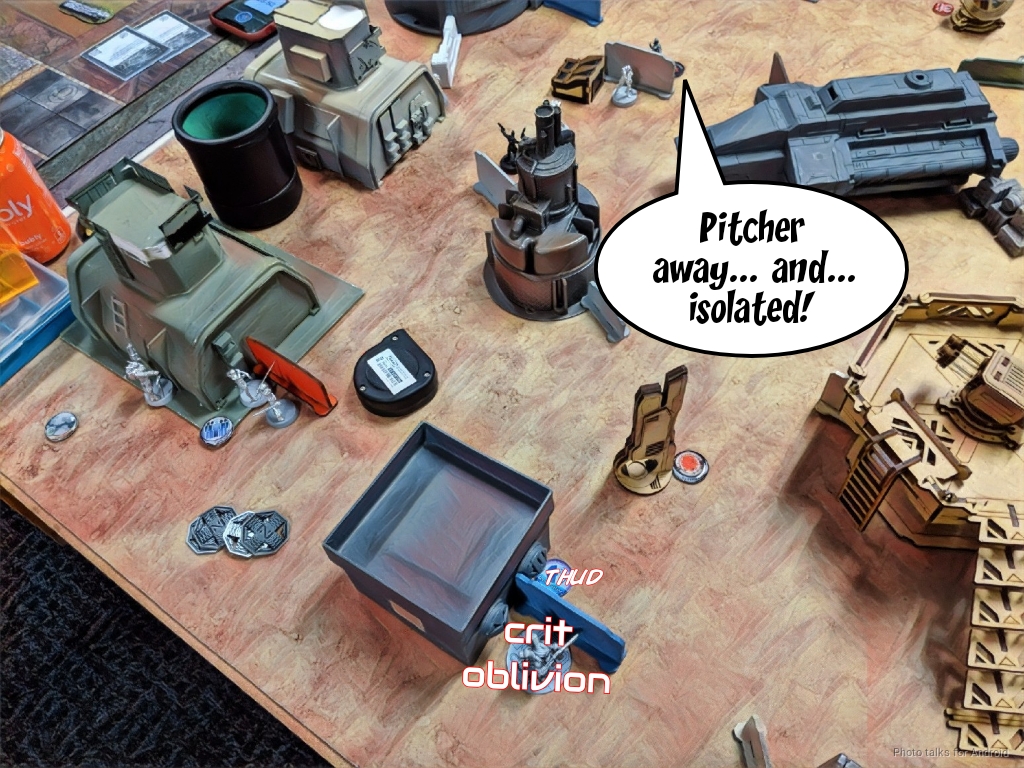
The Zuyong HMG pokes out to see Valkyrie, but she’s a champ and DAs the Zuyong in the face, causing a wound.
She keeps being a champion and fends him off for the next few orders, but Valerya drops a pitcher and crit-Oblivionss my Kriza. I had hoped that the second pitcher that she shot (closer to the AC2) would be in range of my Bolt KHD, but that was the only pitcher that she whiffed. Ah well.
The link retreats to a defensible position, the TR bot advances, and Adam passes the turn.
Turn 3
Top of 3 – ForCo
I’m in loss of lieuteant with a Bolt on the table and four command tokens. I only have 4 orders, not counting my Kriza’s anyway, so it basically doesn’t matter. It’s all about the small things, right?
I try to clear out the Zuyong HMG with the Kriza, but my dice just aren’t doing the thing today and nothing happens.
| 51.89 | 34.00 | 14.11 |
I figure my only real game plan is to run the Bolt KHD forward, grab D-Charges out of the Panoply, and somehow survive a link team’s worth of AROs including Akrylat-Kanones. Not to mention a TR bot and a bunch of flash pulses. I do some quick eyeballing of movement distances and decide that it’s not totally insane (ignoring the AROs, just movement).
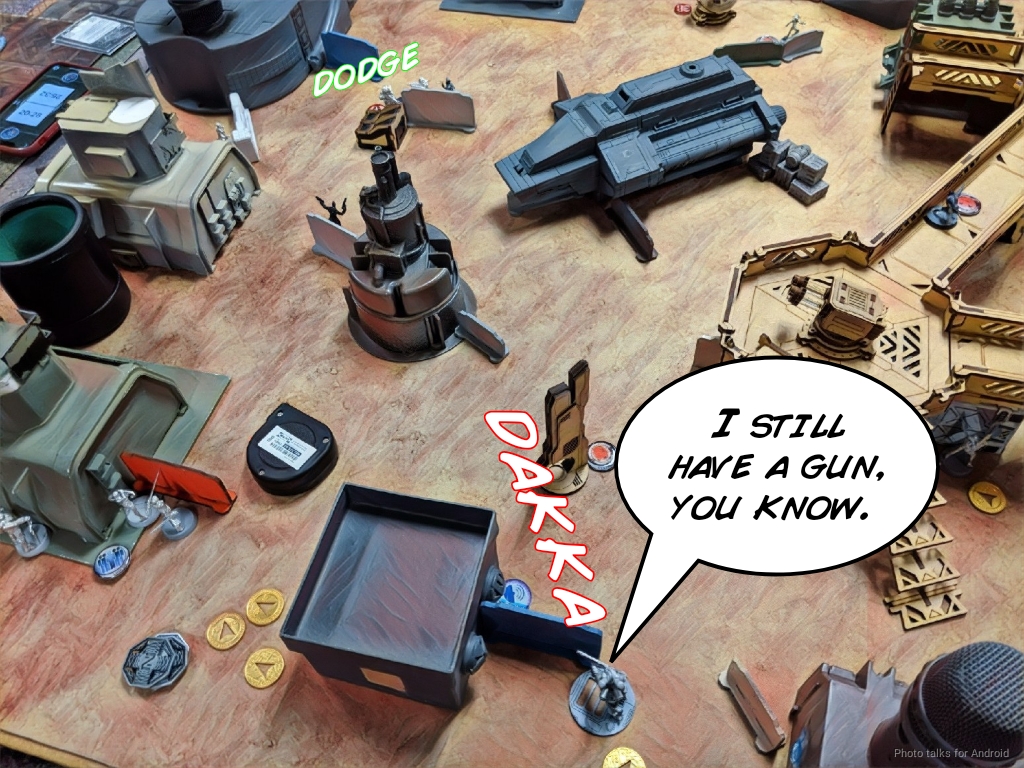
Once I start moving, it’s immediately clear that I need at least two more orders. My second short skill move exposes the Bolt to a ABH with an Akrylat Kanone, and I’m glued.
This does have the side effect of making it impossible to glue Valkyrie with that ABH, as she’s now out of glue cannon ammo. I throw some grenades at the Zuyong HMG out of spite, catching the Zuyong Haris and Valerya in the blast. Of course, all of them either pass their dodge or ARM, making my last spiteful maneuver meaningless.
We call it here, as Adam is securing my HVT and has no further way of getting more points. We’re not at at tournament, so there’s no need to run out the simulation of him trying to table me to minimize my VP. It’s a
8-1 Dashat Company Victory!
Post Game Analysis
Well, I think I’ve managed to isolate the error signal from all the noise! In other words, I can point to some decision making on my part that isn’t just “take a different list,” which is what it felt like the last two games told me.
I should’ve stuck to my plan of Kriza-ing as many things as possible. If I had removed a bunch of McMurrough’s orders (or better yet, McMurrough himself), then Adam would’ve been forced to either send in Saito, or set up for a turn 2 run. My mines would’ve helped against Saito, since there wouldn’t have been enough orders to run Saito in as well as detonate the mines with the Libertos.
Basically, I jumped the gun and sent in the Uberfall. Once they were there, I made mostly the right calls. Even though the Eclipse smoke was the best option in the initial face to face against Saito, I still think that dodge or shoot the combi was better. Combi lets me remove the threat entirely if I win the face to face and Saito fails ARM, and dodge keeps my Pupnik count up. The pupniks are precious commodities in Looting and Sabotating, since they (and not the Chimera) have DA CCWs.
If I had thrown eclipse smoke, the only way I could deal with Saito, aside from dropping a mine in smoke with the Zero, would have been to get into CC with the two remaining Pupniks. I’m pretty much guaranteed to kill Saito at the cost of losing a Pupnik, since I can choose who does the swinging after Saito declares his ARO, but I’m definitely losing a Pupnik as well. That puts me down to a single Pupnik and the Chimera–not a great situation.
I also don’t want to leave the mine up for Adam to deal with in his active turn. He’s much too clever to let Saito trigger the mine. He’d have thrown one of the Libertos fishmen under the bus or something similar. Given that my Uberfall were degraded after their encounter with Saito and Adam surprised me by throwing a real grenade instead of a smoke grenade with McMurrough, I think I handled the actual situation, post decision to move the Uberfall up, more or less correctly. Given the chance to take out both of Adam’s primary plans to take out the AC2 (Plan C was get the Dozer across the board), I should definitely have taken it.
The other takeaway is that Looting and Sabotaging is very difficult in the Limited Insertion format. You must keep all three turns in your head from the beginning and span your planning across all three turns. I did not do this properly, so I lost. I think I had the tools to pull a win out of this game–admittedly that would be very difficult given Adam’s skill level and list, but I executed poorly and was punished for it.
Deploying the CoC Bolt forward was also a mistake. I think my positive experiences with singleton Druze, used in a similar fashion out of Ikari, encouraged me to do so. The CoC makes a big difference here, but this is a pretty simple adjustment for future games.
I also need to spend some more time thinking about stacking AROs in deployment–that Libertos ganking the Zero on the catwalk might’ve been helped if I could get the Bolt KHD to help out the Zero had I placed the Zero on the ground floor. This is somewhat of a trap though, because pie slicing exists. I think the takeaway here is just to spend some more cycles in deployment working out mutual support from units.
So, let’s summarize: limited insertion, at least the way I think I should be playing it, is not about making risky big plays. Set up the low risk, slow grinding, pressure game. Attack the enemy’s order pool (order pressure), board control (positional pressure), and set up bad situations for your opponent (psychological pressure). In this game that meant ramboing the Kriza around to wipe McMurrough’s order pool and take out as much of the link as possible. The high risk play of running in the Uberfall didn’t succeed and I didn’t develop my board at all as a result. Even though I killed Saito, Adam’s Plan A of giving McMurder 8 orders was still functional.
I could have ramboed the ORC HMG up, but that would have exposed Valkyrie and Avicenna to some pretty awful stuff as they got closer to the link. I don’t think I had enough orders to kill the flash pulse bots and get close enough to threaten the link, kill them, and then set up to defend. I should further note that ramboing the Kriza around also requires that I spend some orders setting up the rest of my list for success. Really, a very challenging mission to play with a really challenging list. I’m curious to try out the ORC HMG/Avicenna/Valkyrie core in a less ridiculous scenario, see how they do.
My deployment could use some work too. We’ve been moving towards a very null-deploy heavy meta here, which means warbands and the like are quite strong. I think MSV2 ARO is more important, with the understanding that you will lose it once the warbands move. That and more midfield control. The problem is that you need to have defense in depth in the midfield, and most factions, aside from Hassassins and probably SEF now, can’t really give you the crazy defense that you need, at least if you’re turn 1 reactive.
Now that I’m three losses in with Foreign Company, I’ve started to get a feel for how they work. Excellent gun platforms, decent midfield presence (albeit at the expense of specialists if you take all minelayers), and some weird quirky things like the Uberfall. I’m really pleased with the inclusion of the Uberfall, as I wanted to learn how to use them and for some reason Foreign Company feels like the right place to do that for me. I absolutely understand that they shine with Morlock support for impetuous smoke and chain rifle screening, but for some reason I’m just more inclined to use them in ForCo, which means I’ll actually invest more orders on them, thereby getting that all-important experience.
ForCo feels expensive. They have AVA 1 Fugazi and Mulebots, which is pretty annoying if you’re trying to go the order spam route. Your next best bet is spamming 3 CSU. I think the 12-point SO Rifle/LSG/Nanopulsar guy is the right choice, even though the 11-point BSG guy is cheaper. The extra toolkit and the training to push buttons is totally worth that extra point. Securitate are also spammable, coming at 13 points for the cheapest profile… but unless you’re planning on littering the backfield with boring Securitate, you’re going to want to take some of the cooler profiles like the Feuerbach, HMG, or repeater.
ForCo removes a lot of the Nomad “tricks,” even though we have access to a good deal of Nomad stuff. It definitely feels accurate to the fluff, which is a bunch of showboating PanO stuff and flashy characters prancing around while the Nomads do all the work. I think if anything, if I continue to invest a lot of effort into ForCo I will become much more proficient at using Zeros to get a lot of work done. It’s kinda funny, really. Last game the ORC HMG did a lot of work for me, but it wasn’t real work, it was just PanO showing off PanO ballistic skill. Killed a few things but ultimately it wasn’t enough. One imagines the ORC posing for instagram selfies in his power armor after each kill, wasting valuable time. Funnily enough, they have AVA2 on Warcors, presumably to capture all the action!
Their extremely restrictive link composition rules means you’re basically carting around expensive characters with very situational utility. Valkyrie is a close combat goddess and a survivable gunfighter, but I’m not sure I want to blow up almost 40 points. While I like toolboxy characters, and Valkyrie is decently toolboxy, I don’t think she’s toolboxy enough to justify her price TAG, especially since I have to protect her.
The links she can be a part of, like the Avicenna/ORC link, are good, but they don’t have a great set of defensive tools–basically I’m hoping that they stall out the attack long enough for Avicenna to pick up the pieces. A Bolt-based link would be better here, as I could throw drop bears and such as I settle in for the reactive turn. This isn’t to say I can’t screen the link with Bolts or Zeros, but that’s concentrating threat and applying order pressure to myself.
I think ForCo is a very challenging sectorial to play. They demand careful attention to prioritization in order expenditure, and positioning is absolutely critical for them. I think that Akali are very important as well–really you want to clear out the AROs to let the specialists saunter into position. Very NCA-like, I’m told. Well, I’ve written a bunch of mostly unorganized thoughts down now, and given a short first impressions of ForCo. Hope that was useful. Thanks for reading!
Further Discussion
I’m enjoying the engagement the battle reports have been generating recently, here’s a discussion from my local meta about the game:
xammy
@WiseKensai after reading your latest battle report I find it interesting that you are happening into PanO style strategic thinking… like utilizing gun power to clear way for the real workers.
… I don’t know if it’s a good thing really… I just find it interesting at the very least I feel like that’s an area I need to grow in as a PanO player… what tools outside of shoot with good shooter
natetehagressar
@xammy: all factions work that way. You clear threats with guns or smoke, because if you don’t your opponent gets normal rolls while you try to press buttons
xammy
lol sure, I guess it’s the lists he’s brought recently… LI + not as many mid fielders feels a lot like NCA/MO… where your first/biggest hurdle is getting out of the DZ
having zeros is so amazing for ForCo cheap effective midfield is so nice
maybe it’s the innate risk that comes with shooting and how PanO defaults to that being the best option from their list of options (granted that’s not as much the case as it use to be)
WiseKensai
it’s more that for L&S i needed to do two things: smash the ac2 as well as prevent Adam from doing so.
running the Uberfall in only does one thing, killing shit with the kriza does both
Jhokalups
Looking at the data I have seen for L&S, it seems like protecting your own AC2 is more important than taking out the other one. At least turn 0 and turn 1.
xammy
which is why I have an entire combat group dedicated to defense
Jhokalups
Defending it can be done in a number of ways. For CHA defending the AC2 involves the CHA thing of, hey, look at all these warbands screaming up he board at you. Deal with it.
xammy
@WiseKensai
out of curiosity why are you sticking with LI lists recently?
WiseKensai
glutton for punishment.
but more seriously i couldn’t find a non-LI list out of ForCo that I liked for L&S. they were all just “fine”
xammy
I think you probably could do as well without the ORC
WiseKensai
run Valkyrie across the table by herself?
Jhokalups
ForCo seems hard in L&S, at least as part of the killing the AC2
xammy
@WiseKensai that’s what I mean about pano like strategies you end up with odd less than ideal options that are really GREAT at killing not as well at objectives
but a 3 man group is going to get there roughly as well as 1. 10 orders is so hard to run across the map with
WiseKensai
lol, yes. i’m very aware of this ?
xammy
LOL sorry for pointing out the obvious lol
WiseKensai
i’m just amused.
Jhokalups
I wonder, for ForCo, should plan A be having a specialist Zero pull out D-Charges and go for the hail Mary?
the reason why I wanted to take the 3-man core across is for the burst bonus.
xammy
for me, I would use the zeroes to plant mines and go on order killing
WiseKensai
since we agree that it’s hard to get across the board because orders are the limiting resource, i therefore have less orders to whack the AC2 with, so they’d better be pretty efficient
i think my current problem is i’m trying to do too much in one turn and I need to slow down.
i alluded to this in my post game analysis, but I didn’t make it explicit.
Funnily enough, Julian caught a mistake!
Julian
How did Valerya Oblivion you with a regular hacking device?
WiseKensai
lol, that’s a good point. not like it really would’ve mattered though.
Adam
Haha, because he told me she could. 😛