
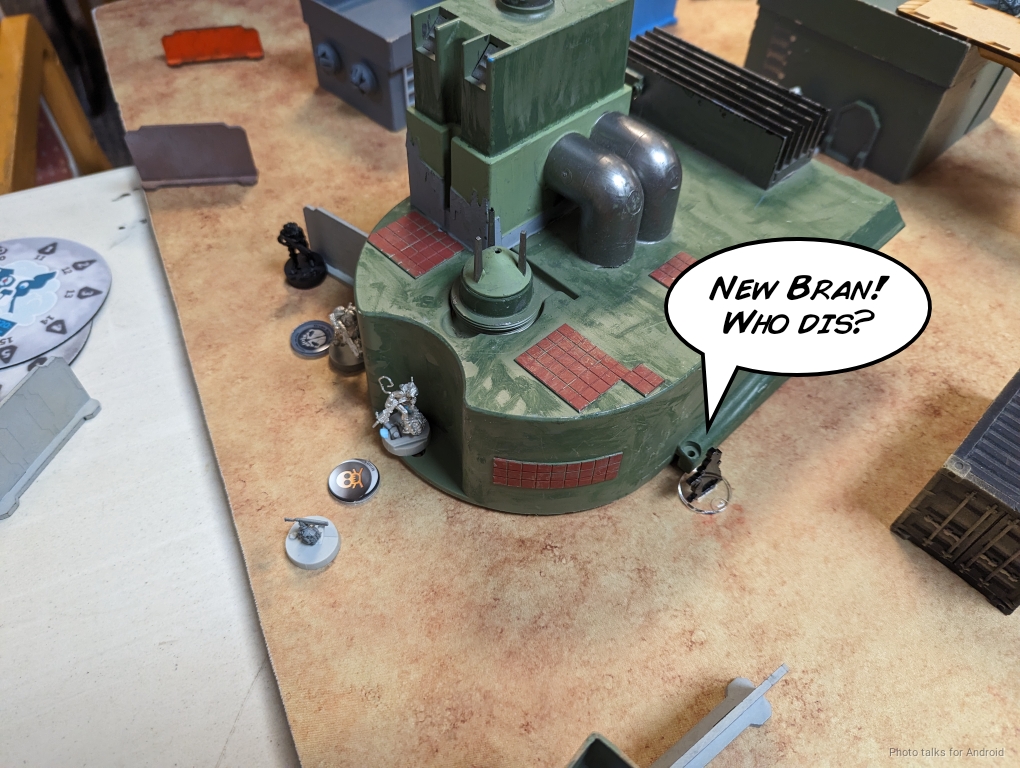
New Bran Who Dis
Well, after the grand success of my “play Bakunin like it’s vanilla” experiment,
I decided to see if it was a fluke. Time to give it the acid test of throwing it against Adam playing Dahshat in a game of Biotechvore!
Overview
- Mission: ITS14 Biotechvore
- Forces: Jurisdictional Command of Biotechvore versus Dahshat Company (300)
- Deploy First: Bakunin
- First Turn: Dahshat
Zero changes to the list from last game. I want to see if I can repeat the success and really understand how the list works.
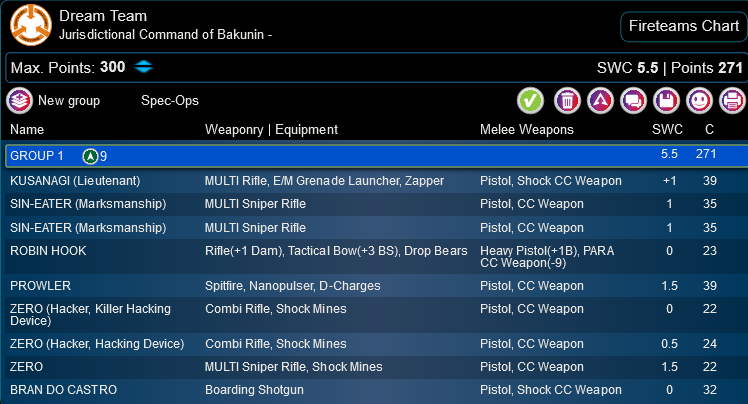
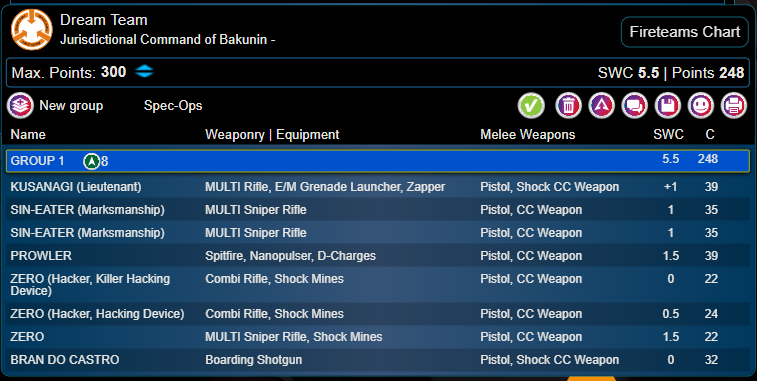
Dream Team
KUSANAGI (Lieutenant) MULTI Rifle, E/M Grenade Launcher, Zapper / Pistol, Shock CC Weapon. (+1 | 39)
REVEREND MOIRA MULTI Sniper Rifle, Zapper / Pistol, Shock CC Weapon. (1.5 | 29)
SIN-EATER (Marksmanship) MULTI Sniper Rifle / Pistol, CC Weapon. (1 | 35)
ROBIN HOOK Rifle(+1 Dam), Tactical Bow(+3 BS), Drop Bears / Heavy Pistol(+1B), PARA CC Weapon(-9). (0 | 23)
PROWLER Spitfire, Nanopulser, D-Charges / Pistol, CC Weapon. (1.5 | 39)
ZERO (Hacker, Killer Hacking Device) Combi Rifle, Shock Mines ( ) / Pistol, CC Weapon. (0 | 22)
BRAN DO CASTRO Boarding Shotgun / Pistol, Shock CC Weapon. (0 | 32)
10 | 7 SWC | 300 Points | Open in Army | Copy Code
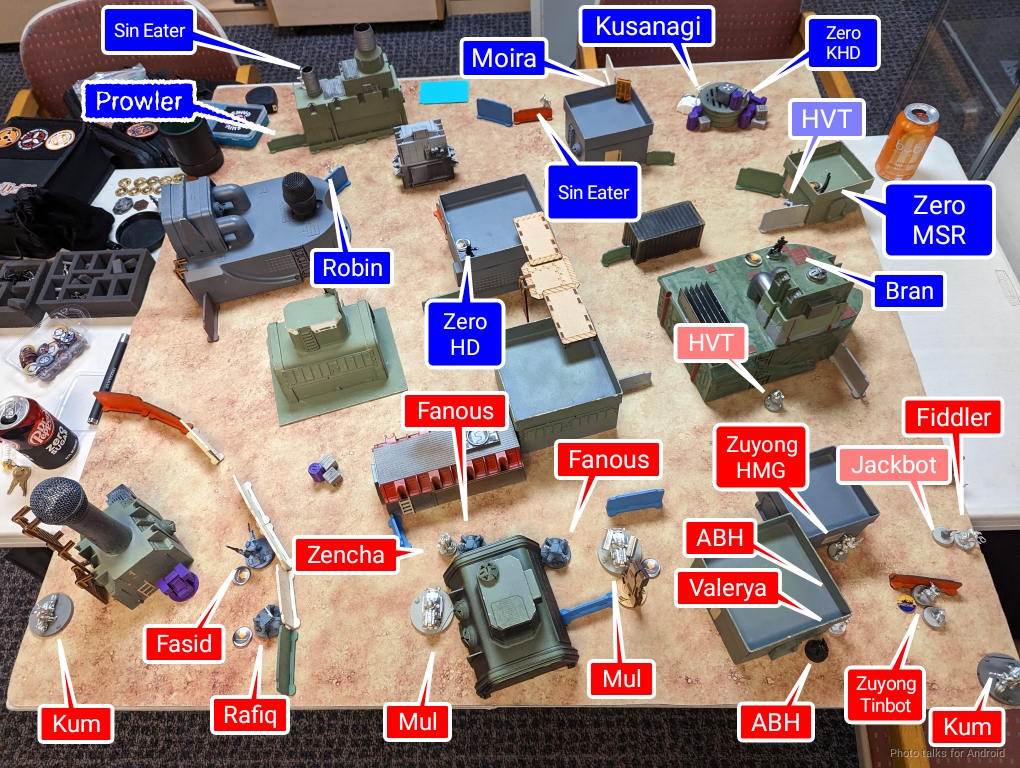
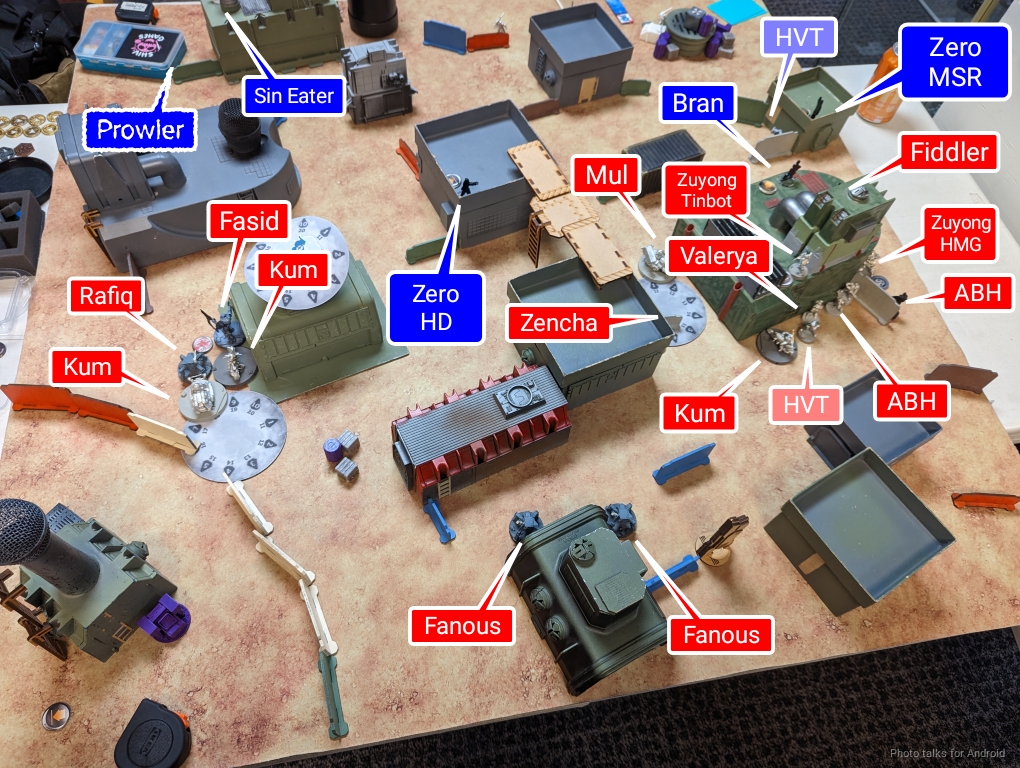
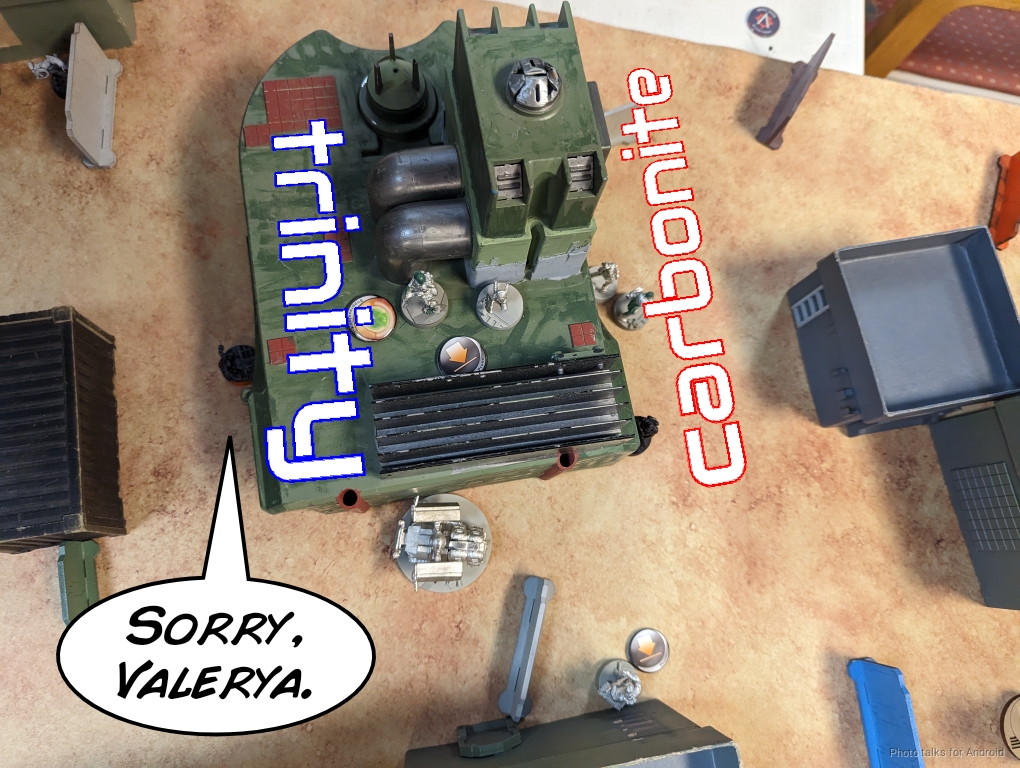
Adam brought the following filth to the table! He’s got a Zuyong core powered by ABH with Valerya. He’s taken a big risk in that the Zuyong HMG is both a gunfighter and his lieutenant, but he’s got plenty of ways to be non-interactive with Kum and an Al Fasid for smoke.
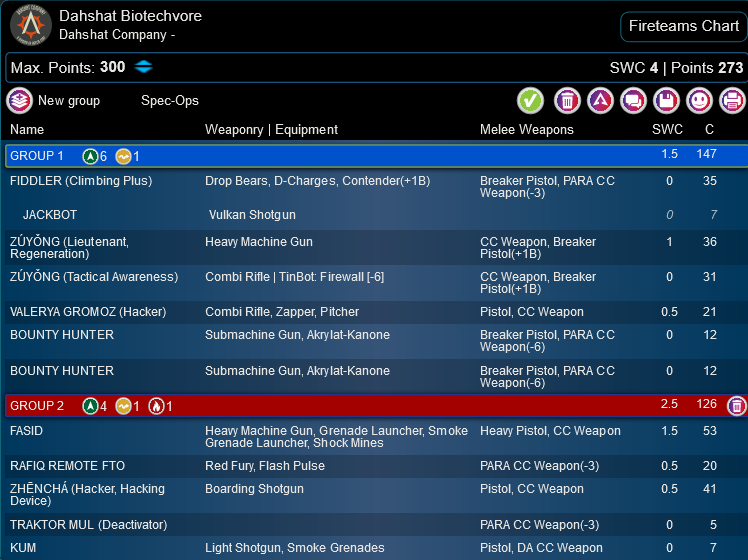
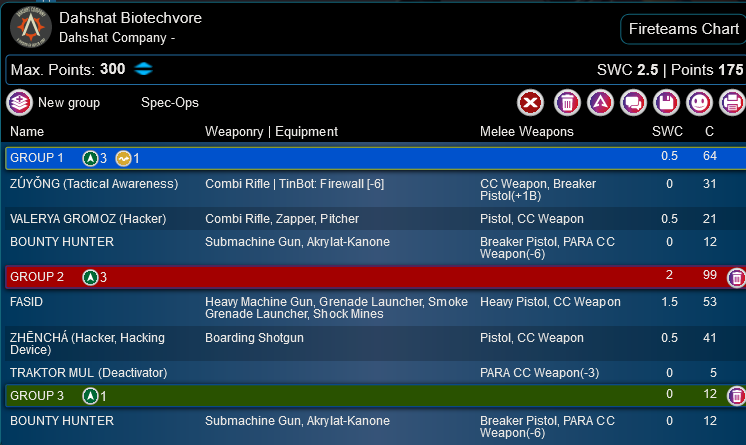
Dahshat Biotechvore
GROUP 1
1
FIDDLER (Climbing Plus) Drop Bears, D-Charges, Contender(+1B) / Breaker Pistol, PARA CC Weapon(-3). (0 | 35)
JACKBOT Vulkan Shotgun / . (0 | 7)
ZÚYǑNG (Lieutenant, Regeneration) Heavy Machine Gun / CC Weapon, Breaker Pistol(+1B). (1 | 36)
VALERYA GROMOZ (Hacker) Combi Rifle, Zapper, Pitcher / Pistol, CC Weapon. (0.5 | 21)
BOUNTY HUNTER Submachine Gun, Akrylat-Kanone / Breaker Pistol, PARA CC Weapon(-6). (0 | 12)
GROUP 2
FANOUS REMOTE Flash Pulse / PARA CC Weapon(-3). (0 | 7)
2
FASID Heavy Machine Gun, Grenade Launcher, Smoke Grenade Launcher, Shock Mines / Heavy Pistol, CC Weapon. (1.5 | 53)
RAFIQ REMOTE FTO Red Fury, Flash Pulse / PARA CC Weapon(-3). (0.5 | 20)
ZHĒNCHÁ (Hacker, Hacking Device) Boarding Shotgun ( ) / Pistol, CC Weapon. (0.5 | 41)
TRAKTOR MUL (Deactivator) ( ) / PARA CC Weapon(-3). (0 | 5)
KUM Light Shotgun, Smoke Grenades / Pistol, DA CC Weapon. (0 | 7)
4 SWC | 299 Points | Open in Army | Copy Code
Fiddler and a Zencha give plenty of options for classifieds as well.
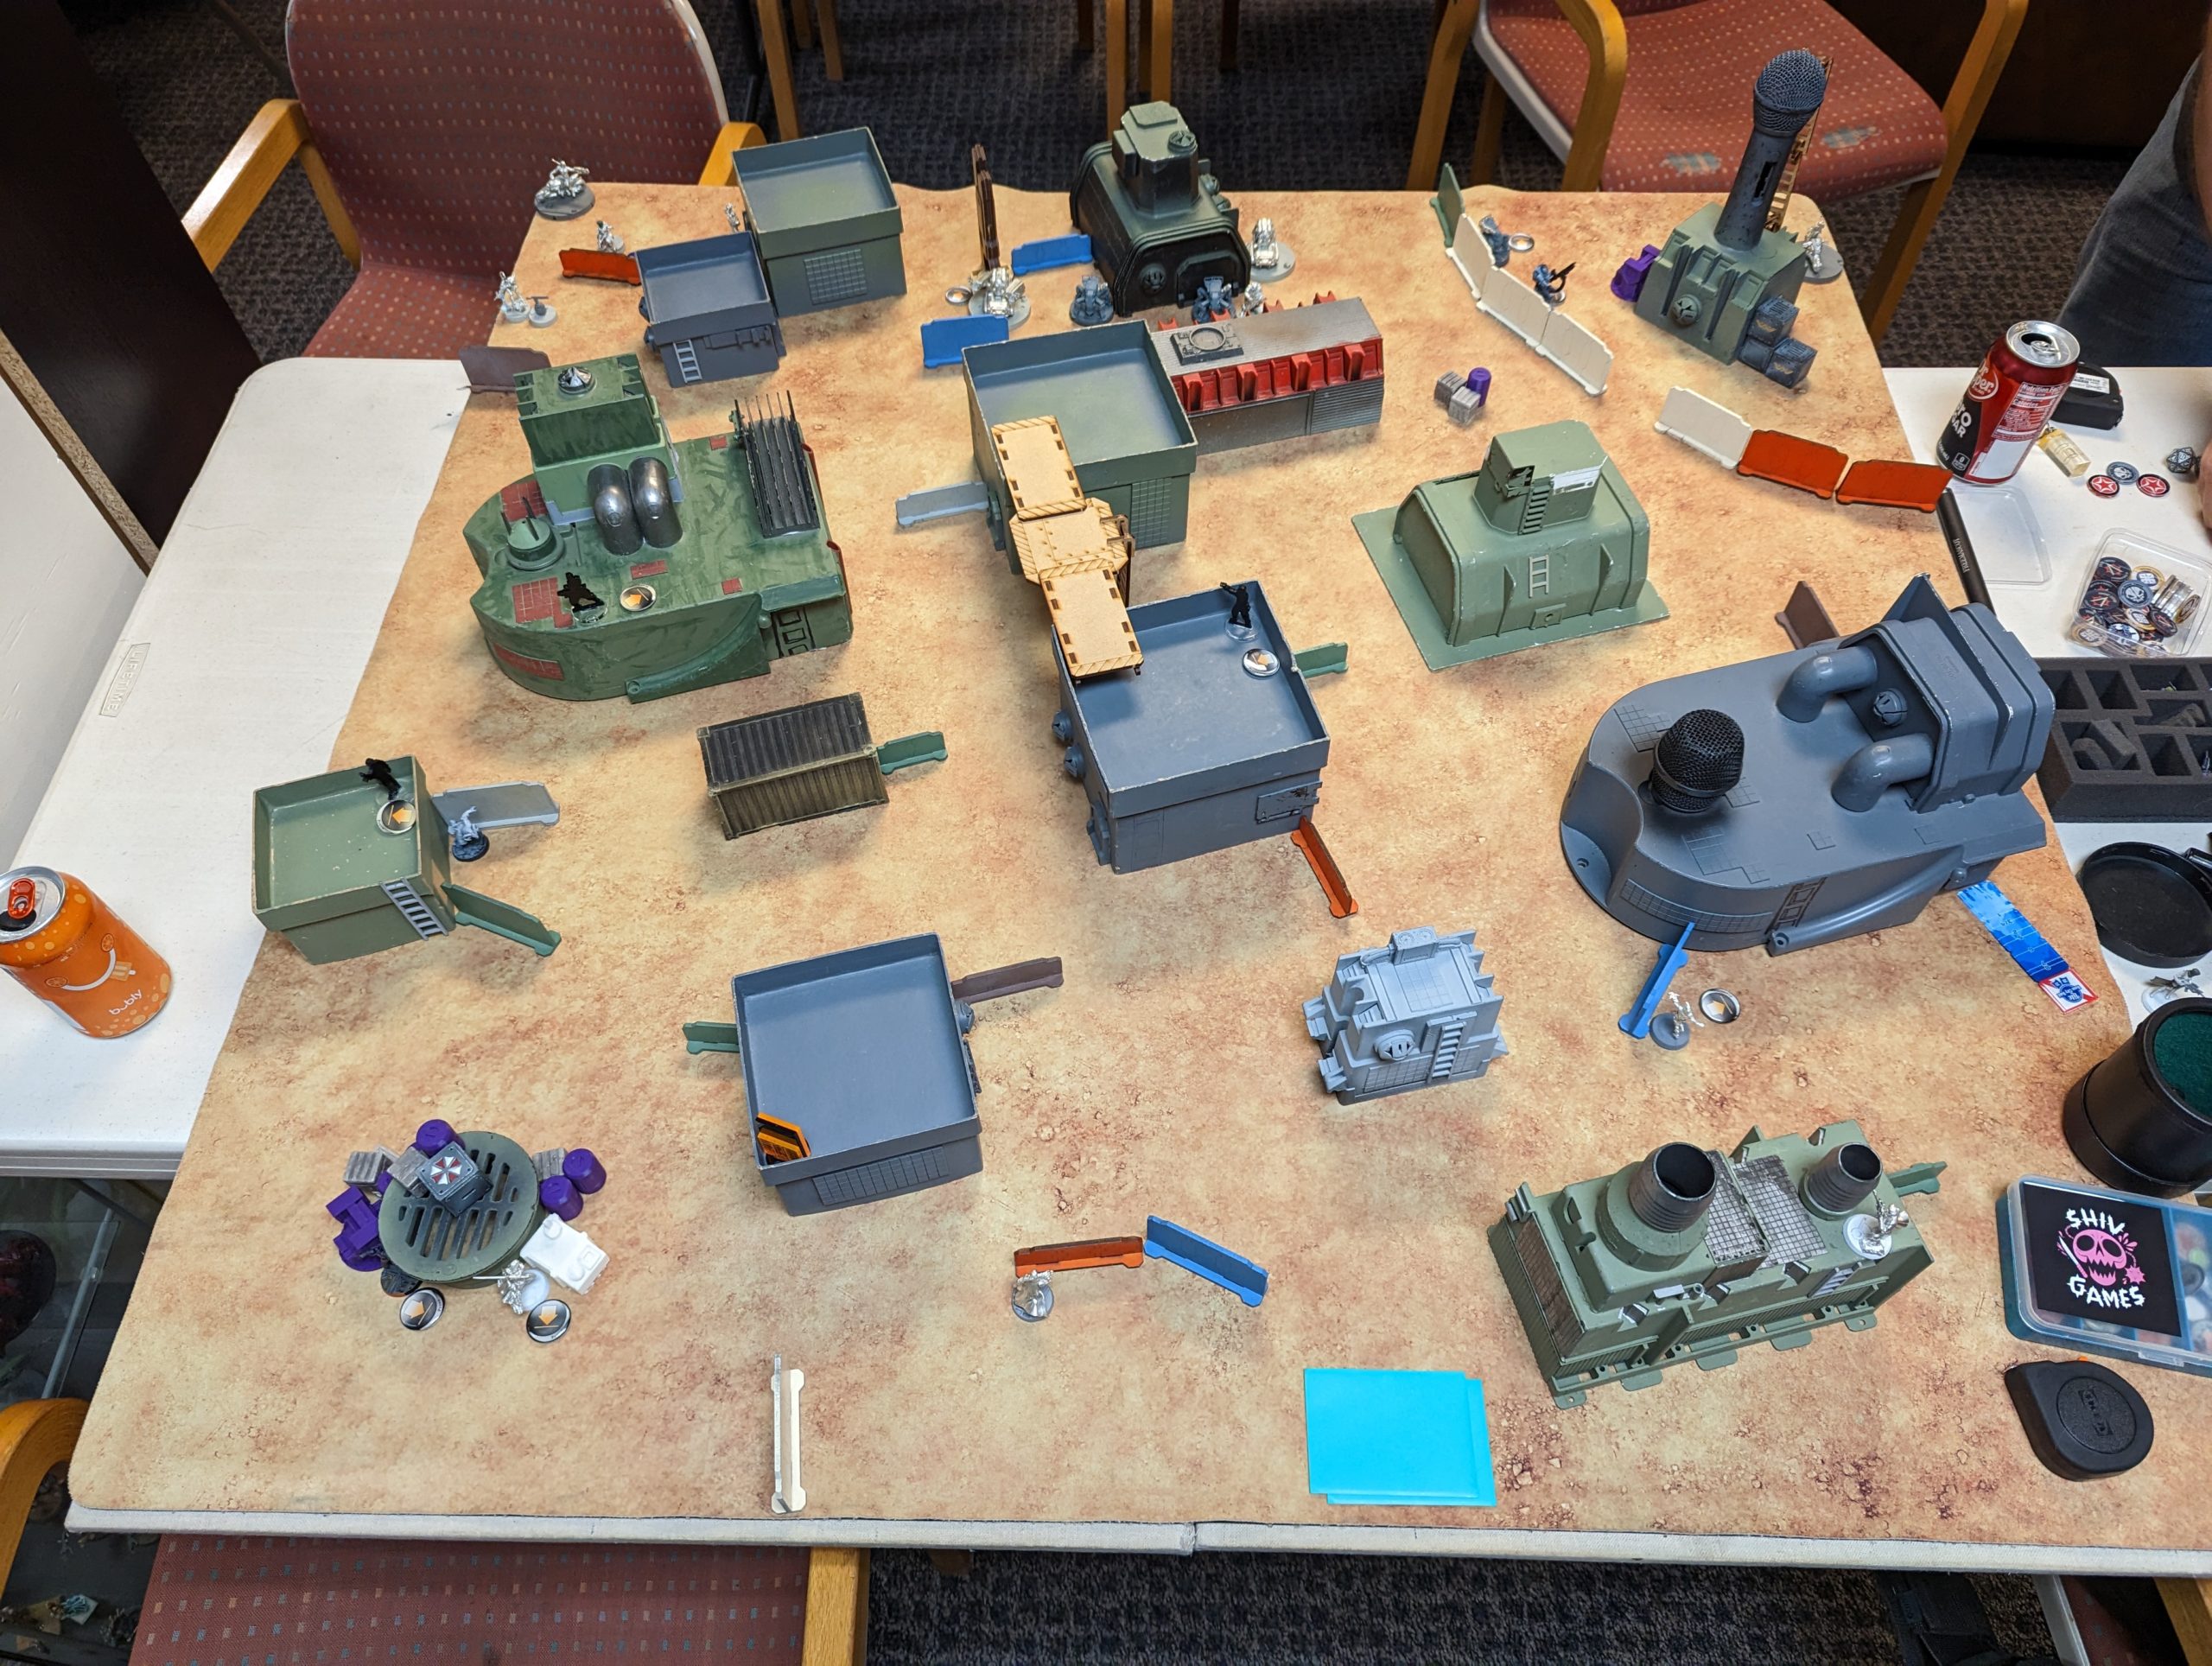
Deployment
Adam took deployment, so I took second turn. Deployment positioning isn’t as important in Biotechvore because you’re not staying there. My plan was to hold Bran in reserve and only infiltrate him up to the centerline in a position to punish Adam’s link placement. I also don’t have much in the way of decisions to make regarding deployment in my list, so going second and deploying first isn’t a big deal.
Biotechvore deployment is a strange beast. It demands that you not only deploy in a way that you can leave the deployment zone, but it also demands that you be within 2-3 orders of a safe spot in the midfield. If you do neither, then your opponent can severely punish you. I decided to hold Bran in reserve, infiltrate him up to the centerline, and thereby still get that PH 16 roll. Placing the Sin Eaters and Moira MSRs was easy. I was prepared to lose all of them in the first turn, but hopefully box Adam into his deployment zone and force BTS saves (and hopefully failures).
There are two main firelanes on the table, both slightly diagonal, so I put Sin Eaters watching both of them. They also have other lines of sight to prevent Adam from pushing too far up. The Moira backed them both up by stacking more AROs onto similar regions, but also by watching the left side of the table.
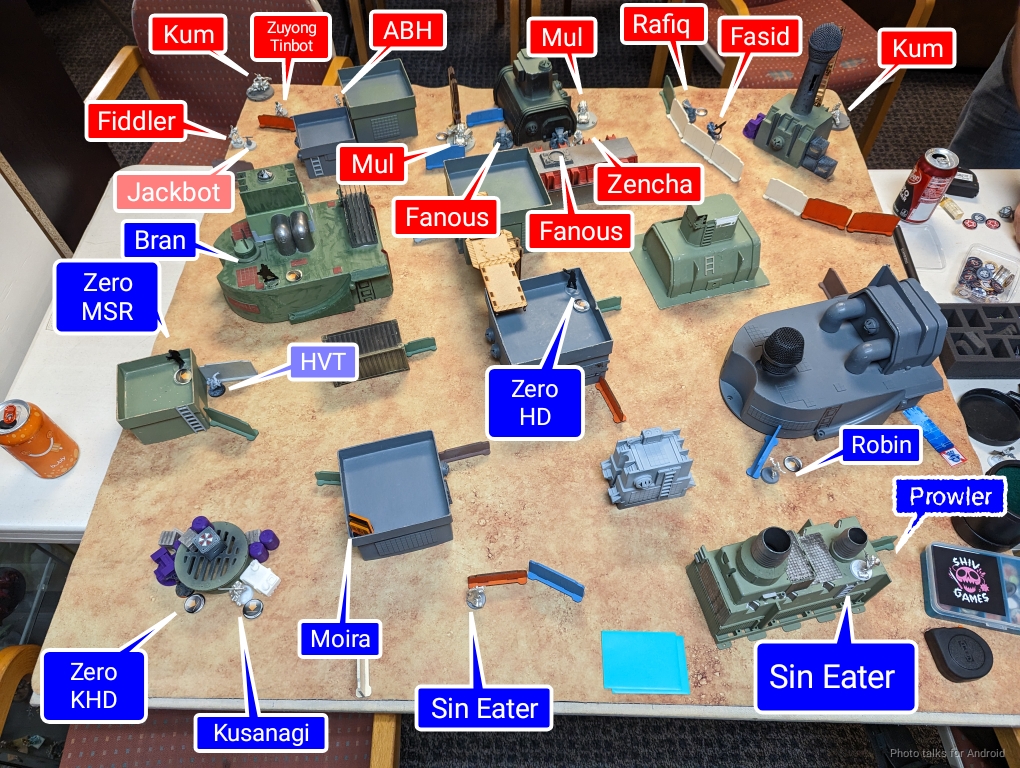
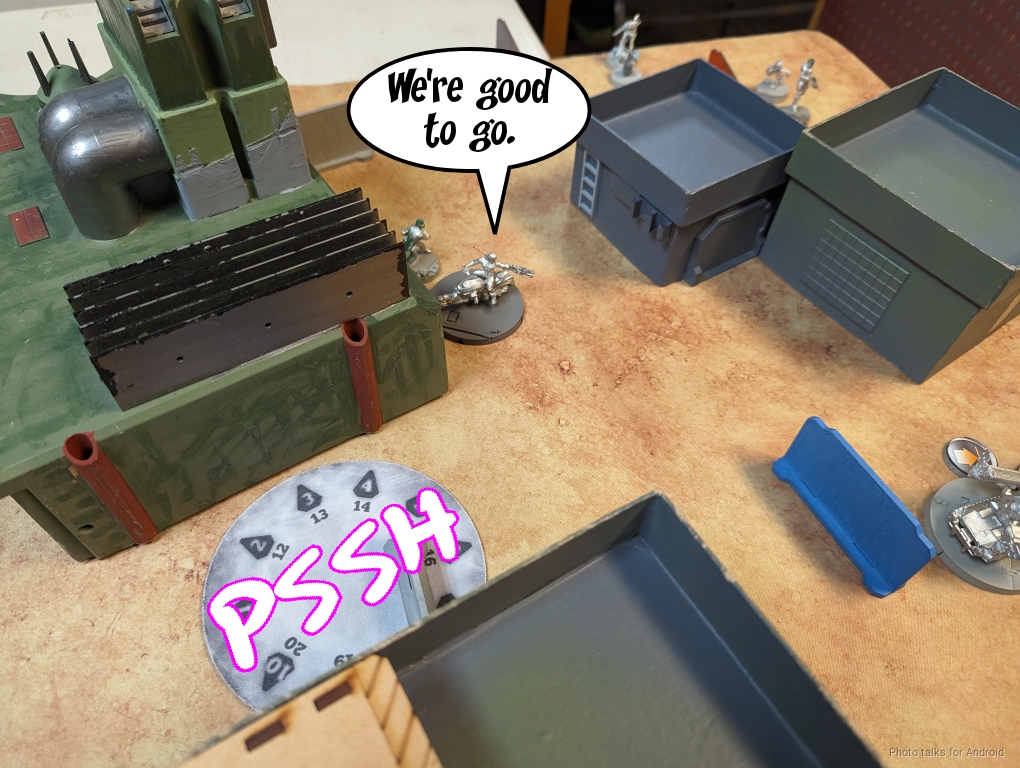
I attempted to infiltrate the Zeros, and got the MSR onto a roof on the left that was watching a horizontal firelane to a spot where Adam would have to go in order to be safe, but decided to leave the MSR prone to keep it safe. The Zero Hacker made it onto a building smack dab in the middle of the table, but the Zero KHD failed its roll and ended up on the left. Robin also made her roll, so she just was tucked just outside my deployment zone.
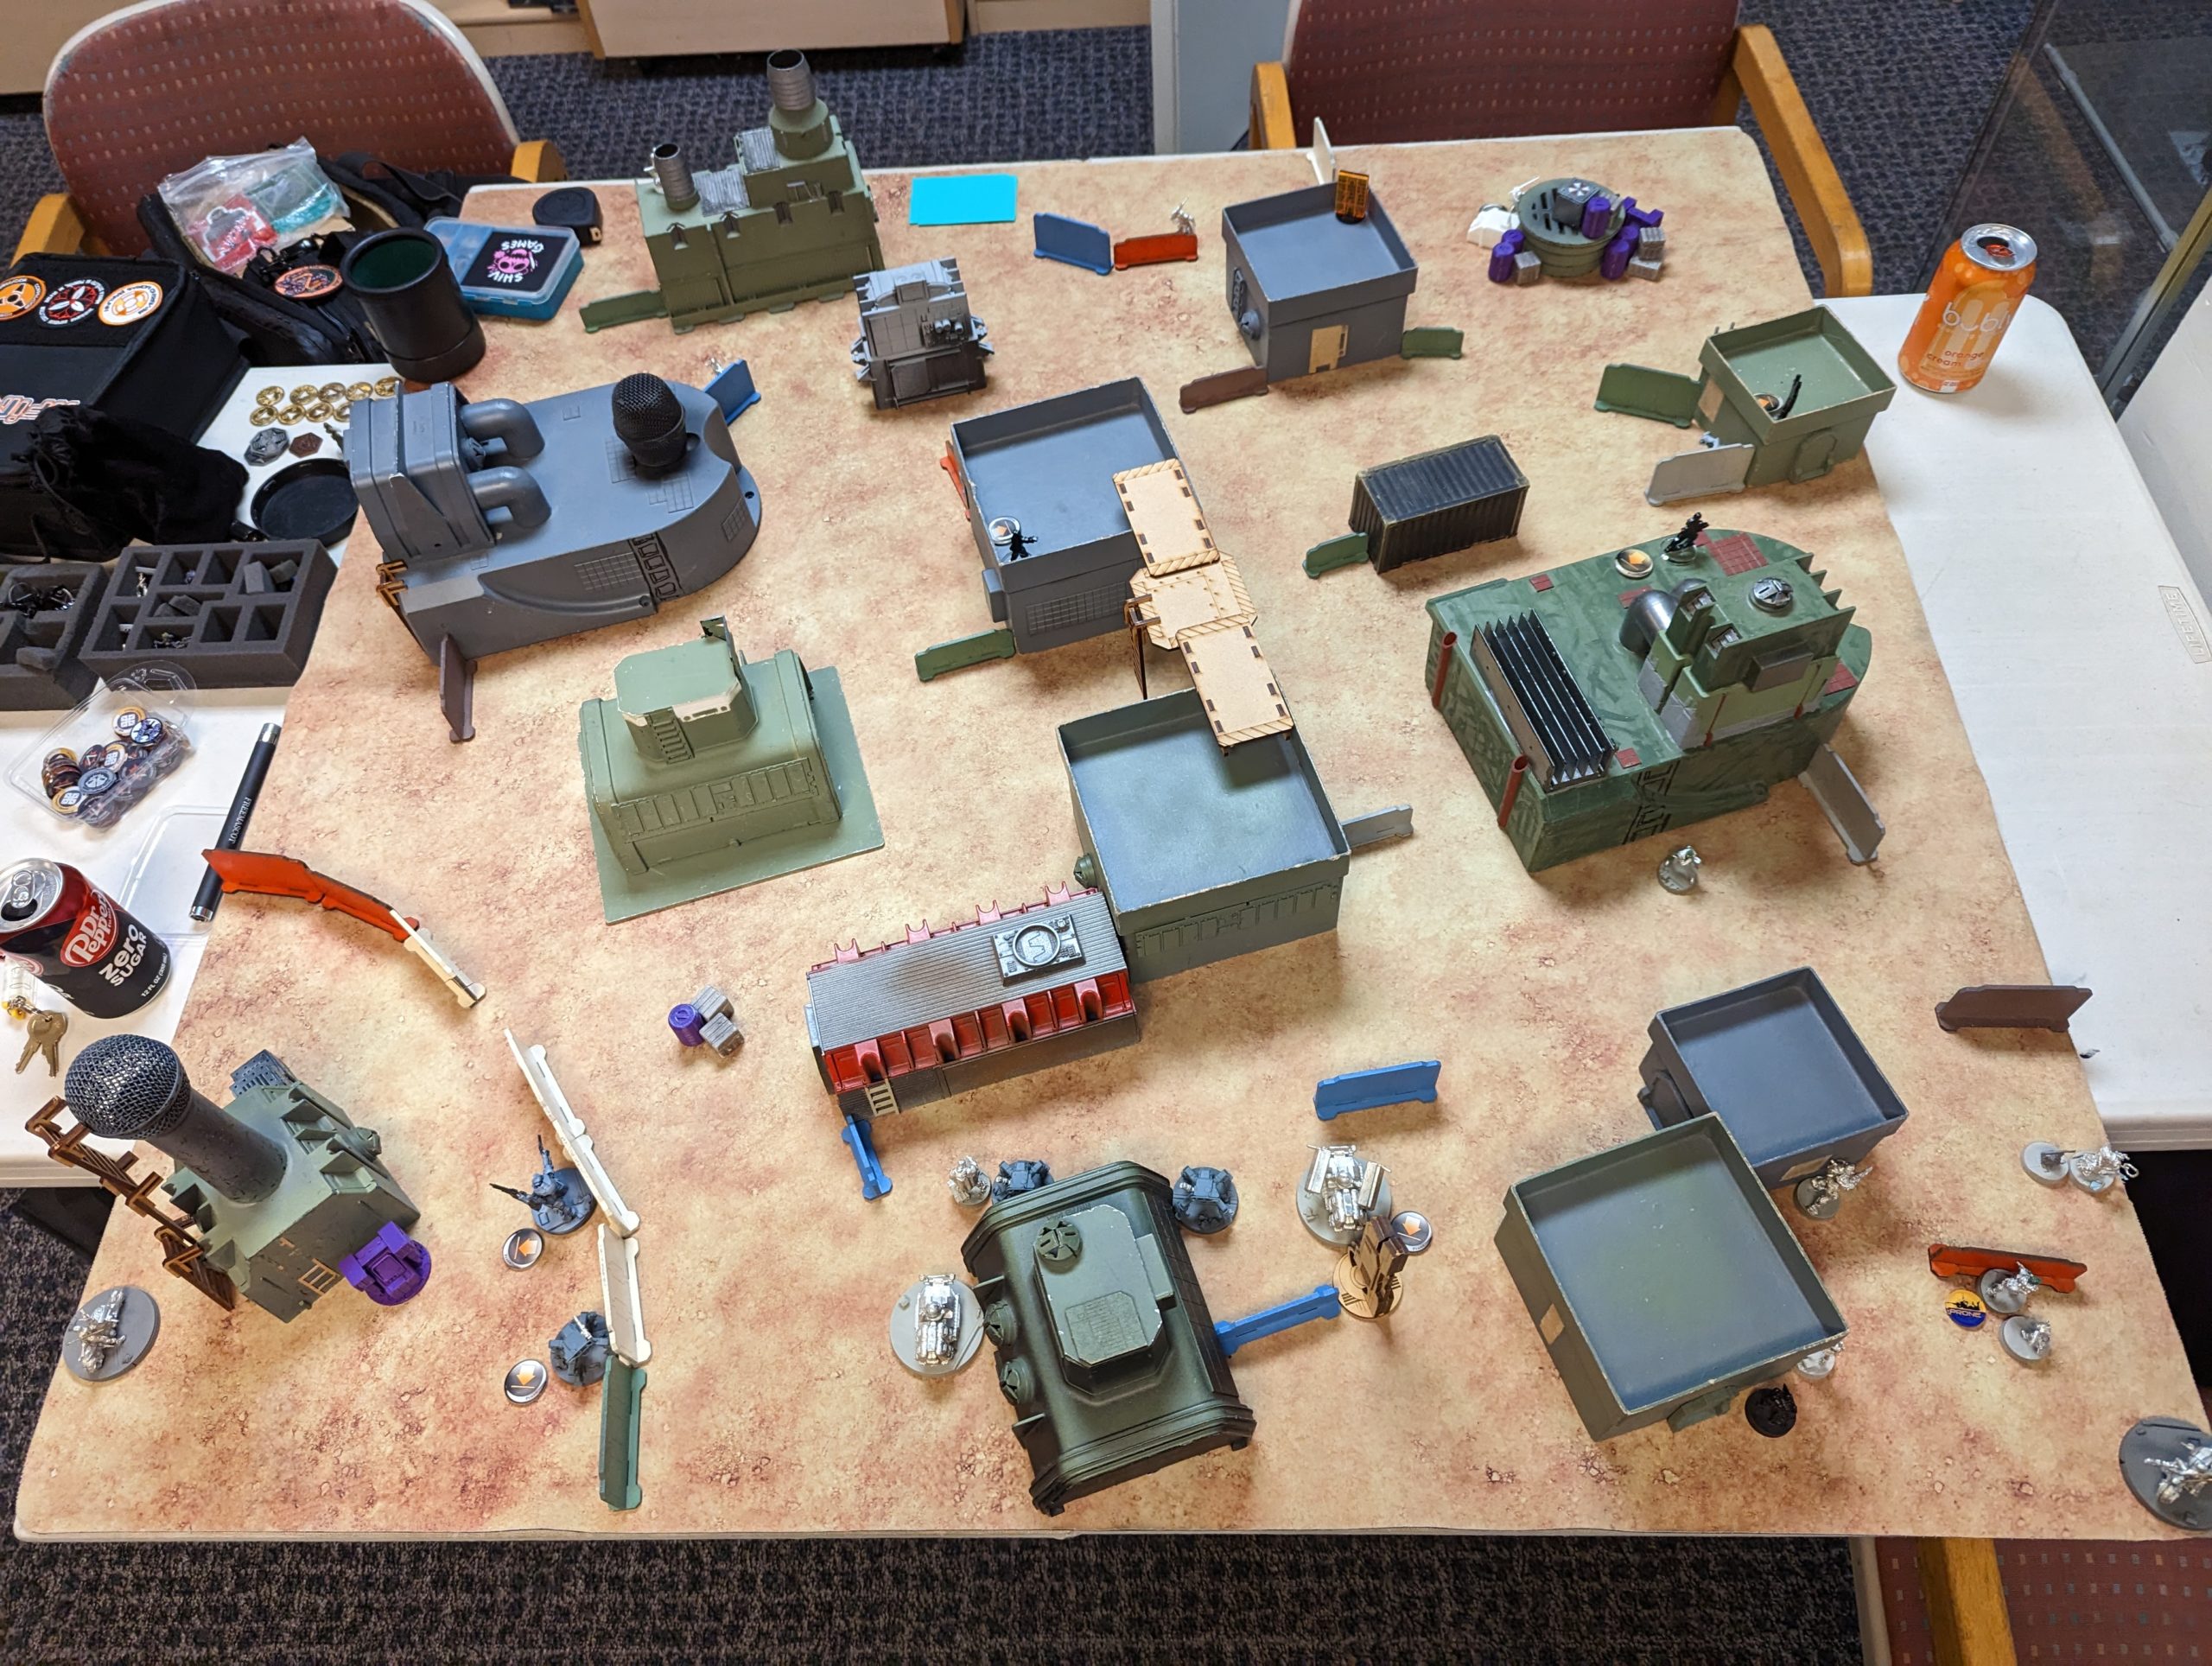
Kusanagi went on the left and the Prowler on the right, in my deployment zone, to have competent guns on both sides of the table. With that, it was Adam’s turn to deploy. He attempted and failed to infiltrate the Zencha, which is really good for me. That’s a big chunk of points and also a lot of classified capability that’s stuck in his deployment zone. He then split his links, with the Fasid/Rafiq on the left and the Zuyong core on the right. There’s really only two safe spots–the green buildings on his left and right, so he has to get there. The rest of his forces are just sort of scattered across the middle of his deployment zone, and he’s got Kum Bikers on both sides to provide smoke to help him against the Sin Eaters.
I put Bran just on my side of the centerline to give me the full +3 to PH (net) after confused deployment. I chose the roof right in front of Adam’s link, because that would be the _most_ irritating, and I already and a Prowler and Robin Hook on the other side. Adam held the Al Fasid and Rafiq in reserve, and they ended up on my right.
Turn 1
Top of 1 – Dahshat
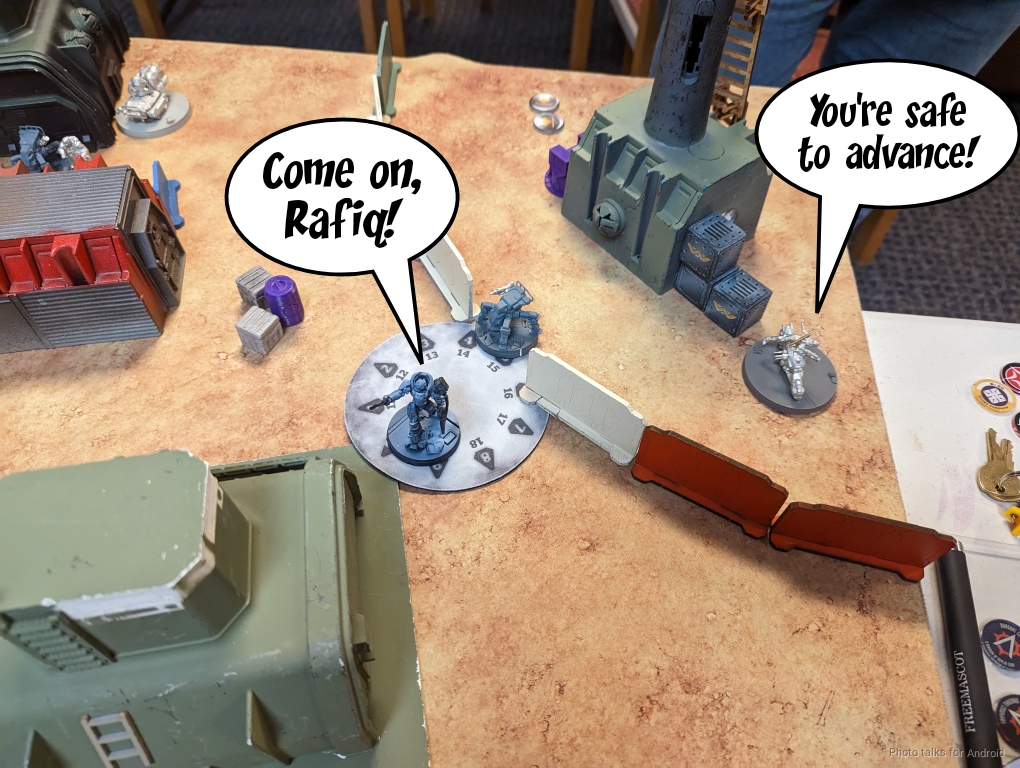
The only real threat to Bran is Fiddler, so I debated taking orders from that pool. I looked more carefully at Adam’s list though, and really the big hit would be to keep him to 1 command token to only allow him to coordinate out one set of order generators (the Fanous xor the Traktor Muls). Adam made extra unhappy noises, so I knew I had chosen correctly. With all the Sin Eaters around, I knew Adam would have to spend a fair amount of orders throwing smoke, which is exactly what I wanted to happen. He got some smoke with both Kum…
let the Al Fasid/Rafiq team scoot out of their corner in relative safety.
Next Adam decided to challenge the Moira MSR, which I thought was pretty gutsy, especially for his Lieutenant.
| 20.9 | 35.5 | 43.6 |
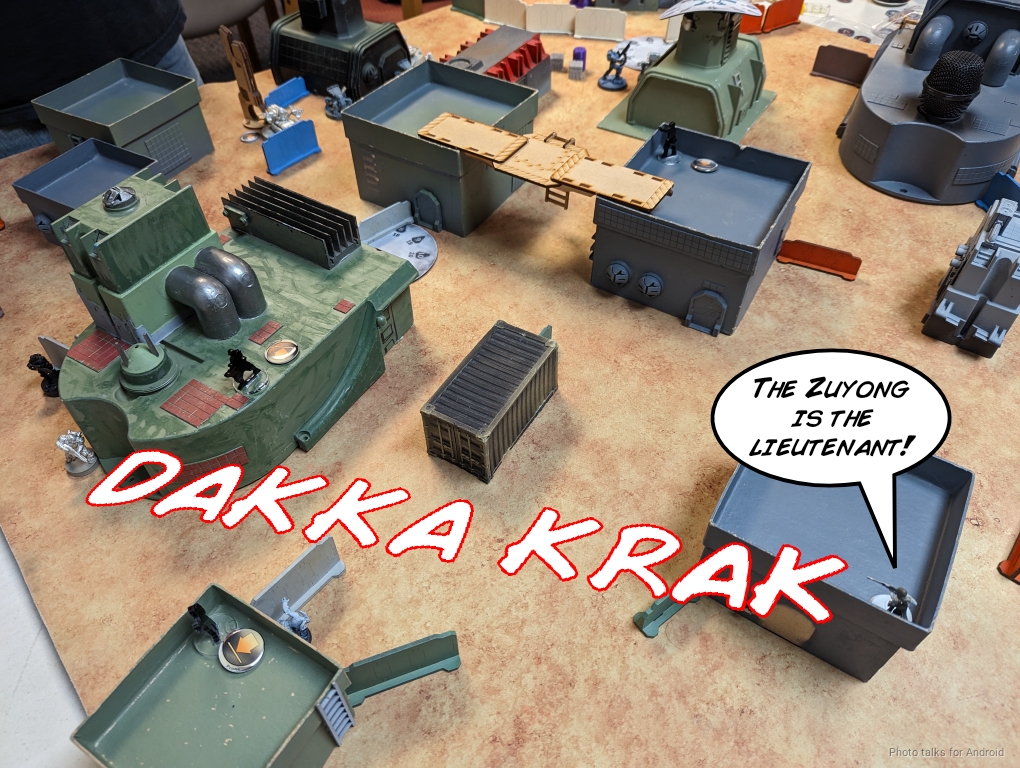
He’s got a 16% chance of losing the Zuyong and then having to attempt a regen roll, which feels really unnecessarily risky to me. It works out for him though, and I lose the Moira after two orders of him blasting away. The Fasid takes on a Sin Eater next, which is definitely in my favor in terms of draining orders:
| 41.2 | 36.4 | 22.4 |

I do manage to land a hit but the Fasid’s high ARM keeps it safe. Adam spends a few more orders getting the Fasid and Rafiq situated, and then he has a few to pump into Fiddler. He knows he’s got to stall out Bran so after putting the Zuyong Tinbot in Bran’s way on the roof of the building, Fiddler drops a mine in Bran’s other path forward.
Adam manages to get the Traktor Muls out, but not the Fanous, which is fine by me. The Mul on the left is just inside the biotechvore zone and goes down, as do both Fanous and the Kum on the right.
Bottom of 1- Bakunin
I’m not really in all that much trouble here and Adam has a lot of positional weaknesses to exploit. After getting everyone out of the Biotechvore zone or within an order or two of getting out, I can start making my attack run. I get Bran off his roof with a Super Jump and set up for a coordinated with Kusanagi that also lets me get some movement on the Sin Eaters to complete their exit from the zone.
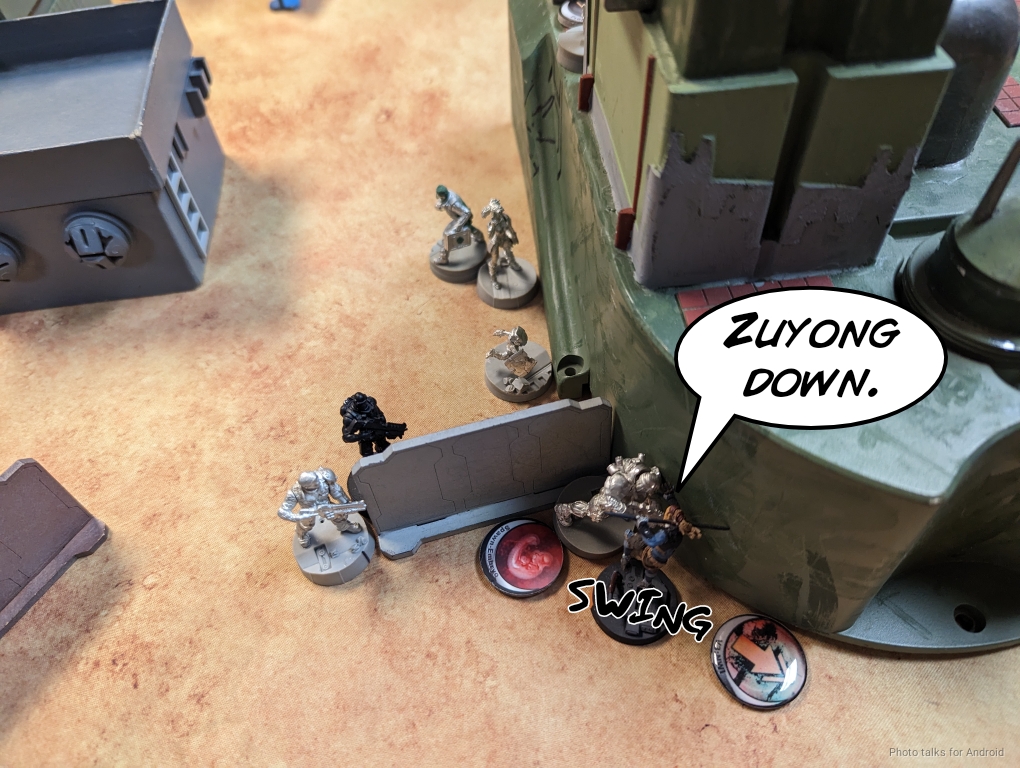
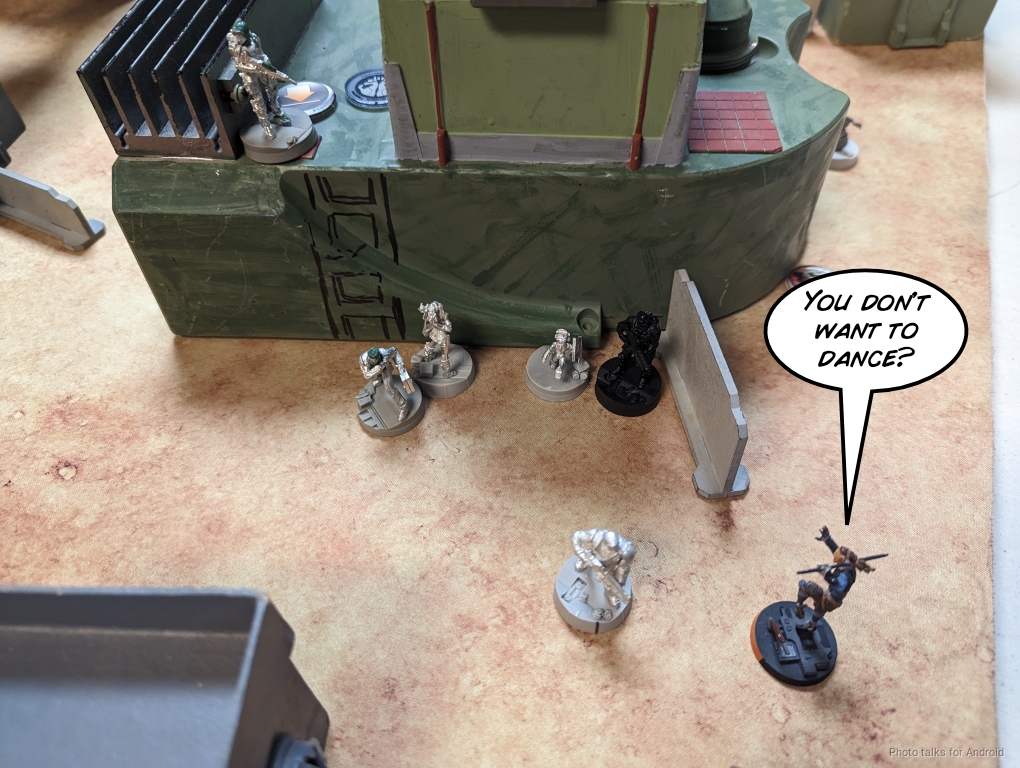
Kusanagi pops up and drops a E/M grenade on the ABH in the back. She can’t see the Zuyong through Fiddler, but she can see the ABH and the template covers the Zuyong, so that’s fine. Bran forces the dodge on Fiddler, the Zuyong, and the ABH by laying a template and face tanks the mine.
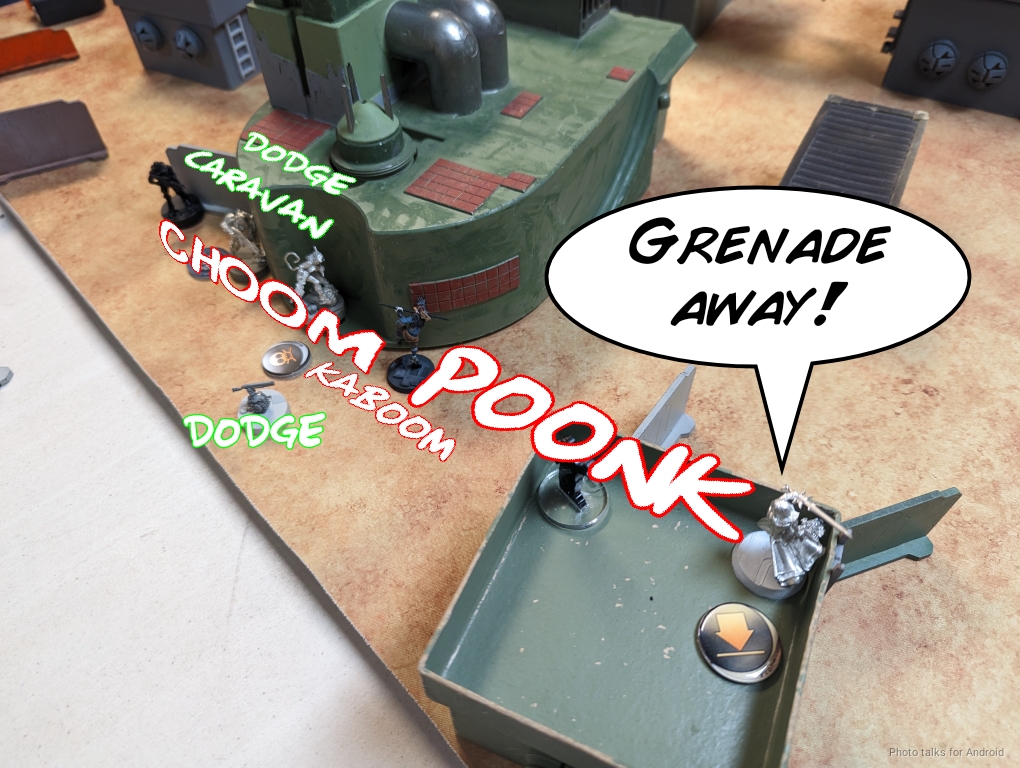
Adam passes the dodge against the shotgun on everyone, dodging the Jackbot into close combat with Bran. Kusanagi, however, beats both the ABH’s dodge and the Zuyong’s dodge. The ABH fails its BTS saves and fails guts around the corner so I can’t keep generating templates off of it. Unfortunately for me, the Zuyong passes both its BTS saves!
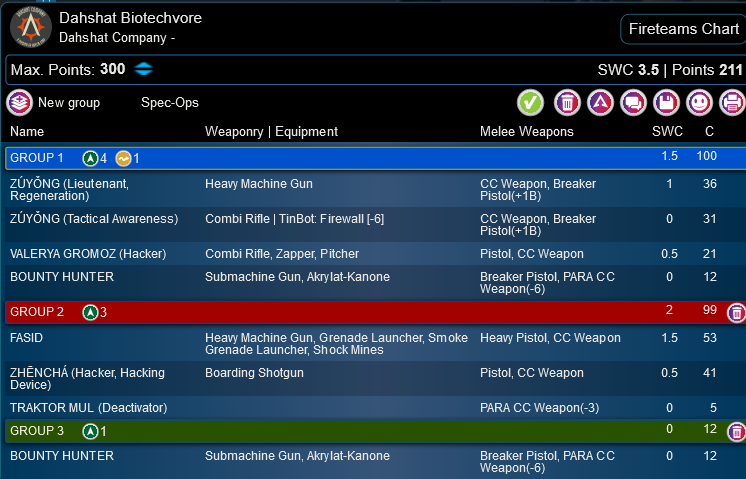
Now to attack the other flank. Robin Hook comes around the corner and lays a flamethrower template (thanks, Booty roll!) across everything, forcing a dodge on the Kum and Rafiq. The Al Fasid laughs in the face of danger and fires back with a Heavy Pistol.
Robin Hook takes a wound, the Fasid passes ARM, the Kum dodges, but the Rafiq takes a wound and goes unconscious. I leave Robin Hook in template range and go back to the problem of Fiddler. I’ve got Fiddler out of cover with Kusanagi, but dodging on 15’s is still pretty good:
| 64.3 | 35.7 |
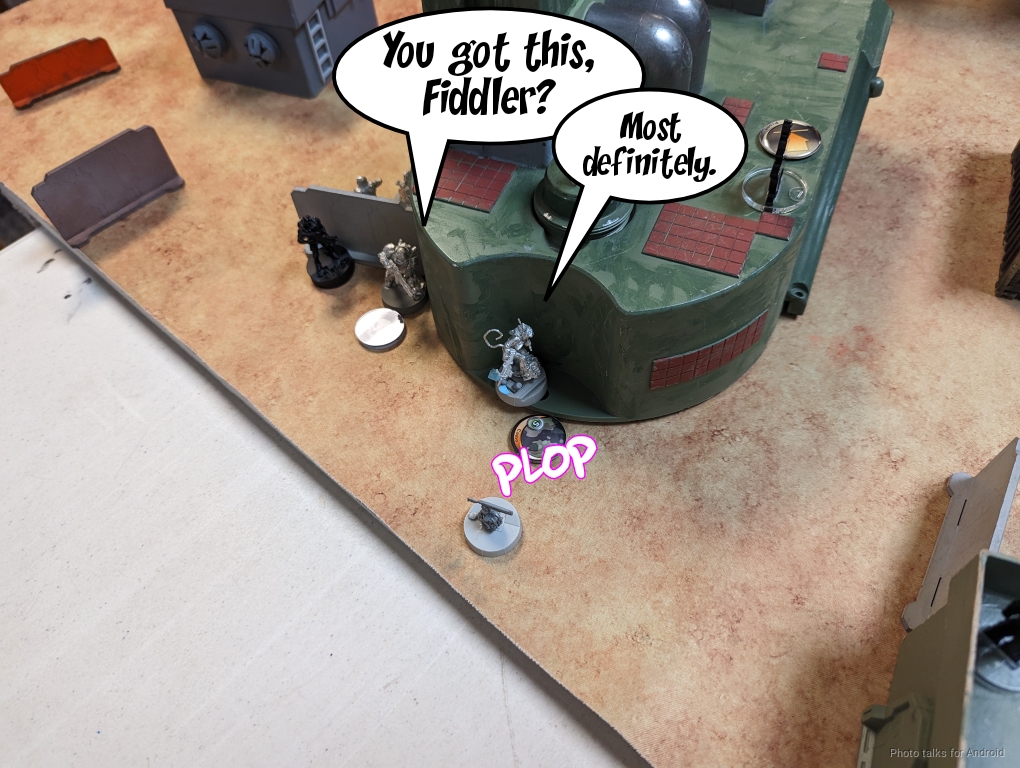
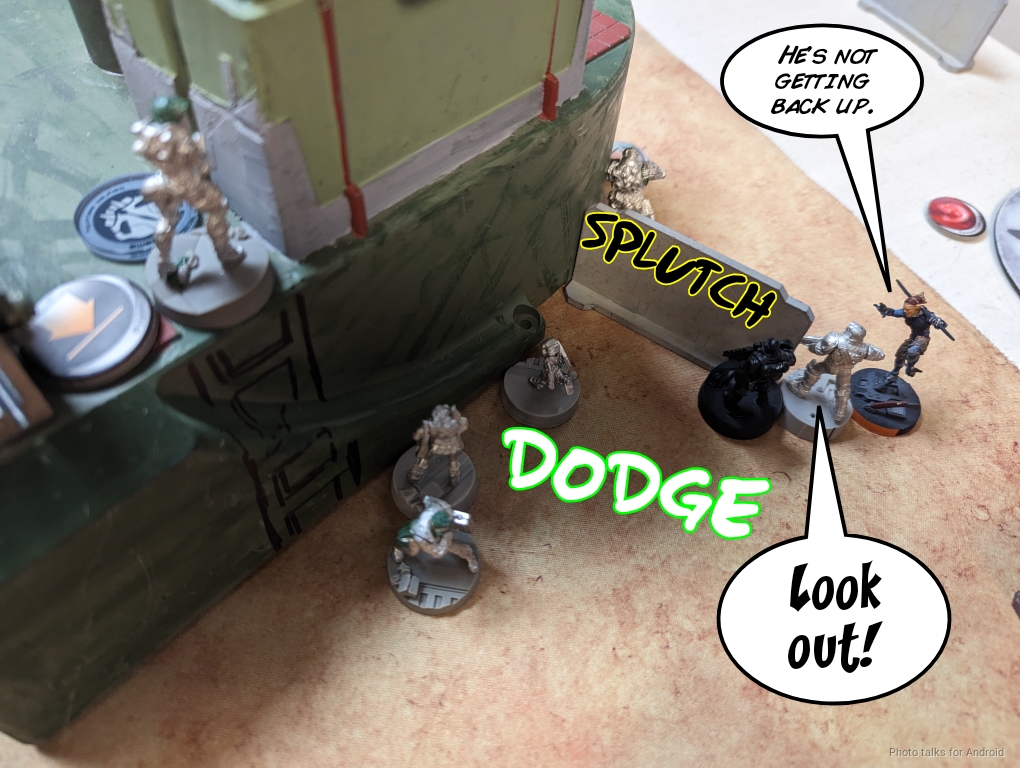
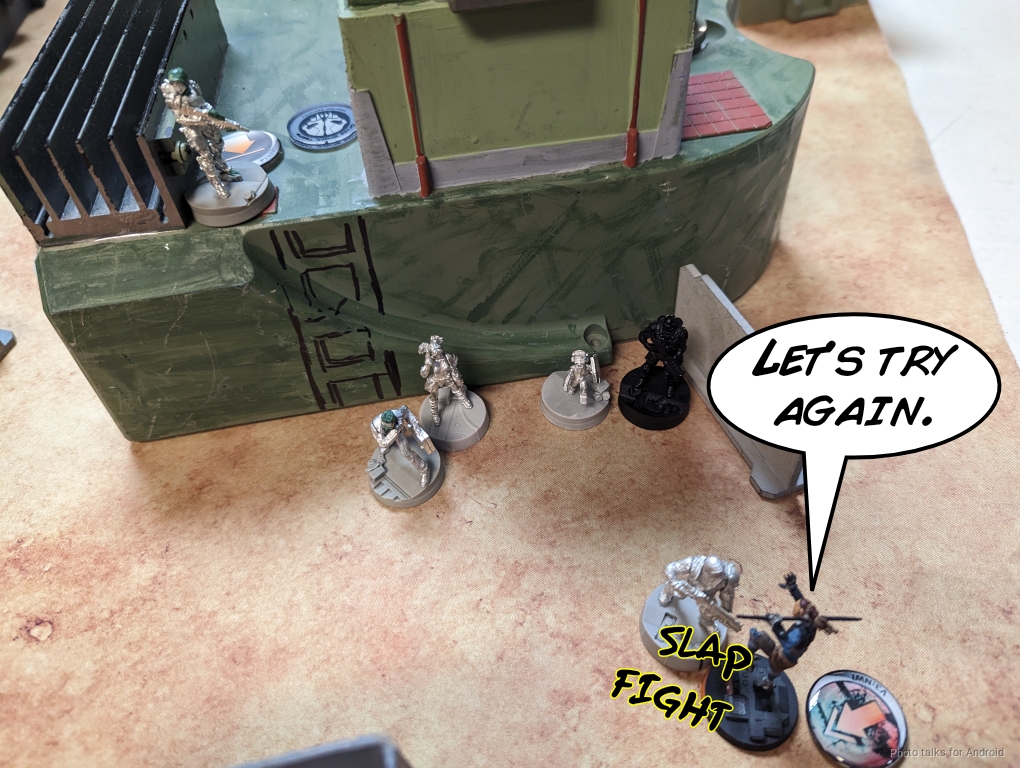
Fiddler dodges into close combat with Bran after taking one wound, so I take the opportunity and swing with Bran. Burst two PARA -3 makes this pretty dicey, but it’s not particularly dangerous for Bran:
| 39.9 | 36.4 | 23.7 |
I get it done and Fiddler is off the table. I roll into close combat with the Zuyong Lt on my last order and swing, leaving Bran as a problem for Adam to solve:
| 54.4 | 39.0 | 6.6 |
I don’t crit and the Zuyong passes the one save it has to make. I’ve done what I need to do–everyone is out and I have some very annoying problems for Adam to solve.
Turn 2
Top of 2 – Dahshat
The Kum cancels its order then goes backwards around the building to try and deal with Robin Hook. The super annoying thing is that I can’t see the Kum because of the Fasid being in the way–I’m not far enough to the right to see it behind the Fasid. I have to dodge, so I do that.
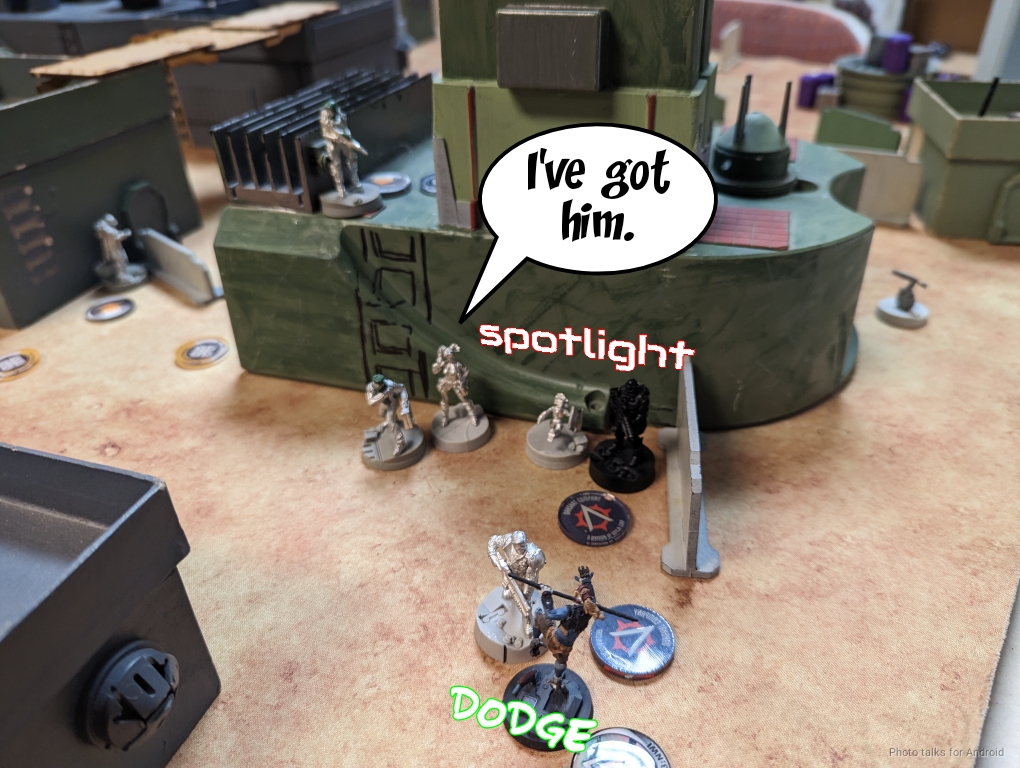
The Kum comes in on another order and I dodge instead of templating. I think this is a mistake, because the Kum has a shotgun for my dodge roll, but I do snag Telemetry via Robin Hook’s repeater before she goes down.
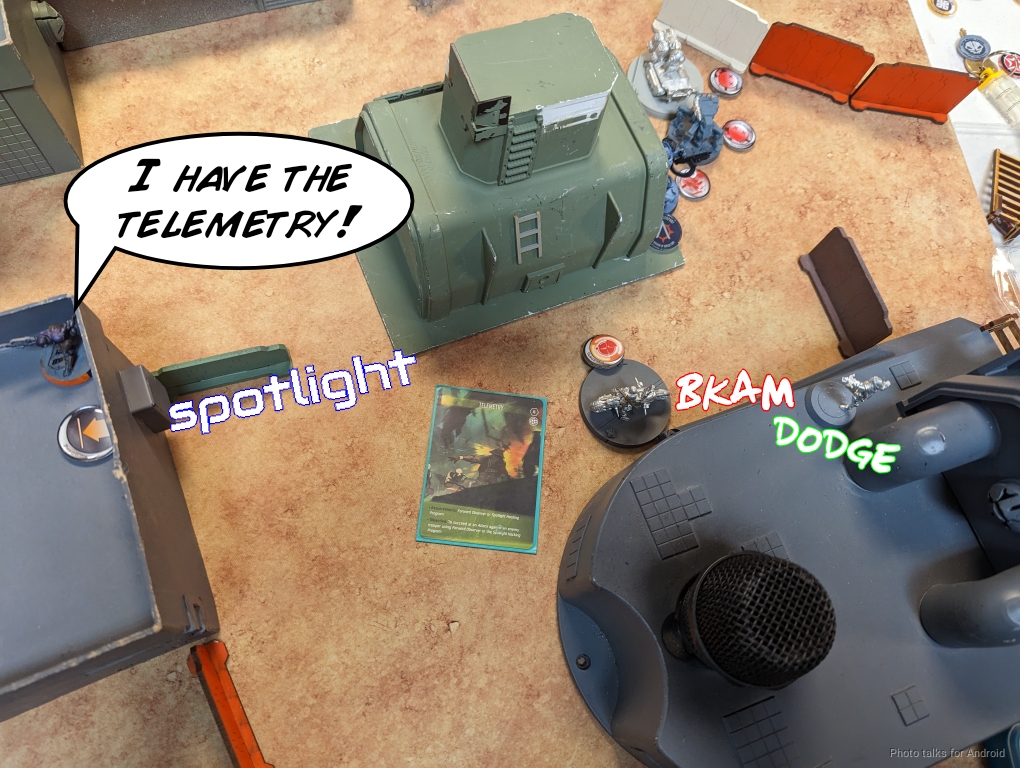
This telemetry comes in handy later, putting me back on 16’s when the Kum comes rolling around the corner to fight the Sin Eater just outside of 8″! The Sin Eater drops the Kum and that’s that.
Edit: Piotr caught that I would have been on 13s at 8-16″. Thanks Piotr! Not sure what we did in the game but Adam and I are usually pretty good about catching these things at the table, probably I made a mistake writing.
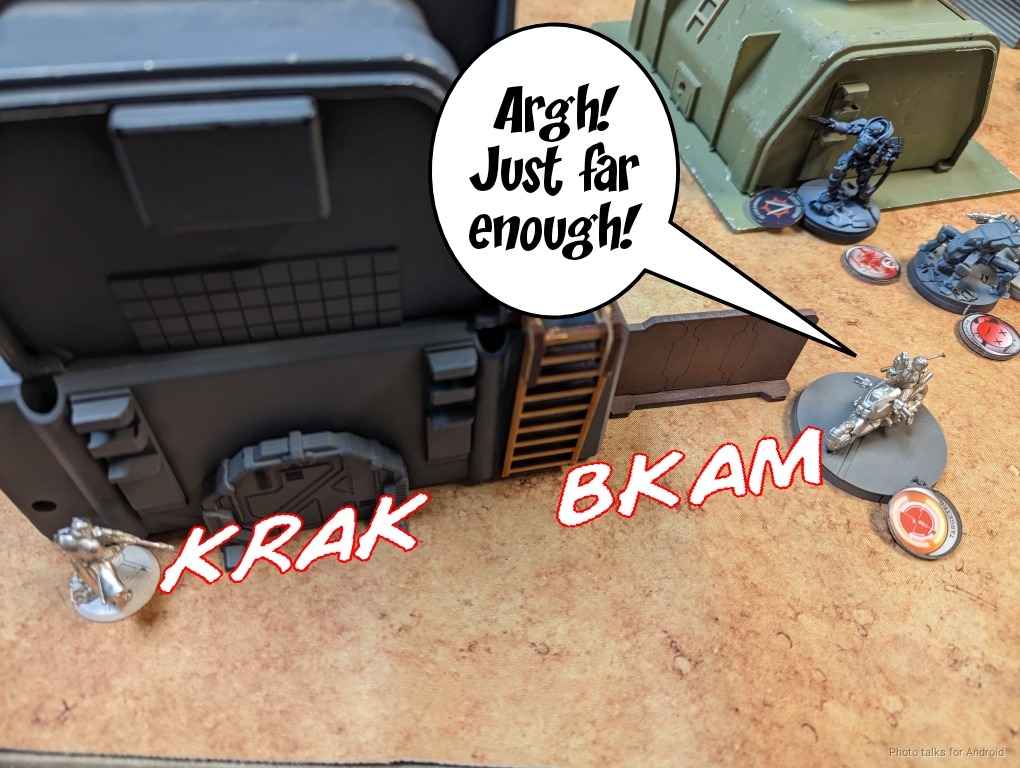
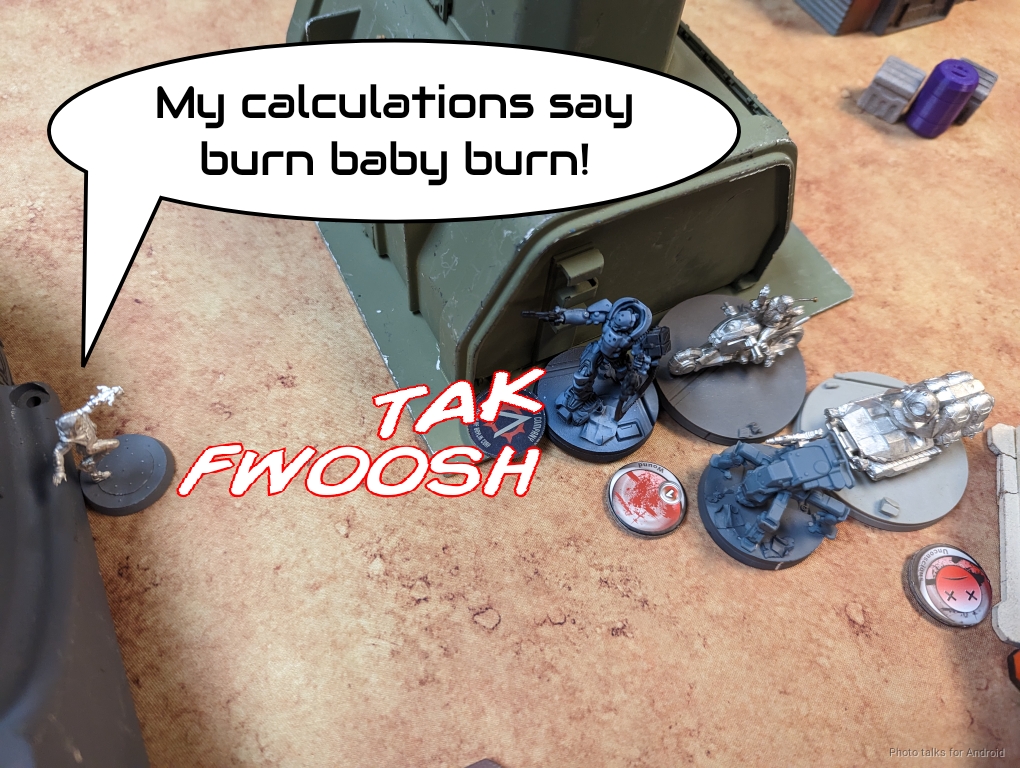
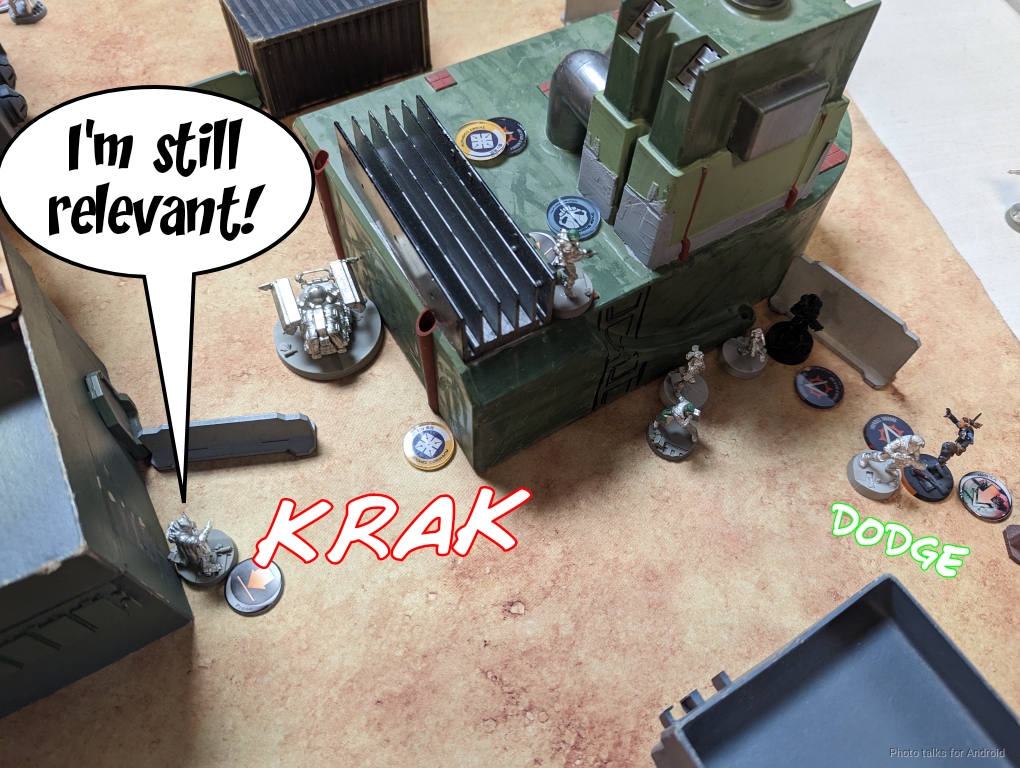
Adam decides to try and deal with Bran with bullets, so he starts by sinking some orders into Valerya, breaking the link to avoid granting a CC ARO to Bran on the Zuyong. I reset successfully against Valerya’s spotlight several times, which is great–wasting orders on burst 1 face to face rolls is exactly what I want!
Adam then attempts to take out Bran with some shock ammo from the ABH’s SMG, but I successfully dodge and the ABH successfully does a wound to the Zuyong. Adam wisely stops trying this line of play and passes turn after throwing the Fasid into suppression.

Bottom of 2 – Bakunin
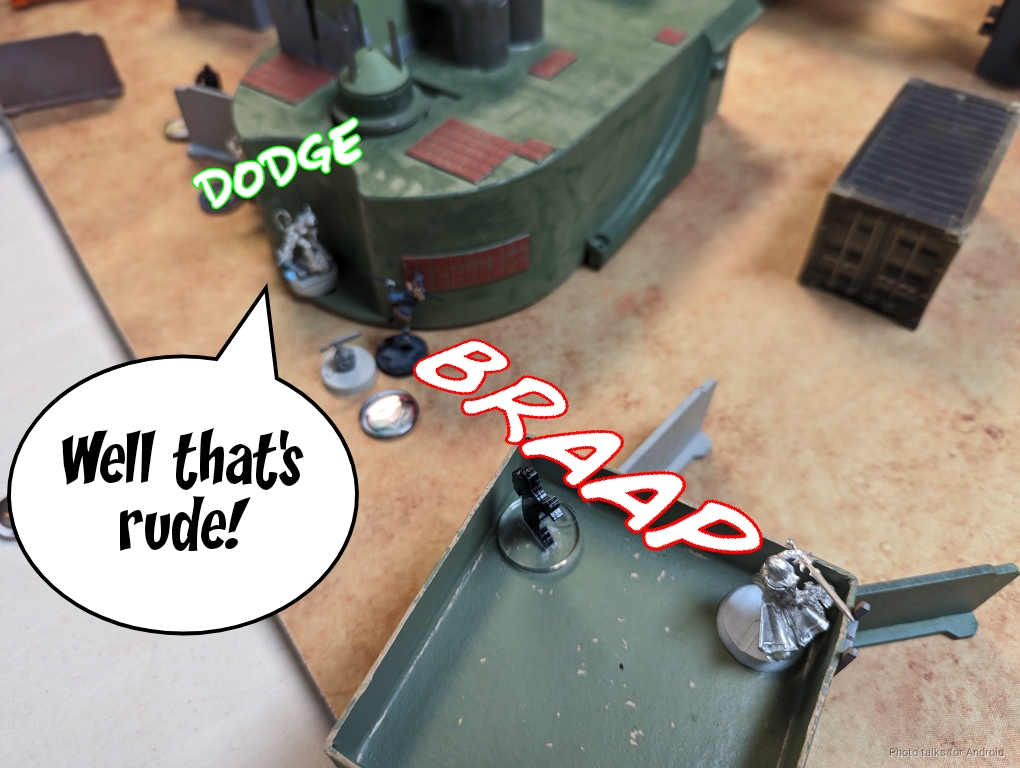
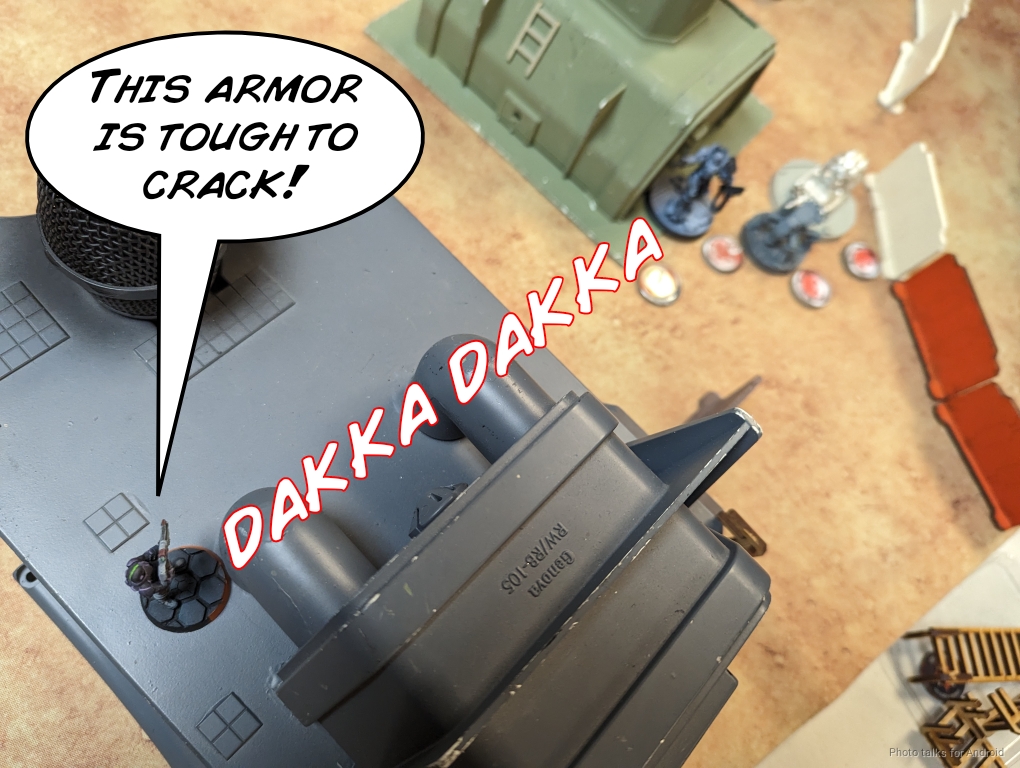
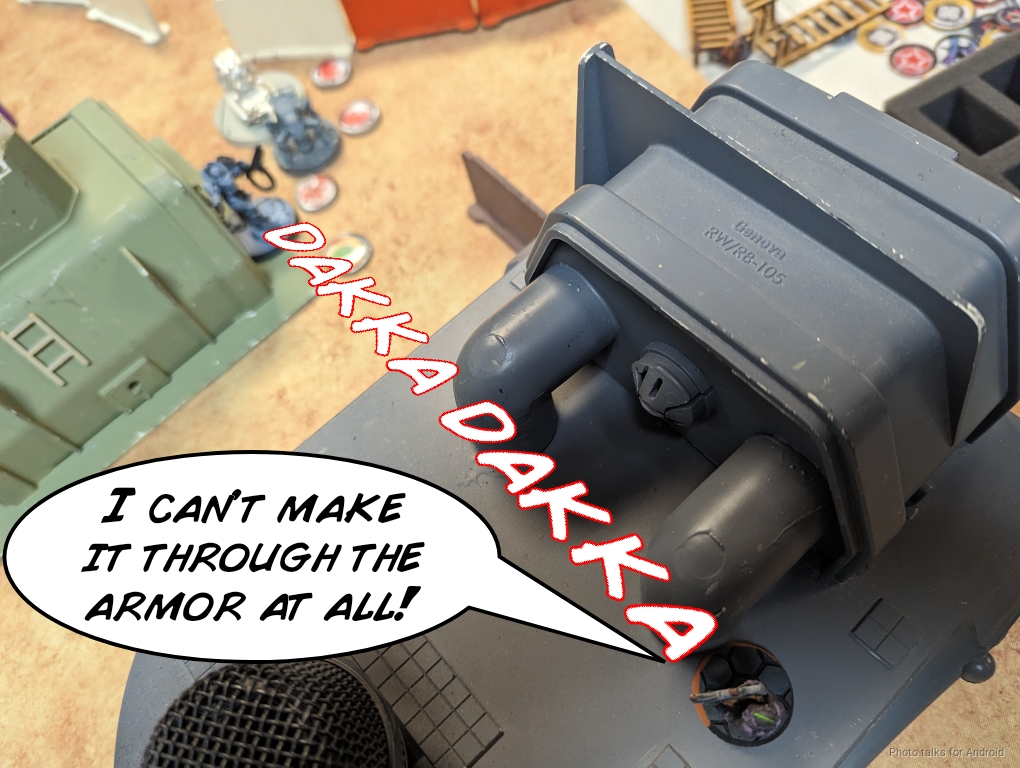
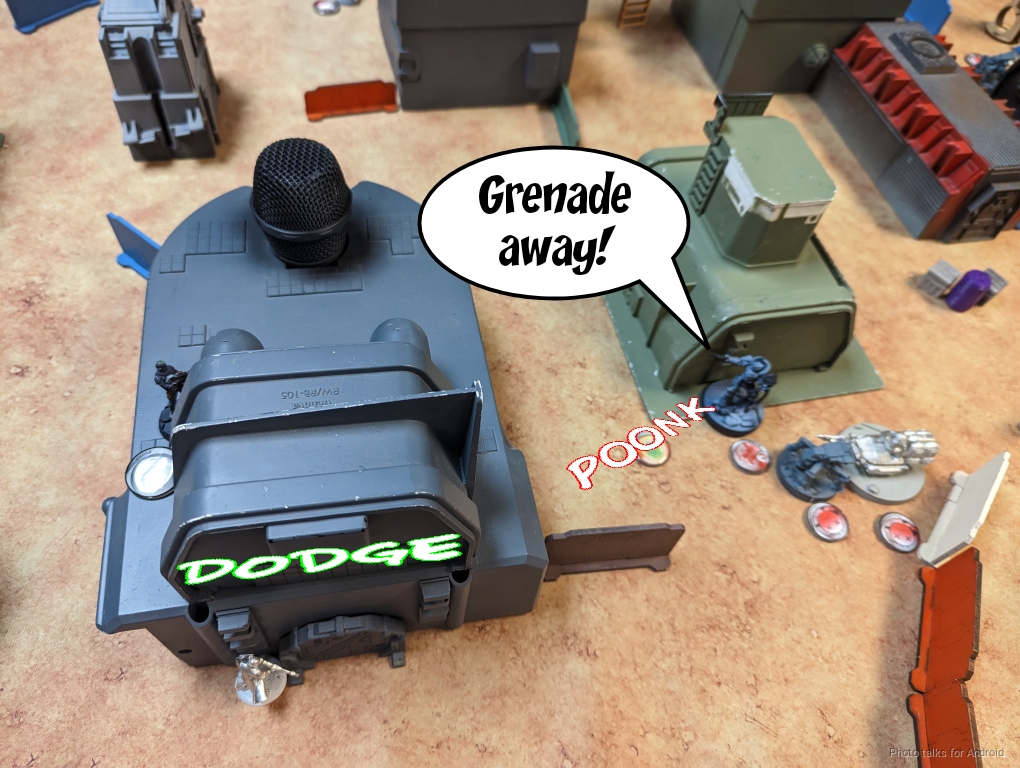
I reveal my trap card and try to take out the Fasid with some surprising shots from the Prowler. Even with the Fasid out of cover I can’t crack its armor through suppression.
Thanks to the wound from the ABH, I do manage to take down the Zuyong though, which frees Bran to move.
I threaten a double template on the remnants of the link, and Adam takes the bait and dodges, so I coup de grace. This denies the Zuyong a regen opportunity, which is rad.
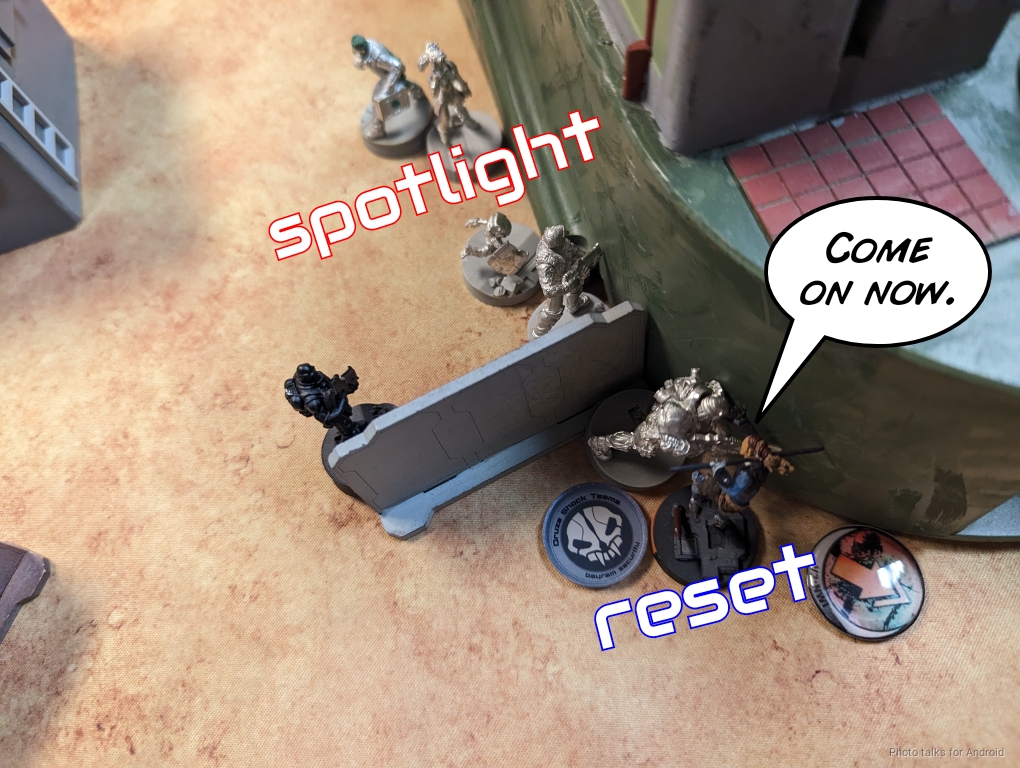
I push Bran out further and force another dodge, with no effect.
I move into base to base with one of the ABH and force yet another dodge. I CC the ABH but nothing happens.
Bran is still a problem for Adam. He’s actually in the biotech zone but will end up passing BTS at the end of the turn. I scoot the Prowler out of harm’s way and try to take down the Fasid, but I can’t do anything!
Turn 3
Top of 3 – Dahshat
Adam’s in loss, so I don’t have much to fear from this turn. Valeyra finally snags spotlight on Bran, and I dodge him out of CC to really make things annoying.
Adam’s Zencha is out of template range though, so it manages to do one last wound to Bran against a dodge.
Adam decides to try and take out the Sin Eater on my right with a spec-fired grenade from the Fasid, but it doesn’t work.
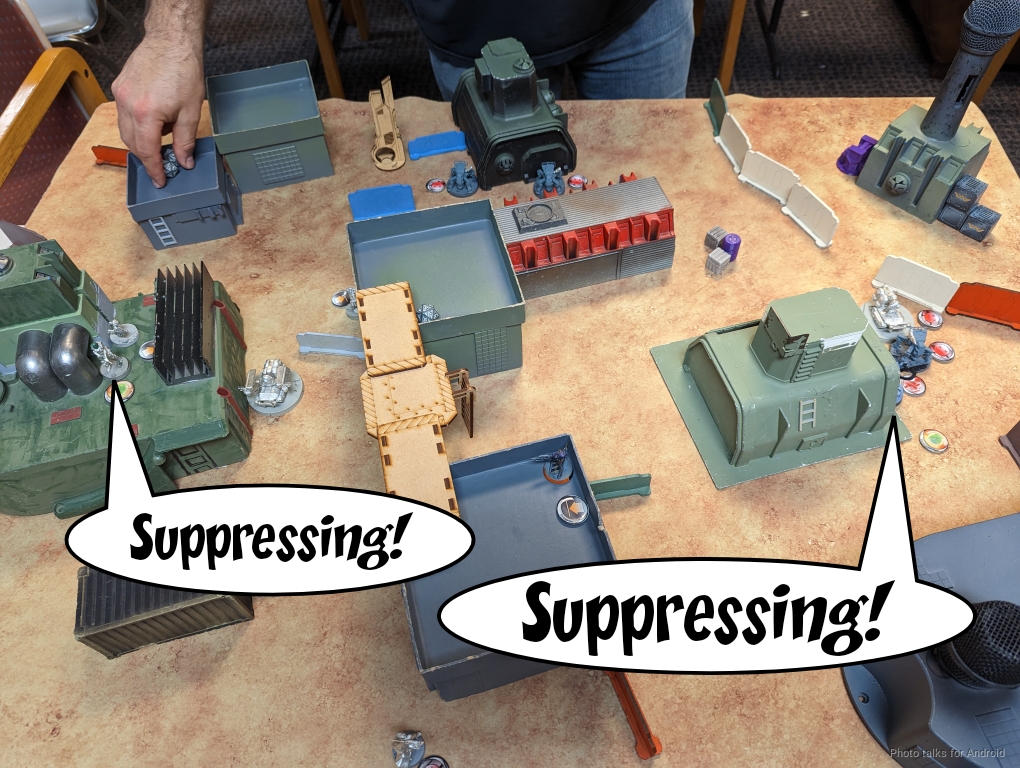
He settles for throwing the remaining Zuyong and Fasid into suppression before passing turn.
Bottom of 3 – Bakunin
All I need to do now is get my last classified off the HVT and secure it for the win. With the Tinbot Zuyong no longer attached to Valerya, this is a job for my Zero KHD. I blow up Valerya’s brain…
snag HVT: Espionage, and then secure the HVT for the win.
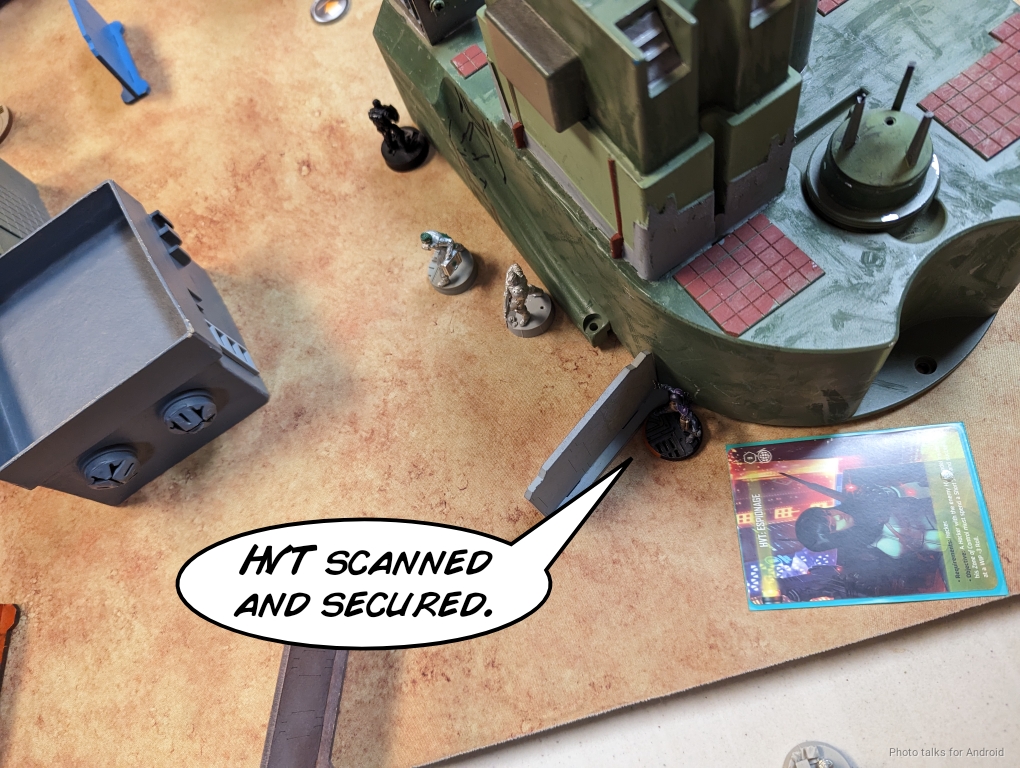
9-2, 216-154 Jurisdictional Command of Bakunin Victory!
Post Game Analysis
I really love this list. The Sin Eaters are so good and Bran lets me exploit vulnerabilities in really effective ways. You lose a little off the top end without a Custodier hacker, but the Zero hackers get the job done and give you some opportunities to do things a Custodier can’t.
I’ll admit I did not expect an effectively vanilla, limited insertion list to clean house so aggressively against a multi-link Dahshat list in Biotechvore. The Sin Eaters didn’t even kill anything on turn 1! Really it was a combination of Bran and exploiting positioning that did most of the damage.
I did get quite lucky on infiltrating the Zeros, but I don’t think it would have been particularly game breaking if I had not, given that I was going second and had full access to all my resources. I’m also really liking the Prowler in “reserve” somewhere in my deployment zone. It’s obviously way more powerful in a mission without Confused Deployment or an Exclusion Zone, but it works quite effectively in Biotechvore. It’s immune to the zone until it shows up, and it can punish bad positioning in the midfield with its rangebands.
Adam’s main takeaway from the game was just how much 5-strong links suck. I’m definitely in agreement, especially since in this specific case he didn’t get the full link bonuses. You obviously get a lot of efficiency in getting out of the deployment zone, but at the potential cost of just having to bunch up in an awkward spot.
One thing I think people don’t really do is set up a table well for Biotechvore. People tend to do the first bit of work in making sure there’s some sort of sane deployment zone within 8″, but it’s not always that people set up the table to allow units to exist outside of 16″. We saw that with my game against Steve with my vanilla Nomads:
This table was no different. I didn’t have great places to be, but Adam had even worse places to be, especially with the mess that was the Al Fasid situation on my right. The link was actually pretty safe if Bran didn’t exist, but having a close combat specialist with a shotgun and two effective wounds is just too good! He’s really changed with the latest Bakunin update. He was worse than a glass cannon before, now he’s a reliable assassin.
Clint (pseudonymmster) is of the opinion that the loss of the DA CCW really removes a lot of capability. I agree that Bran has lost a lot in terms of being able to take out multi-wound models efficiently in close combat, but he’s gained a lot in with NWI and shock immunity in being able to get there. I think that’s more important, and he’s more of a shotgun delivery tool and a CC tar pit. I’m really quite pleased with my usage of him this game as an example of how I think he should be played in general. I did make one mistake in that I pushed him too far and got him into the biotechvore zone on Adam’s side of the table! This doesn’t often happen!
As another data point, Nate (natetehagressar) is of the opinion that the Breaker Combi Rifle version of Bran is preferable to him. The key usage case is longer-range assassin and bear hunter. Bran has the mobility to get there, potentially even to the back arc of a Bear to avoid getting smoked out, but I just don’t think it’s reliable enough. I see Bears in the same category as TAGs in the sense that you can just attack their order pool which is often more disruptive. As we’ve seen in this game and the game before against Obi,
delivering a shotgun to to the nougaty center of a link is crazy good. Sometimes you get unlucky with rolls, but the threat must be answered. Both Adam and Obi spent much of their resources trying to remove Bran, leaving me basically free to do other things on the table during my turn.
In short, the mission does a lot of work to disrupt the first player’s turn. I stacked a pair of Sin Eaters and a Moria MSR on top of that to further complicate things. This basically forced Adam to work extra hard with smoke to get out safely as well as guarding against Adam attacking my order pool.
Fiddler with Jackbots is also a particularly awkward unit to use in Biotechvore because she has such a difficult time getting out with order efficiency. She’s fast but you can’t share those orders with anyone else, and Adam spent not just orders getting her out but also in trying to contain Bran. Really I couldn’t have asked for him to have had a more difficult first turn other than losing all his face to face rolls.
My first turn went exactly as planned. Because he couldn’t leave AROs up because the Sin Eaters exist, I was able to get out safely and then use the remaining orders to really punish his unfortunate positioning. He was pretty upset about misreading NWI as NBW on Fiddler’s profile while glancing at his phone. I don’t necessarily think that it was a bad idea to dodge her in to fight Bran–it drains orders from me, which is what he wants, and the odds aren’t heavily stacked in my favor. I did go my way, and then I was in CC with the Zuyong–in this case the odds are in my favor, which of course went poorly for him.
I’m always happy to see someone attempt multiple spotlights as well, during their turn. It’s so inefficient, and without a more credible threat than “fire an SMG into lose combat” I wasn’t particularly concerned. Yes, the guided missile trick can be a problem, but in practice I haven’t really seen it be successful without extreme resource expenditure. You do need to have an answer, usually some way of scalpeling out the missile bot, but that wasn’t an issue here.
This game really boils down to me being able to exploit structural vulnerabilities in the table and the positioning that forced on Adam. Furthermore, I think there were some structural vulnerabilities in his list as well. He makes frequent use of the Zuyong HMG lieutenant, which I think is needlessly risky. It’s worked for him in the past, but it’s too high variance for my taste. Also it’s difficult to get much of his list out of the deployment zone aside from the Kum and the links. It’s easy to spend those points on the Fanous + Mul package in Dahshat, but you’d better have a plan for extricating them from trouble, especially if someone docks you command tokens like I did.
Admittedly I don’t think my own list would work very well on the first turn. I think I would be forced to make rolls on the Sin Eaters or something, which would just be awful with their zero BTS. Thankfully, most people seem content to take deployment to “force” you to go first, or they’ll take first and grant you deployment, both of which seem fine to me.
If anything, this game has encouraged me to investigate deploying first and going second more often. It’s not like I’m not going to stand up a Sin Eater to ARO. Sure, you can set up a coordinated order to take one down, in which case I’ll take command tokens from you instead of docking orders so you can’t do it to both Sin Eaters. I can also hold the second in reserve to punish your plan. Lots of counter play options. Anyway, thanks to Adam for a fun game and thanks to you for reading!


Pingback: Mission 056: Breaking Links – Bromad Academy
Shouldn’t Sin Eater >8″ be on 13s against Spotlit Kum?
+0 for range on MSR
+3 for Spotlight
-0 for Cover
-3 for Mimetism