Hellcat Strafing Run
Well, with Kurage Crisis ending early this year, I guess getting a legit game in on Aplekton was not to be. I had scheduled a game with one of our local veterans, Eric (Raindog), who graciously agreed to play Supplies against me, but with the pull in on the campaign end, there was no way I’d have been able to write up this game in time. Eric also plays Nomads and to prevent a blue-on-blue took his Haqq instead. What a gentleman! Surprisingly enough, Eric is a pretty big figure in our local community, but this was our first time across the table from one another. I was pretty excited to throw down against Eric, he’s been playing miniature wargames for a long time so I was sure I’d come away from our game with some pretty solid learnings. I had prepared a legal +1 SWC list, but since it wasn’t going to be a game for Aplekton and Eric hadn’t prepped a +1 SWC list himself, I took the list I was supposed to take against Jordan my last game. After oogling the new Operation Cold Front miniatures which Adam had got, we set up a table and got down to business.
Overview
- Mission: Supplies
- Forces: Nomads versus Hassassin Bahram
- Deploy First: Nomads
- First Turn: Nomads
[img]https://assets.infinitythegame.net/infinityarmy/img/_logosweb/logo_501.png[/img][b] Supplies[/b]
[b]GROUP 1 | [/b][img]https://assets.infinitythegame.net/infinityarmy/img/_logosweb/orden_regular.png[/img]8 [img]https://assets.infinitythegame.net/infinityarmy/img/_logosweb/orden_irregular.png[/img]2
[img]https://assets.infinitythegame.net/infinityarmy/img/_logosweb/501/logo_16.png[/img] [b]INTERVENTOR Hacker Lieutenant (Hacking Device Plus)[/b] Combi Rifle / Pistol, Knife. (0.5 | [b]25[/b])
[img]https://assets.infinitythegame.net/infinityarmy/img/_logosweb/501/logo_30.png[/img] [b]MORAN (Forward Observer)[/b] Combi Rifle, CrazyKoalas (2) / Pistol, Knife. (0.5 | [b]22[/b])
[img]https://assets.infinitythegame.net/infinityarmy/img/_logosweb/501/logo_30.png[/img] [b]MORAN (Forward Observer)[/b] Combi Rifle, CrazyKoalas (2) / Pistol, Knife. (0.5 | [b]22[/b])
[img]https://assets.infinitythegame.net/infinityarmy/img/_logosweb/501/logo_10.png[/img] [b]ZERO (Minelayer)[/b] Combi Rifle, Antipersonnel Mines / Pistol, Knife. (0.5 | [b]19[/b])
[img]https://assets.infinitythegame.net/infinityarmy/img/_logosweb/501/logo_10.png[/img] [b]ZERO (Minelayer)[/b] Combi Rifle, Antipersonnel Mines / Pistol, Knife. (0.5 | [b]19[/b])
[img]https://assets.infinitythegame.net/infinityarmy/img/_logosweb/501/logo_9.png[/img] [b]BANDIT Hacker (Killer Hacking Device)[/b] Light Shotgun, Adhesive Launcher / Pistol, DA CCW. (0 | [b]25[/b])
[img]https://assets.infinitythegame.net/infinityarmy/img/_logosweb/501/logo_9.png[/img] [b]BANDIT Hacker (Killer Hacking Device)[/b] Light Shotgun, Adhesive Launcher / Pistol, DA CCW. (0 | [b]25[/b])
[img]https://assets.infinitythegame.net/infinityarmy/img/_logosweb/501/logo_56.png[/img] [b]KRIZA BORAC[/b] HMG / Heavy Pistol, CC Weapon. (2 | [b]54[/b])
[img]https://assets.infinitythegame.net/infinityarmy/img/_logosweb/501/logo_5.png[/img] [b]REVEREND MOIRA[/b] MULTI Sniper Rifle / Pistol, Shock CCW. (1.5 | [b]34[/b])
[img]https://assets.infinitythegame.net/infinityarmy/img/_logosweb/501/logo_3.png[/img] [b]HELLCAT[/b] Boarding Shotgun / Pistol, Knife. (0 | [b]21[/b])[b]GROUP 2 | [/b][img]https://assets.infinitythegame.net/infinityarmy/img/_logosweb/orden_regular.png[/img]2 [img]https://assets.infinitythegame.net/infinityarmy/img/_logosweb/orden_irregular.png[/img]3 [img]https://assets.infinitythegame.net/infinityarmy/img/_logosweb/orden_impetuosa.png[/img]3
[img]https://assets.infinitythegame.net/infinityarmy/img/_logosweb/501/logo_21.png[/img] [b]TRANSDUCTOR ZOND[/b] Flash Pulse, Sniffer / Electric Pulse. (0 | [b]8[/b])
[img]https://assets.infinitythegame.net/infinityarmy/img/_logosweb/501/logo_21.png[/img] [b]TRANSDUCTOR ZOND[/b] Flash Pulse, Sniffer / Electric Pulse. (0 | [b]8[/b])
[img]https://assets.infinitythegame.net/infinityarmy/img/_logosweb/501/logo_12.png[/img] [b]MORLOCK[/b] Chain Rifle, Smoke Grenades / Pistol, E/M CCW. (0 | [b]6[/b])
[img]https://assets.infinitythegame.net/infinityarmy/img/_logosweb/501/logo_12.png[/img] [b]MORLOCK[/b] Chain Rifle, Smoke Grenades / Pistol, E/M CCW. (0 | [b]6[/b])
[img]https://assets.infinitythegame.net/infinityarmy/img/_logosweb/501/logo_12.png[/img] [b]MORLOCK[/b] Chain Rifle, Smoke Grenades / Pistol, E/M CCW. (0 | [b]6[/b])
[b] 6 SWC | 300 Points |[/b] Open in Infinity Army
[img]https://assets.infinitythegame.net/infinityarmy/img/_logosweb/logo_402.png[/img][b] Hassassin Bahram[/b]
[b]GROUP 1 | [/b][img]https://assets.infinitythegame.net/infinityarmy/img/_logosweb/orden_regular.png[/img]8 [img]https://assets.infinitythegame.net/infinityarmy/img/_logosweb/orden_irregular.png[/img]2 [img]https://assets.infinitythegame.net/infinityarmy/img/_logosweb/orden_impetuosa.png[/img]2
[img]https://assets.infinitythegame.net/infinityarmy/img/_logosweb/402/logo_10.png[/img] [b]FARZAN (Chain of Command)[/b] Boarding Shotgun / Pistol, Knife. (0 | [b]26[/b])
[img]https://assets.infinitythegame.net/infinityarmy/img/_logosweb/402/logo_10.png[/img] [b]FARZAN (Minelayer)[/b] Boarding Shotgun, Antipersonnel Mines / Pistol, Knife. (0 | [b]23[/b])[img]https://assets.infinitythegame.net/infinityarmy/img/_logosweb/402/logo_8.png[/img] [b]ASAWIRA (Fireteam: Haris)[/b] Spitfire, Nanopulser / Pistol, Shock CCW. (2 | [b]44[/b])
[img]https://assets.infinitythegame.net/infinityarmy/img/_logosweb/402/logo_4.png[/img] [b]MUYIB (Forward Observer)[/b] Rifle + Light Shotgun, D.E.P. / Pistol, Knife. (0 | [b]24[/b])
[img]https://assets.infinitythegame.net/infinityarmy/img/_logosweb/402/logo_4.png[/img] [b]MUYIB (Minelayer)[/b] Rifle + Light Shotgun, D.E.P. Viral Mines / Pistol, Knife. (0 | [b]25[/b])[img]https://assets.infinitythegame.net/infinityarmy/img/_logosweb/402/logo_17.png[/img] [b]FANOUS REMOTE[/b] Flash Pulse, Sniffer / Electric Pulse. (0 | [b]8[/b])
[img]https://assets.infinitythegame.net/infinityarmy/img/_logosweb/402/logo_5.png[/img] [b]BARID (Forward Observer)[/b] Rifle + Pitcher / Pistol, Knife. (0 | [b]14[/b])
[img]https://assets.infinitythegame.net/infinityarmy/img/_logosweb/402/logo_5.png[/img] [b]BARID Hacker (Assault Hacking Device UPGRADE: Icebreaker)[/b] Rifle + Pitcher / Pistol, Knife. (0.5 | [b]19[/b])
[img]https://assets.infinitythegame.net/infinityarmy/img/_logosweb/402/logo_11.png[/img] [b]MUTTAWI’AH[/b] Chain Rifle, E/Marat, Jammer, Smoke Grenades / Pistol, Knife. (0 | [b]5[/b])
[img]https://assets.infinitythegame.net/infinityarmy/img/_logosweb/402/logo_11.png[/img] [b]MUTTAWI’AH[/b] Chain Rifle, E/Marat, Jammer, Smoke Grenades / Pistol, Knife. (0 | [b]5[/b])[b]GROUP 2 | [/b][img]https://assets.infinitythegame.net/infinityarmy/img/_logosweb/orden_regular.png[/img]6 [img]https://assets.infinitythegame.net/infinityarmy/img/_logosweb/orden_irregular.png[/img]2 [img]https://assets.infinitythegame.net/infinityarmy/img/_logosweb/orden_impetuosa.png[/img]2
[img]https://assets.infinitythegame.net/infinityarmy/img/_logosweb/402/logo_2.png[/img] [b]GHULAM Lieutenant[/b] Rifle + Light Shotgun / Pistol, Knife. (0 | [b]12[/b])
[img]https://assets.infinitythegame.net/infinityarmy/img/_logosweb/402/logo_2.png[/img] [b]GHULAM[/b] Rifle + Light Shotgun / Pistol, Knife. (0 | [b]12[/b])
[img]https://assets.infinitythegame.net/infinityarmy/img/_logosweb/402/logo_2.png[/img] [b]GHULAM[/b] Sniper Rifle / Pistol, Knife. (0.5 | [b]16[/b])
[img]https://assets.infinitythegame.net/infinityarmy/img/_logosweb/402/logo_2.png[/img] [b]GHULAM[/b] Missile Launcher / Pistol, Knife. (1.5 | [b]17[/b])
[img]https://assets.infinitythegame.net/infinityarmy/img/_logosweb/402/logo_25.png[/img] [b]LEILA SHARIF Hacker (Killer Hacking Device)[/b] Shock Marksman Rifle, D-Charges / Breaker Pistol, Knife. (0 | [b]20[/b])[img]https://assets.infinitythegame.net/infinityarmy/img/_logosweb/402/logo_16.png[/img] [b]SHAYTANIYAH REMOTE[/b] Smart Missile Launcher / Electric Pulse. (1.5 | [b]18[/b])
[img]https://assets.infinitythegame.net/infinityarmy/img/_logosweb/402/logo_11.png[/img] [b]MUTTAWI’AH[/b] Chain Rifle, E/Marat, Jammer, Smoke Grenades / Pistol, Knife. (0 | [b]5[/b])
[img]https://assets.infinitythegame.net/infinityarmy/img/_logosweb/402/logo_11.png[/img] [b]MUTTAWI’AH[/b] Chain Rifle, E/Marat, Jammer, Smoke Grenades / Pistol, Knife. (0 | [b]5[/b])
[b] 6 SWC | 298 Points |[/b] Open in Infinity Army
Deployment
I won the rolloff and elected to go first. I deployed pretty much identically to my game against Jordan — prepped interlocking smoke orders with the Morlocks (left to right Dogged, Super-Jump, +1ARM) to cover the objectives, Bandits next to the objectives (middle and right), and Morans/Zero Minelayers locking down the center of the board.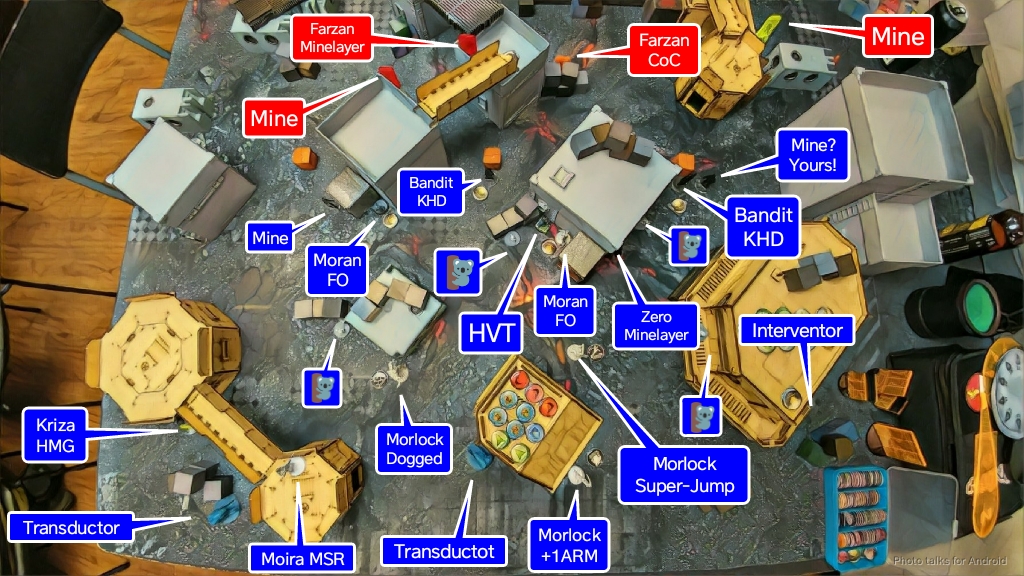 I put the Kriza down on the left, as there was a really giant firelane there to cover. I covered the left and middle objectives with Transductors, and put the Zero Cool and his HD+ down on the right, prone on a catwalk. I figured he was reasonably safe there. The Moira MSR was my reserve, which I placed in response to Eric’s Mutts and link. The Moria’s position let me cover both the left straight fireland and a diagonal one reaching to the right side of the table… speaking of which, let’s go to the other side of the table. Eric put Mutts on his flanks, two to a side, guarding this deployment zone against AD troops. His defensive Ghulam link settled in on and around a building on Eric’s right. The Muyib/Asawira Haris hung out in a building on the left (at least I think so, it’s hard to tell from my pictures and I forget the details), with a mine nearby.
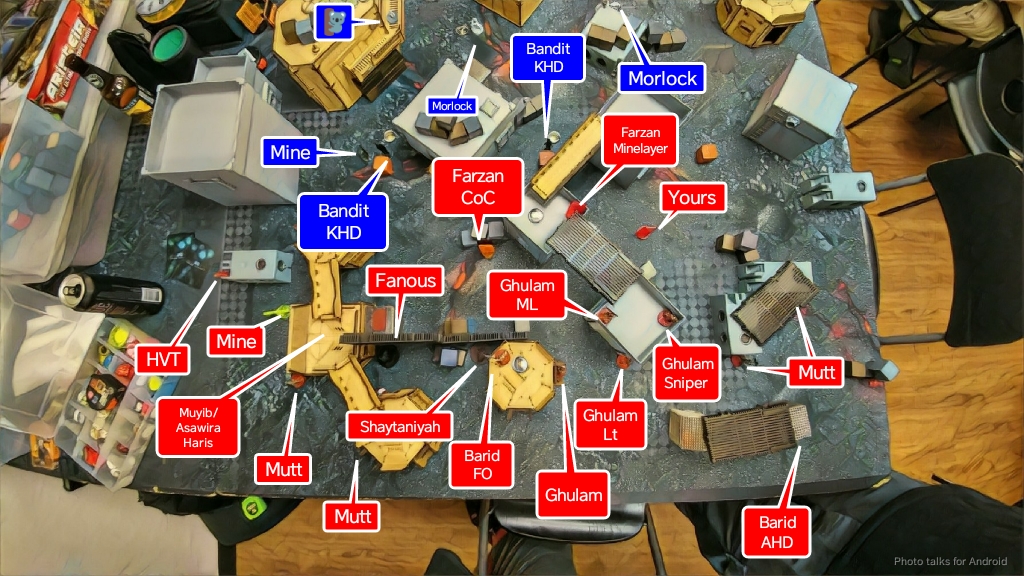 There were three Lt options on the table: two Ghulams and a Barid FO. I wasn’t sure which was which, but the Barid was on a roof so I figured it was a possibility. A pair of Farzans hung out in the middle of the table, with the Farzan Minelayer’s mine screening the approach to his Ghulam fireteam. Eric explained to me that this was an old list designed to drop missiles on stuff, and then proved his statement by putting down a Shaytaniyah tucked into total cover hanging out with a Fanous buddy. Eric’s reserve was a Barid AHD, tucked all the way into the back of his deployment zone.
Turn 1
Top of Turn 1 – Nomads
My Tech-Coffin opening plans go off without a hitch. One Morlock covers the other with smoke, who then is free to get smoke off onto the center objective while the third gets smoke on the right objective. Both Bandits grab their boxes and scurry away. The right one makes it into the ground floor of the Comanche Barracks and the other one hides in one of the Comanche pillboxes just at the edge of my deployment zone. I’ve got a few orders to play with, so I use them to chip away at Eric’s order pool. Step one is to pop the Moira out and remove Leila from outside of 24″.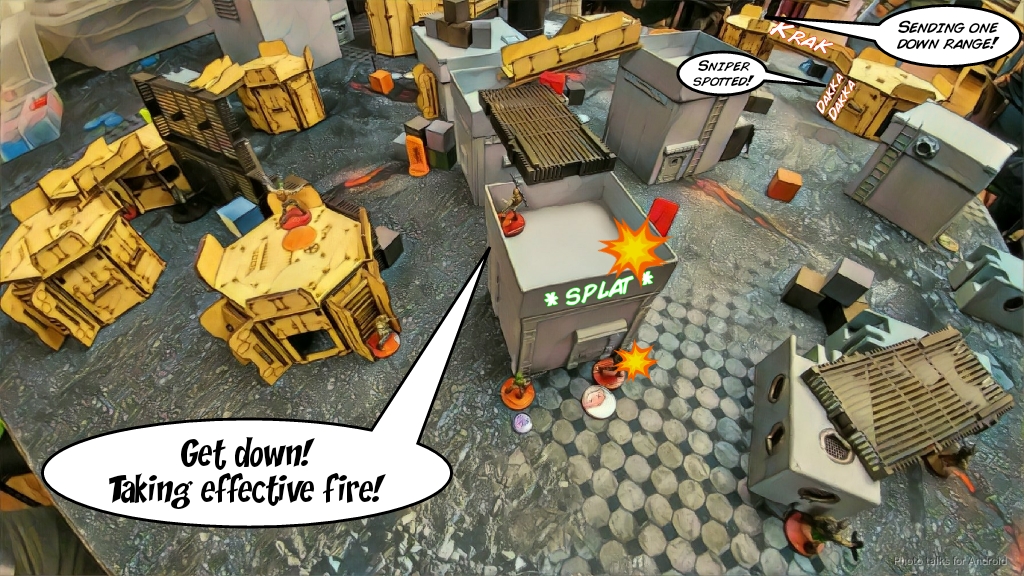 The +3 BS bonus is gone, which lets me relatively safely paste the Ghulam sniper with the Kriza. I spend another pair of orders dropping a mine and running away with my Zero Minelayer on the left, effectively trying to get a Mutt to come around the corner and eat a mine to the face.
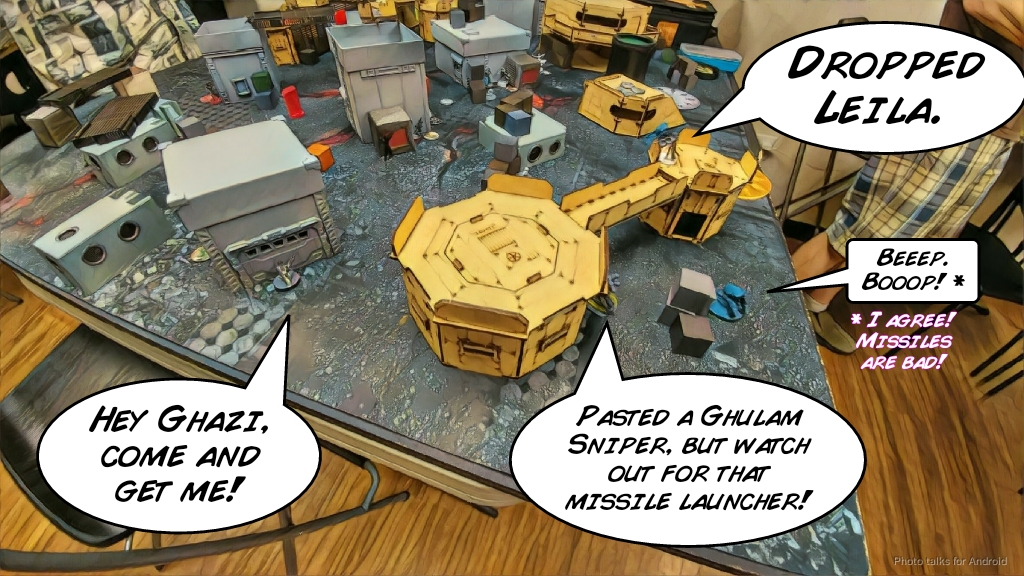 My super-jumping Morlock is pretty far up the table at this point, and there’s a potential Lt snipe opportunity. I sacrifice the Morlock to get a chain rifle off on the Barid FO but lose the Morlock to a hail of fire from the two regular Ghulams.
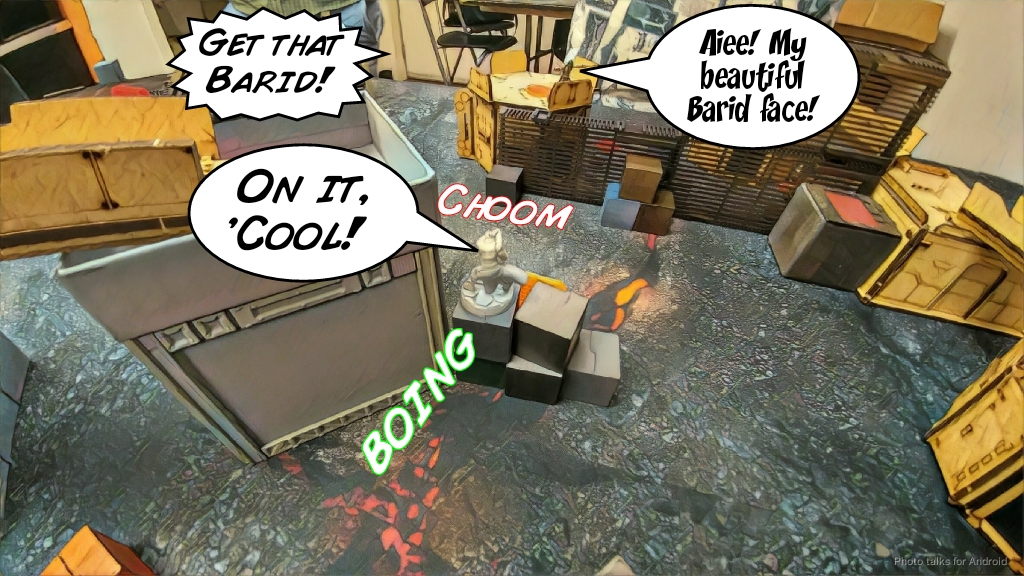 I’m basically out of orders at this point, so after moving the left Morlock up to protect my vulnerable left flank from Mutts, I pass the turn. This is what the table looked like at the end of my turn:
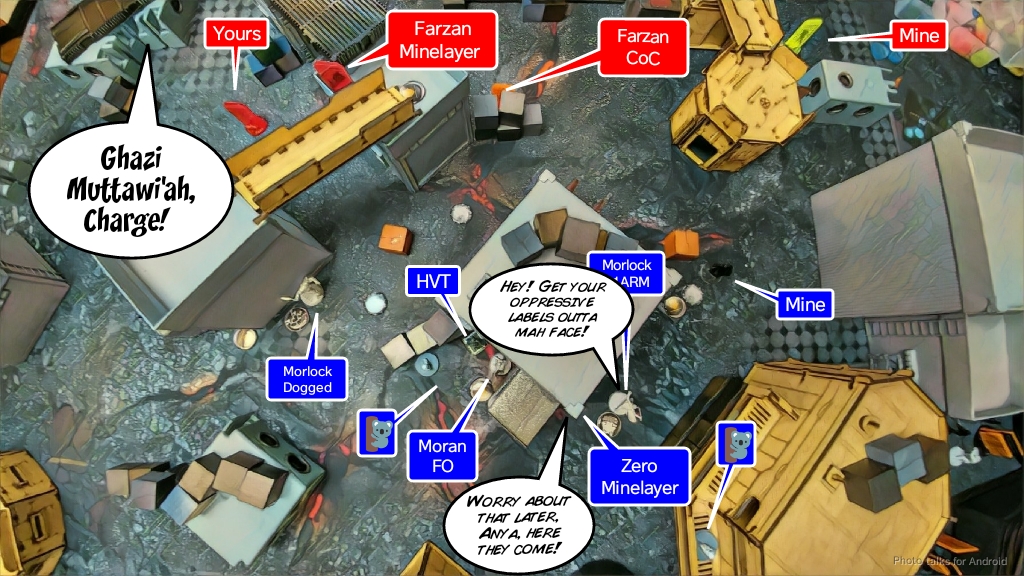
Bottom of Turn 1 – Hassassin Bahram
The Mutts shuffle around in the back and fail a bunch of smoke rolls (which Eric proudly predicted would happen). It’s really not all that much worse odds on 15’s than my 16’s with my Morlocks, but Eric informs me that his dice like to roll 20’s. Uh oh. Well, that’s good for most face to face rolls, right? I get a few shots on them with the Moira but fail to hit anything. It’s time to send in the Asawira. Eric starts picking off pieces in my containment, starting with my dogged Morlock.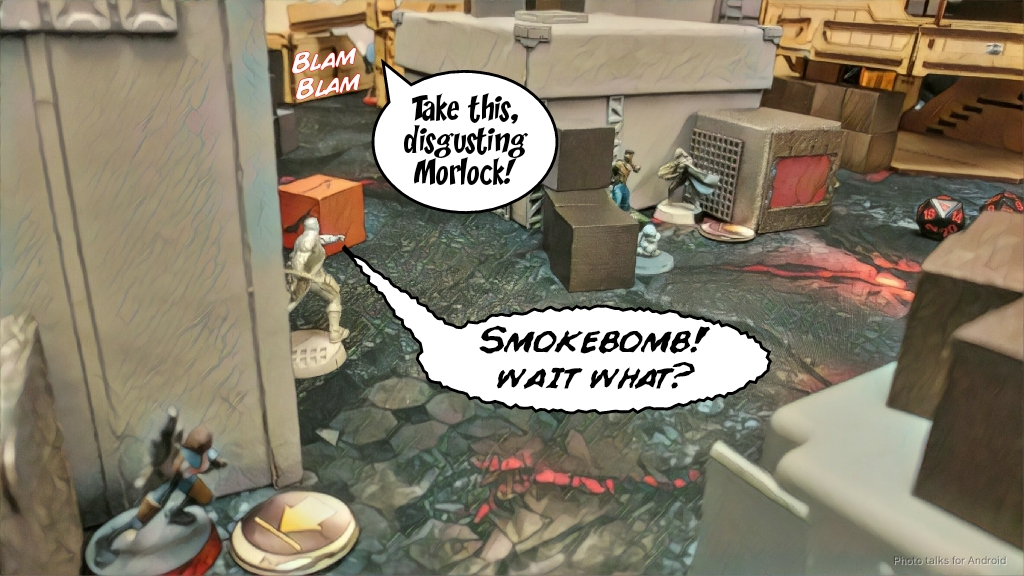 There’s a mine on my right flank, so Eric needs to get rid of it before he marches the Haris through that area.
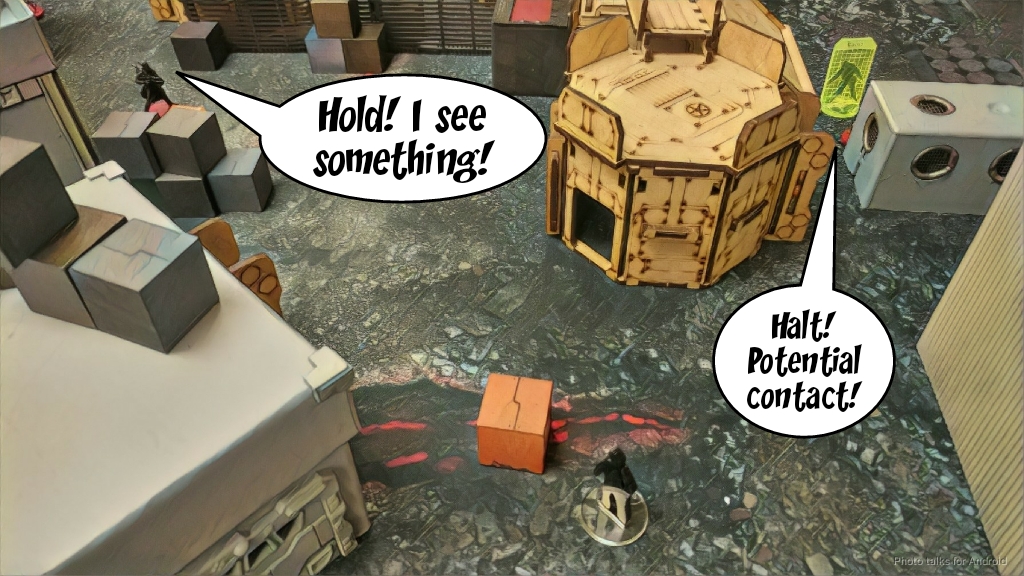 Eric’s tool of choice: Dr. Stabby Knife, who is just a regular Ghulam this game, and not a Ghulam Doctor. The mine gets removed with a quick Discover+Shoot. Dr. Stabby Knife’s claim to fame is shotgunning down an entire Rodok link team in one order, so it’s no surprise that a mine had no chance whatsoever!
 Now unstuck, the Asawira pushes forward and just throws buckets of dice at my right flank, chewing through two Koalas and Anya the Morlock.
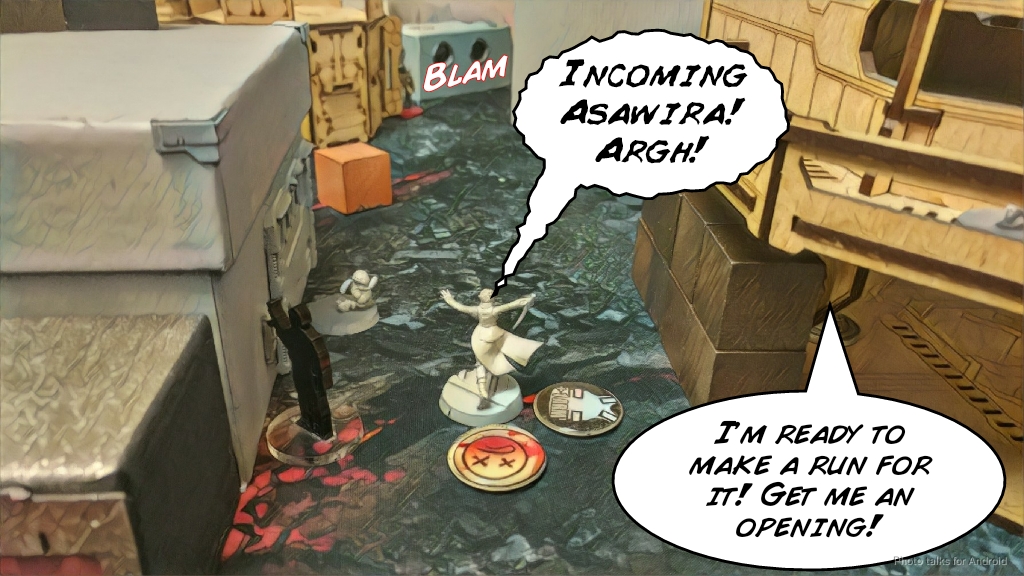 My Bandit, who is hiding in the nearby Comanche Barracks is getting nervous! The Asawira pushes up further and Discover+Shoots my Zero, blasting poor Acid Burn off the table.
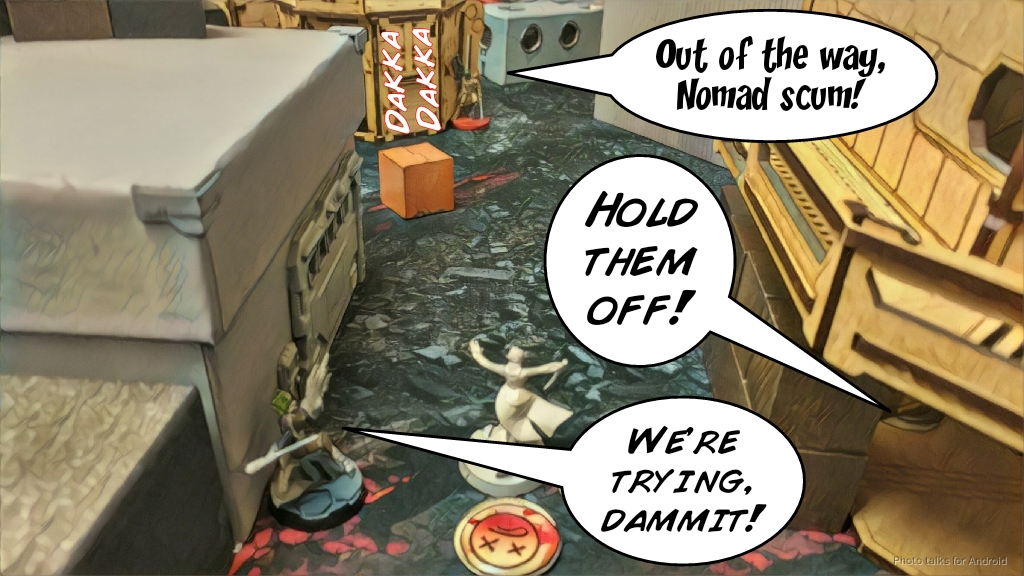 All in all it could’ve gone much worse, but my right flank is in some serious trouble. Eric peers around on my side of the table and decides he needs to castle up his Asawira Haris before passing the turn back to me, which he does, dropping a mine for good measure to really lock things down.
Turn 2
Top of Turn 2 – Nomads
I start off by moving a Transductor into group 1 to replace Acid Burn’s order. It’s a good thing that Eric hid the Haris, because my Moria would’ve had an easy time moving into position for a shot. As it stands, moving the Kriza over would’ve been too many orders so I was left with some pretty bad options. I’m out of Morlocks, so I spent two orders trying to take out the nearest Muyib with my Moran, forgetting they have dogged. It doesn’t matter, ’cause my Moran takes a stray rifle round to the face and drops.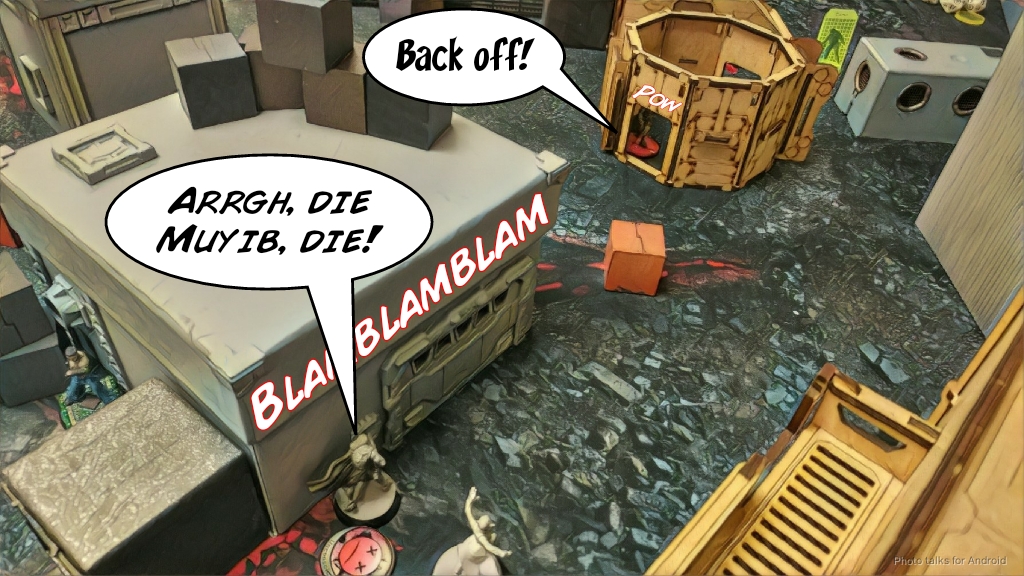 I really need to deal with that Asawira. With the Moran on that side down and without Fast Pandas from my Interventor, I don’t have good hacking coverage on my right flank, so there’s nothing stopping the Asawira from running up and dropping a Nanopulsar on my Bandit hiding in the Comanche Barracks. Eric’s probably got the orders to kill my Lieutenant too, so I really gotta do something about this. With the Barid FO dead and no call of Loss of Lieutenant, I figure Eric’s either got a Farzan with Chain of Command on the table or one of the two Ghulams is his Lieutenant. Sadly, he’s locked down the area around the Ghulams with Mutts and other nasty AROs, and the entire right board edge is just a mess of angry Muyibs and mines. Not good.
There’s always a hole though, so I bring on a Hellcat BSG, walking on right next to Eric’s HVT. I do this in full view of the mine his Muyib placed, but I (thankfully) correctly judged it to be out of range. I move into base to base with his HVT, taking a mid range shot at a nearby Mutt, sending it Dogged. The HVT is in the way of my movement, so I synchronize it with the Hellcat and move it out of the way and then come around the corner and lay a BSG template on top of the entire Haris and one of the mines. I use the nearby Muyib to body-block one of the mines from going off, but I have to tank the minelayered mine from deployment and a Jammer from the dogged Mutt. We roll my saves against the successful Jammer and the mine, and I fail both, taking the Hellcat off the table… but I’ve still got my strafing run to resolve!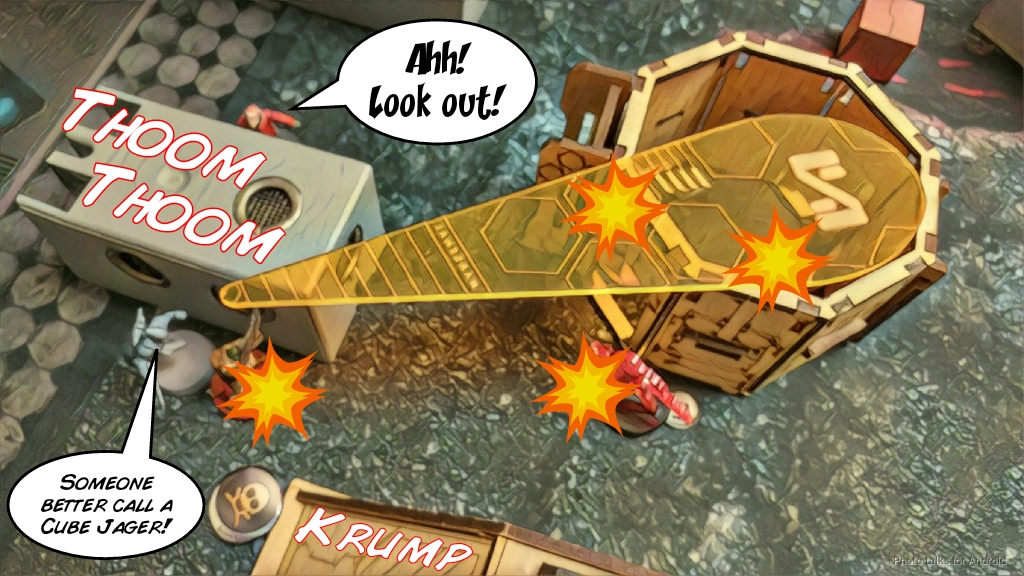 Eric declares dodge with the Haris, but I crit on my roll! Eric loses both Muyibs and the mine but the Asawira tanks both BSG shots and just laughs at me.
 I use the Bandits’ irregular orders to get the one in the Comanche Barracks further back into my deployment zone, essentially forcing Eric to come dig me out. My last order is spent on the Transductor alone in Group 2 to move it up into a position to cover the left approach–hopefully I’ll flash pulse some Mutts!
Bottom of Turn 2 – Hassassin Bahram
Eric’s Mutts move up, the ones on the left dancing with my AROs. He loses one to the Moira, I believe. The one in the center tanks a Crazy Koala to the face, and the one on the right falls over from being dogged. Not too shabby… Then Eric activates the Farzan Chain of Command. I manage to discover it as it crosses a gap, but it’s safe at the end of its movement, grabbing Extreme Prejudice off my Moran for a point.
 Eric tries to drop my Kriza with his Ghulam ML, but Full Auto saves my bacon and we trade ineffective fire for two orders.
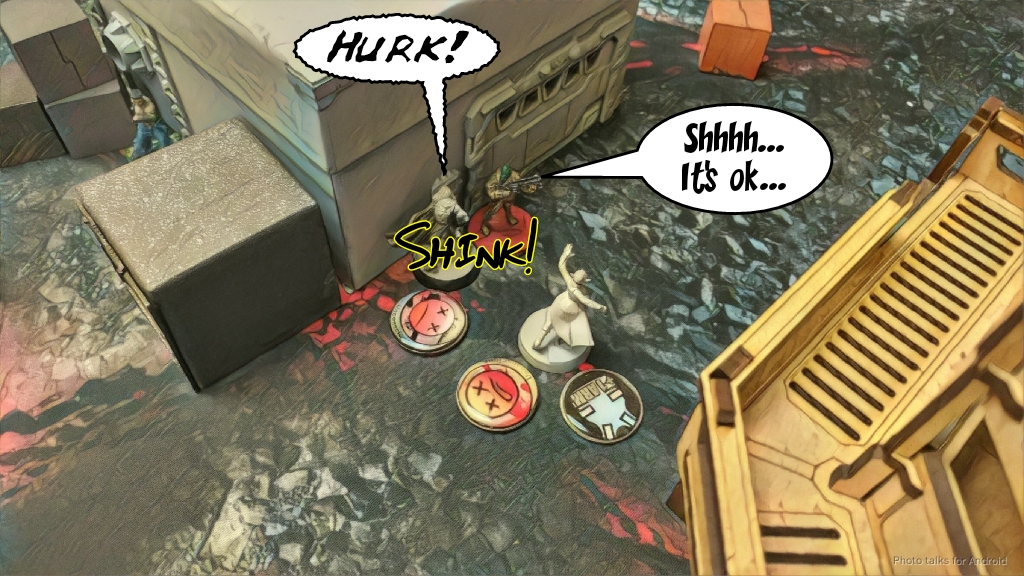
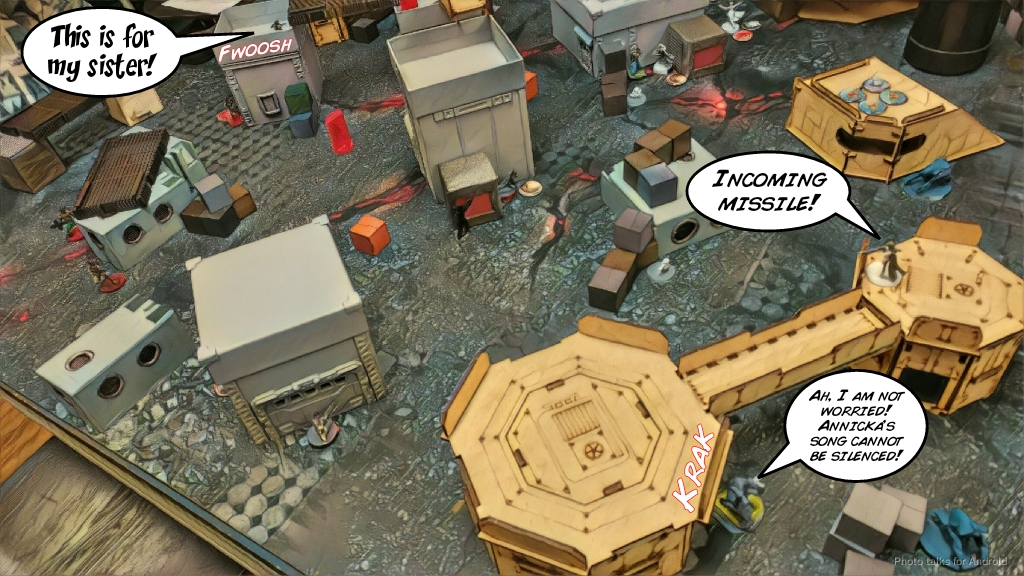 The Farzan re-camos and almost makes it all the way to my Bandit in the back right (the one from the Comanche Barracks) but I get a lucky discover off with my remaining Moran. Now it’s time for the moment I’ve been dreading: Eric sends in the Asawira. The Asawira powers its way up the table, gunning down my Moira with a crit and ends Eric’s turn next to my HVT, daring me to come dig it out after tanking some HMG fire from my Kriza with a 20 ARM save and tanking Oblivion from my Interventor through the Moran’s repeater with a 16 BTS save. Man! This Asawira refuses to die!
Turn 3
Top of Turn 3 – Nomads
My Kriza goes to work. I blast the Ghulam ML off the table, put two Mutts into Dogged, kill the Asawira (3 wounds in one order!), and then sneak up on the Farzan to heavy pistol it in the back. I take a stray pistol shot from one of the Mutts in the process, but at least now I’ve stopped most of Eric’s threats. I try to get my Moran on the left into base to base with the objective, but I stupidly spend my last command token on a coordinated order instead of spending it on flipping one of the Bandit’s orders. Ah well. Nate, who was watching the game, reminds me that “math is hard.”
Bottom of Turn 3 – Hassasin Bahram
Eric’s got one Mutt left, which suicides on the mine I dropped with the Zero back at the end of Turn 1. He then tries to get to the box with his Barid AHD, trading fire with my Transductor on the left. Eventually my Transductor goes own, but my last mine stops him cold.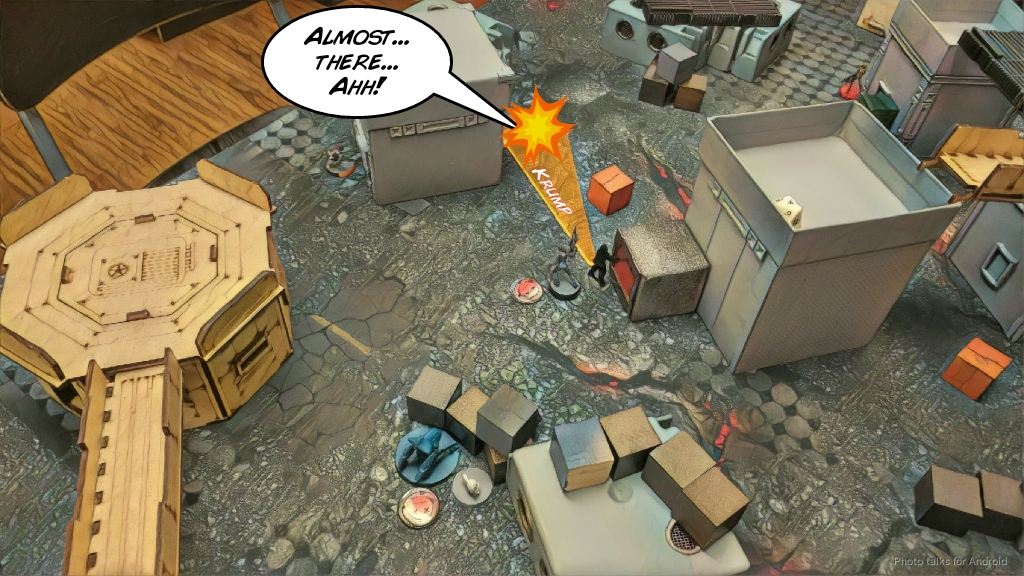 I’ve got 2 boxes to Eric’s none, but Eric spends his last few orders using his remaining Farzan to drop my Kriza and end within 8″ of my HVT, getting him two classifieds. This makes it a
7-2 Nomad Victory!
What a game! Thanks to Eric for coming out to The Portland Game Store on his week off to throw down. I’m really glad to have finally gotten the chance to play him.
Notes
Notes for Me
- I like my plan of smoking up the objectives and running. I’m not terribly sure what I would do in the reactive turn, since I can’t deploy mines or koalas in trigger distance of any camo tokens. Have to think carefully about that one. Eric agreed that the smoke, grab, run was sound.
- I’m really happy with this list, but I think it lacks a few things in terms of indirect fire weapons. Be interesting to swap the Moira MSR for a Moira E/M LGL and use it for suppression and for hitting things out of line of fire. It’s also one of my favorite units, so there’s that.
- I did the Nate thing with my Kriza! It works! REALLY WELL. Just pushed him up the board, killing something with every order. Pretty great. The burst 3 heavy pistol is pretty monstrous too.
- Skirmishers with mines are fantastic for controlling impetuous models. I’ll have to practice and abuse that skill more.
- I did an okay job placing my Morans, but did a poor job placing my Zero and moving my Morlock on the right. I think a quick coordinate order on my Morlocks would’ve gone a long way and would’ve been really helpful. Perhaps I should’ve gone after the Asawira team with a little more gusto on the first turn instead of hunting the Barid FO?
- I’m not sure going Lt hunting against HB is worthwhile, what with the Farzan CoC profile. Order starvation is always good though.
- I should reposition Transductors more often. That 12″ effective move is pretty awesome.
- Eric commented that he thought I should’ve ramboed the Kriza more, earlier. I’m not sure I agree, given the enormous pressure Mutts exert on HI. Also, after Leila and the Sniper Ghulam were down, I felt like I had dealt with the flank pretty well. If anything, I needed more tools on the right, where the Asawira was. I think holding the Kriza in reserve until Turn 3 where he mopped up the remaining serious threats was the right call, but this could be a playstyle difference thing.
- I am pretty happy with my Hellcat strafing run this game. I need to use CivEvac more. And no cheaty Nomad bullshit this time by being over SWC!
Notes for Eric
- Excellent list, sir. I’m always leery of the smart missile launcher trick, as I find it to be too order intensive, but I think you have a good mix of things to support that and just raw killing power in the two links you have.
- Great piloting of your Mutts. As you said, you consistently miss smoke with them. I think you just need new dice!
- That Asawira did a real number on my right flank. I did a pretty poor job of setting my guys up for success over there, which you exploited well.
- I think peeking Leila out in your deployment was a mistake–that let me get the finger hold I needed to dismantle your link. If anything I would’ve put your Lieutenant on the roof where the ML was (perhaps you didn’t want to telegraph your Lt), put the ML where Leila was, and hid Leila in the back. She could’ve cybermasked and then gone and got the remaining box on my left (your right) at your convenience.
- Excellent use of mines this game.
- Maybe leave the bots out to ARO stuff? I know you were protecting your order pool, but they both have pretty rude AROs. It’s tough with your list though–everything really wants orders. I think board edge guarding with the Fanous might’ve been good to defend against Hellcats.
- Great game, thanks again!