Too Close for Missiles
Returned to home base after an awesome vacation of eating food, playing games, and hanging out with friends. After the first day of work, it was time for game night! I was a little jetlagged from my early flight the previous day and Adam was feeling a little under the weather, so we paired off for some brainless Annihilation. After all, it’s easier to destroy than to create!
Overview
- Mission: Annihilation
- Forces: StarCo, Free Company of the Star versus Ikari Company (300)
- Deploy First: StarCo
- First Turn: StarCo
[img]https://assets.infinitythegame.net/infinityarmy/img/_logosweb/logo_905.png[/img][b] StarCo Smash[/b]
[b]GROUP 1 | [/b][img]https://assets.infinitythegame.net/infinityarmy/img/_logosweb/orden_regular.png[/img]8 [img]https://assets.infinitythegame.net/infinityarmy/img/_logosweb/orden_irregular.png[/img]2
[img]https://assets.infinitythegame.net/infinityarmy/img/_logosweb/905/logo_18.png[/img] [b]EMILY (Chain of Command)[/b] Combi Rifle + Light Grenade Launcher (Normal and E/M), Nanopulser / Assault Pistol, Knife. (0.5 | [b]35[/b])
[img]https://assets.infinitythegame.net/infinityarmy/img/_logosweb/905/logo_1.png[/img] [b]ALGUACIL[/b] Combi Rifle / Pistol, Knife. (0 | [b]10[/b])
[img]https://assets.infinitythegame.net/infinityarmy/img/_logosweb/905/logo_1.png[/img] [b]ALGUACIL[/b] HMG / Pistol, Knife. (1 | [b]18[/b])
[img]https://assets.infinitythegame.net/infinityarmy/img/_logosweb/905/logo_1.png[/img] [b]ALGUACIL[/b] Missile Launcher / Pistol, Knife. (1.5 | [b]15[/b])
[img]https://assets.infinitythegame.net/infinityarmy/img/_logosweb/905/logo_1.png[/img] [b]ALGUACIL Paramedic (MediKit)[/b] Combi Rifle / Pistol, Knife. (0 | [b]12[/b])[img]https://assets.infinitythegame.net/infinityarmy/img/_logosweb/905/logo_2.png[/img] [b]BRAWLER (Fireteam: Haris)[/b] Rifle + Light Shotgun / Pistol, Knife. (0.5 | [b]17[/b])
[img]https://assets.infinitythegame.net/infinityarmy/img/_logosweb/905/logo_2.png[/img] [b]BRAWLER Lieutenant[/b] Rifle + Light Shotgun / Pistol, Knife. (0 | [b]16[/b])
[img]https://assets.infinitythegame.net/infinityarmy/img/_logosweb/905/logo_2.png[/img] [b]BRAWLER[/b] Heavy Rocket Launcher / Assault Pistol, Knife. (1.5 | [b]18[/b])[img]https://assets.infinitythegame.net/infinityarmy/img/_logosweb/905/logo_9.png[/img] [b]BANDIT Hacker (Killer Hacking Device)[/b] Light Shotgun, Adhesive Launcher / Pistol, DA CCW. (0 | [b]25[/b])
[img]https://assets.infinitythegame.net/infinityarmy/img/_logosweb/905/logo_9.png[/img] [b]BANDIT (Forward Observer)[/b] Light Shotgun, Adhesive Launcher / Pistol, DA CCW. (0 | [b]23[/b])[b]GROUP 2 | [/b][img]https://assets.infinitythegame.net/infinityarmy/img/_logosweb/orden_regular.png[/img]4 [img]https://assets.infinitythegame.net/infinityarmy/img/_logosweb/orden_irregular.png[/img]3 [img]https://assets.infinitythegame.net/infinityarmy/img/_logosweb/orden_impetuosa.png[/img]1
[img]https://assets.infinitythegame.net/infinityarmy/img/_logosweb/905/logo_10.png[/img] [b]HAWWA’ Hacker (Assault Hacking Device)[/b] Boarding Shotgun, D-Charges / Pistol, Knife. (0.5 | [b]26[/b])
[img]https://assets.infinitythegame.net/infinityarmy/img/_logosweb/905/logo_27.png[/img] [b]SALYUT (Minesweeper, Repeater)[/b] Electric Pulse. (0 | [b]8[/b])
[img]https://assets.infinitythegame.net/infinityarmy/img/_logosweb/905/logo_25.png[/img] [b]TRANSDUCTOR ZOND[/b] Flash Pulse, Sniffer / Electric Pulse. (0 | [b]8[/b])
[img]https://assets.infinitythegame.net/infinityarmy/img/_logosweb/905/logo_17.png[/img] [b]UHAHU Hacker (Hacking Device Plus. UPGRADE: Icebreaker)[/b] Pitcher, D-Charges / Assault Pistol, Knife. (0.5 | [b]25[/b])
[img]https://assets.infinitythegame.net/infinityarmy/img/_logosweb/905/logo_13.png[/img] [b]IRMANDINHO[/b] Chain Rifle, D-Charges, Smoke Grenades / Pistol, AP CCW. (0 | [b]8[/b])
[img]https://assets.infinitythegame.net/infinityarmy/img/_logosweb/905/logo_15.png[/img] [b]SPECTOR (AD: Combat Jump)[/b] Boarding Shotgun, Nanopulser, Drop Bears / Pistol, E/M2 CC Weapon. (0 | [b]33[/b])
[img]https://assets.infinitythegame.net/infinityarmy/img/_logosweb/905/logo_30.png[/img] [b]WARCOR (Aerocam)[/b] Flash Pulse / Stun Pistol, Knife. (0 | [b]3[/b])
[b] 6 SWC | 300 Points |[/b] Open in Infinity Army
[img]https://assets.infinitythegame.net/infinityarmy/img/_logosweb/logo_904.png[/img][b] Ikari Company[/b]
[b]GROUP 1 | [/b]img]https://assets.infinitythegame.net/infinityarmy/img/_logosweb/orden_regular.png[/img]10 [img]https://assets.infinitythegame.net/infinityarmy/img/_logosweb/orden_impetuosa.png[/img]1
[img]https://assets.infinitythegame.net/infinityarmy/img/_logosweb/904/logo_2.png[/img] [b]BRAWLER Lieutenant[/b] Rifle + Light Shotgun / Pistol, Knife. (0 | [b]16[/b])
[img]https://assets.infinitythegame.net/infinityarmy/img/_logosweb/904/logo_6.png[/img] [b]WÚ MÍNG[/b] Heavy Rocket Launcher, Light Shotgun / Pistol, Knife. (2 | [b]33[/b])
[img]https://assets.infinitythegame.net/infinityarmy/img/_logosweb/904/logo_6.png[/img] [b]WÚ MÍNG (Fireteam: Haris)[/b] Chain Rifle, Submachine Gun / Pistol, Knife. (0 | [b]25[/b])
[img]https://assets.infinitythegame.net/infinityarmy/img/_logosweb/904/logo_6.png[/img] [b]WÚ MÍNG[/b] HMG / Pistol, Knife. (2 | [b]39[/b])
[img]https://assets.infinitythegame.net/infinityarmy/img/_logosweb/904/logo_6.png[/img] [b]WÚ MÍNG (Forward Observer)[/b] Boarding Shotgun / Pistol, Knife. (0 | [b]31[/b])[img]https://assets.infinitythegame.net/infinityarmy/img/_logosweb/904/logo_8.png[/img] [b]FASID[/b] HMG + (Smoke and Normal) Light Grenade Launcher, Antipersonnel Mines / Heavy Pistol, Knife. (2 | [b]53[/b])
[img]https://assets.infinitythegame.net/infinityarmy/img/_logosweb/904/logo_16.png[/img] [b]KRAKOT RENEGADE[/b] 2 Chain Rifles, Grenades / Pistol, DA CC Weapon. (0 | [b]14[/b])[img]https://assets.infinitythegame.net/infinityarmy/img/_logosweb/904/logo_14.png[/img] [b]TOKUSETSU EISEI Doctor (MediKit)[/b] Combi Rifle / Pistol, Knife. (0 | [b]14[/b])
[img]https://assets.infinitythegame.net/infinityarmy/img/_logosweb/904/logo_27.png[/img] [b]YÁOZĂO[/b] Electric Pulse. (0 | [b]3[/b])
[img]https://assets.infinitythegame.net/infinityarmy/img/_logosweb/904/logo_14.png[/img] [b]TOKUSETSU KOHEI Engineer[/b] Combi Rifle, D-Charges / Pistol, Knife. (0 | [b]14[/b])
[img]https://assets.infinitythegame.net/infinityarmy/img/_logosweb/904/logo_27.png[/img] [b]YÁOZĂO[/b] Electric Pulse. (0 | [b]3[/b])
[img]https://assets.infinitythegame.net/infinityarmy/img/_logosweb/904/logo_10.png[/img] [b]NINJA Hacker (Killer Hacking Device)[/b] Tactical Bow / Pistol, DA CCW, Knife. (0 | [b]29[/b])[b]GROUP 2 | [/b][img]https://assets.infinitythegame.net/infinityarmy/img/_logosweb/orden_regular.png[/img]1 [img]https://assets.infinitythegame.net/infinityarmy/img/_logosweb/orden_irregular.png[/img]2 [img]https://assets.infinitythegame.net/infinityarmy/img/_logosweb/orden_impetuosa.png[/img]2
[img]https://assets.infinitythegame.net/infinityarmy/img/_logosweb/904/logo_26.png[/img] [b]FUGAZI DRONBOT[/b] Flash Pulse, Sniffer / Electric Pulse. (0 | [b]8[/b])
[img]https://assets.infinitythegame.net/infinityarmy/img/_logosweb/904/logo_12.png[/img] [b]YUAN YUAN[/b] Chain Rifle, Smoke Grenades / Pistol, DA CCW. (0 | [b]9[/b])
[img]https://assets.infinitythegame.net/infinityarmy/img/_logosweb/904/logo_12.png[/img] [b]YUAN YUAN[/b] Chain Rifle, Smoke Grenades / Pistol, DA CCW. (0 | [b]9[/b])
[b] 6 SWC | 300 Points |[/b] Open in Infinity Army
Deployment
I won the rolloff, which meant I was deploying and going first. Adam went next door to get some food so I had a long time to second guess myself while deploying, and boy oh boy did I do that. I had intended for my list to closely match this Corregidor one, which I really enjoyed playing:
[img]https://assets.infinitythegame.net/infinityarmy/img/_logosweb/logo_502.png[/img][b] Corregidor Smash[/b]
[b]GROUP 1 | [/b][img]https://assets.infinitythegame.net/infinityarmy/img/_logosweb/orden_regular.png[/img]8 [img]https://assets.infinitythegame.net/infinityarmy/img/_logosweb/orden_irregular.png[/img]2
[img]https://assets.infinitythegame.net/infinityarmy/img/_logosweb/502/logo_25.png[/img] [b]SEÑOR MASSACRE[/b] Breaker Combi Rifle, E/M Grenades, Eclipse Grenades / Pistol, AP CCW, E/M CCW. (0 | [b]29[/b])
[img]https://assets.infinitythegame.net/infinityarmy/img/_logosweb/502/logo_11.png[/img] [b]JAGUAR[/b] Adhesive Launcher, Panzerfaust / Pistol, DA CCW. (0.5 | [b]13[/b])
[img]https://assets.infinitythegame.net/infinityarmy/img/_logosweb/502/logo_11.png[/img] [b]JAGUAR[/b] Chain Rifle, Smoke Grenades / Pistol, DA CCW. (0 | [b]10[/b])
[img]https://assets.infinitythegame.net/infinityarmy/img/_logosweb/502/logo_11.png[/img] [b]JAGUAR[/b] Chain Rifle, Smoke Grenades / Pistol, DA CCW. (0 | [b]10[/b])
[img]https://assets.infinitythegame.net/infinityarmy/img/_logosweb/502/logo_11.png[/img] [b]JAGUAR[/b] Chain Rifle, Smoke Grenades / Pistol, DA CCW. (0 | [b]10[/b])[img]https://assets.infinitythegame.net/infinityarmy/img/_logosweb/502/logo_3.png[/img] [b]WILDCAT (Fireteam: Haris)[/b] Combi Rifle + Light Flamethrower, D-Charges / Pistol, Knife. (0.5 | [b]20[/b])
[img]https://assets.infinitythegame.net/infinityarmy/img/_logosweb/502/logo_3.png[/img] [b]WILDCAT Lieutenant[/b] Combi Rifle + Light Flamethrower, D-Charges / Pistol, Knife. (0 | [b]19[/b])
[img]https://assets.infinitythegame.net/infinityarmy/img/_logosweb/502/logo_3.png[/img] [b]WILDCAT[/b] Heavy Rocket Launcher / Assault Pistol, Knife. (2 | [b]20[/b])[img]https://assets.infinitythegame.net/infinityarmy/img/_logosweb/502/logo_9.png[/img] [b]BANDIT Hacker (Assault Hacking Device)[/b] Light Shotgun, Adhesive Launcher / Pistol, DA CCW. (0.5 | [b]28[/b])
[img]https://assets.infinitythegame.net/infinityarmy/img/_logosweb/502/logo_9.png[/img] [b]BANDIT Hacker (Killer Hacking Device)[/b] Light Shotgun, Adhesive Launcher / Pistol, DA CCW. (0 | [b]25[/b])[b]GROUP 2 | [/b][img]https://assets.infinitythegame.net/infinityarmy/img/_logosweb/orden_regular.png[/img]6
[img]https://assets.infinitythegame.net/infinityarmy/img/_logosweb/502/logo_5.png[/img] [b]INTRUDER[/b] HMG, Grenades / Pistol, CCW. (1.5 | [b]42[/b])
[img]https://assets.infinitythegame.net/infinityarmy/img/_logosweb/502/logo_10.png[/img] [b]MORAN (Forward Observer)[/b] Combi Rifle, CrazyKoalas (2) / Pistol, Knife. (0.5 | [b]22[/b])
[img]https://assets.infinitythegame.net/infinityarmy/img/_logosweb/502/logo_10.png[/img] [b]MORAN (Forward Observer)[/b] Combi Rifle, CrazyKoalas (2) / Pistol, Knife. (0.5 | [b]22[/b])
[img]https://assets.infinitythegame.net/infinityarmy/img/_logosweb/502/logo_17.png[/img] [b]TRANSDUCTOR ZOND[/b] Flash Pulse, Sniffer / Electric Pulse. (0 | [b]8[/b])
[img]https://assets.infinitythegame.net/infinityarmy/img/_logosweb/502/logo_17.png[/img] [b]TRANSDUCTOR ZOND[/b] Flash Pulse, Sniffer / Electric Pulse. (0 | [b]8[/b])
[img]https://assets.infinitythegame.net/infinityarmy/img/_logosweb/502/logo_13.png[/img] [b]DAKTARI[/b] Combi Rifle / Pistol, Knife. (0 | [b]14[/b])
[b] 6 SWC | 300 Points |[/b] Open in Infinity Army
I had to make some concessions as Transductor Zonds are AVA 1 in StarCo, we don’t get Intruders, and the Alguacil link is slightly more expensive than the Jaguar link. Also no Morans. This changed up the character of the list quite a bit, which I noticed immediately when trying to deploy my Salyut baggage Zond. It doesn’t have a flash pulse, which is just awful! I hadn’t realized how much I’ve come to depend on my Transductor Zonds as a source of cheap orders and effective AROs. S4 remotes are also just so chunky and hard to deploy. I didn’t pack my Salyuts so I proxied a Lunokhod instead.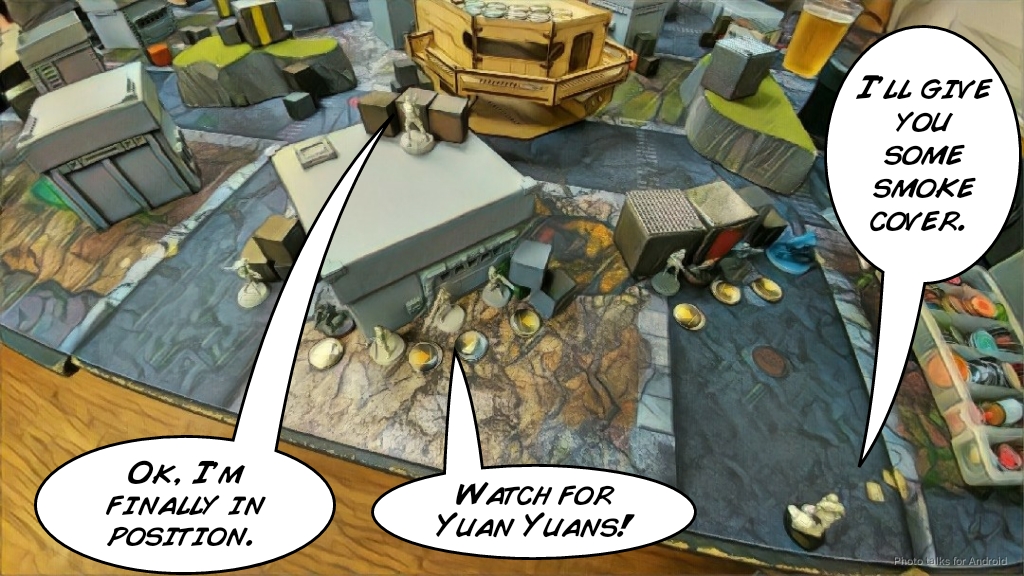 The board hand plenty of LoF blocking terrain, including the large Comanche Barracks in the middle. I borrowed two Brawlers from Adam, which he’s lovingly converted from Muyibs, to round out my Haris. I originally had deployed my Brawler Haris on the left, with the HRL covering a large swath of the board, but this left my Brawler Lieutenant very susceptible to getting Yuan Yuaned in the face, which is something I knew Adam would do. My Alguacil link set up to the right of the Brawler Haris, protected by a Transductor Zond.
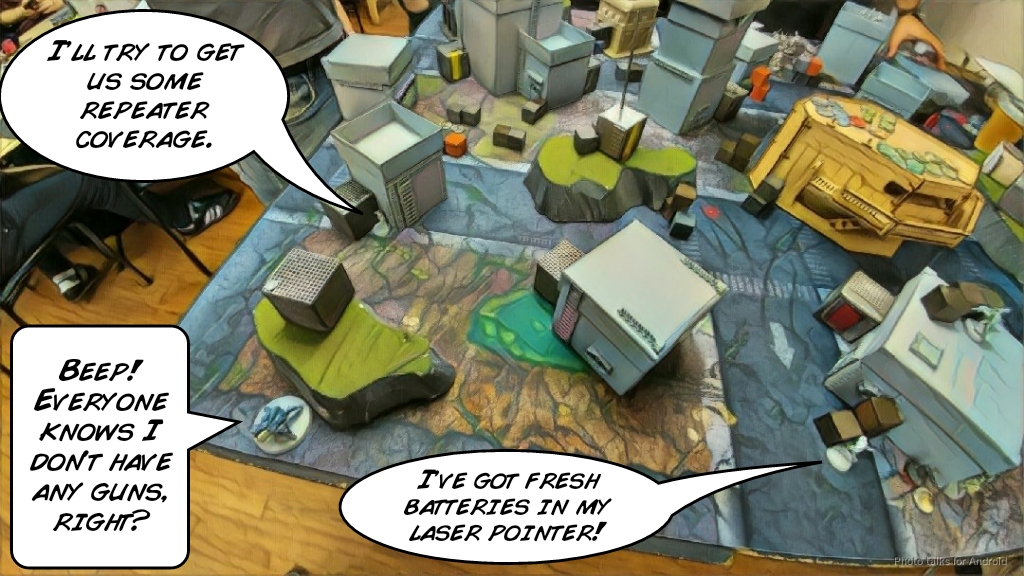 I was forced to take a Salyut baggage Zond since I wanted another 8-point regular order, so that just hung out in the back left with some coverage from my Warcor in the middle.
 Uhahu was on the left, primarily because I felt like at least someone with a gun should be over there, and she had a reasonable shot at getting a pitcher into Adam’s deployment zone early.
 My Bandit FO (which I thought was a KHD because I almost always take a KHD) was on the left, with the Al’Hawwa AHD in the backfield watching for Yuan Yuans. My AHD Bandit was smack dab in the center of the map, and placed out of reserve to counter Adam’s Wu Ming. Speaking of, Adam’s illegal Wu Ming core was spread out in the center, forming a loose V with the point towards him. The Brawler was at the point, in the back of his deployment zone, and the HRL and HMG covered the right and left parts of the V, respectively, with the other two Wu Ming in the center. Of course, you can’t form a 5-man core of Wu Ming without a Clipper, but Adam missed this point, just like I forgot my Bandit didn’t have a KHD. This is why we practice!
 Adam stuck his engineer in the middle of nowhere in the back left of his deployment zone, primarily to prevent Raoul from dropping in there, or from walking on, or from doing anything useful. His Doctor hid on a little hill in the back right of his deployment zone along with his Al Fasid (out of reserve), a Krakot (again there to combat Raoul) and a Fugazi.
 The pictures are from after we dropped our reserves, but I deployed mine (Bandit AHD) to deal with his link and he deployed his (Al Fasid) to protect the stuff on the right from Raoul. Gross. I chose Emily as my DataTracker (a mistake) and he chose his Doctor. I should’ve chosen one of my Brawler Rifle + LSGs, perhaps the Haris profile to encourage Adam to go after both. Ah well. Both of us were playing pretty sloppily thanks to jetlag and a cold, so we just got on with it!
Turn 1
Top of Turn 1 – StarCo
The Irmandinho ran ahead on his Impetuous order and just parked ahead of the link team. With that sorted, I started doing other stuff. I attempted to break the link with the Bandit AHD by isolating the link leader, which I think was the Chain Rifle Wu Ming a few times, but I kept failing rolls. I broke my own rule of thumb, which is to never hack on my own turn! I got a grand total of nothing isolated. I decided to cut my losses and drop in Raoul into a small pocket that Adam didn’t see. After blasting the engineer’s Yaozao bot, Raoul smacked the Wu Ming HMG in the face with his E/M2 CCW, freezing the HI trooper in place and doing a wound. Sadly, Raoul did get flash pulsed by the Wu Ming FO.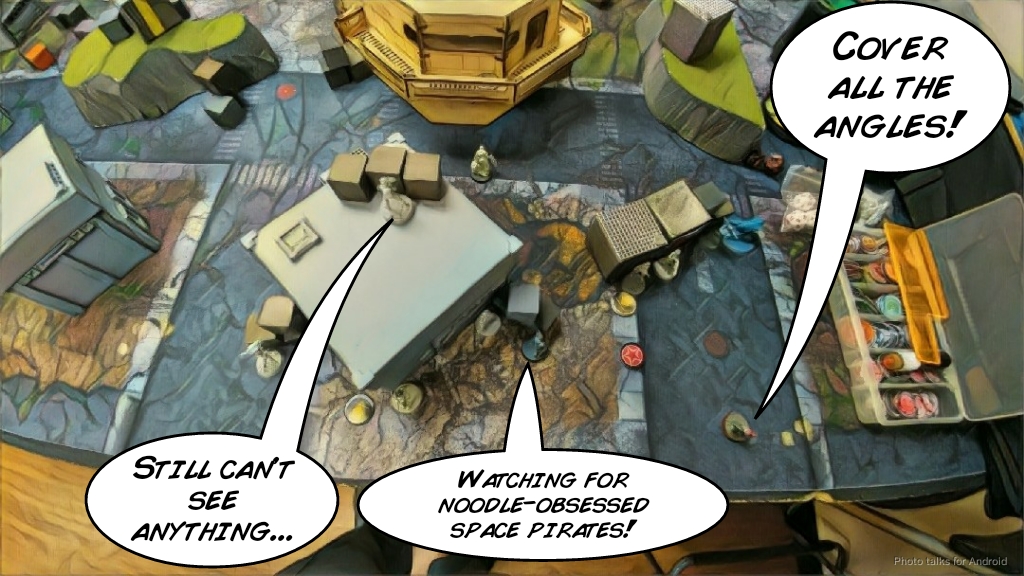 At the time, we thought that I was stuck in combat because IMM-2 is not a null state, so I just left Raoul there and repositioned my link team to cover the right side of my deployment zone in AROs, preparing for Yuan Yuans. Uhahu got herself killed by walking into the ZoC of a KHD Ninja (which was a TO camo marker that I forgot about, so it’s not even like I was surprised). I had intended on getting a pitcher off to cover the Wu Ming to let my Al’Hawwa AHD help, but Uhahu failed both her Redrum rolls and died. I erroneously thought my Bandit on that side was a KHD Bandit, so I Redrumed the Ninja back, killing it, then recamoed both Bandits before passing the turn.
Bottom of Turn 2 – Ikari
Adam cancels the Krakot’s order so it doesn’t get shot in the face by my Bandit KHD, although this might’ve been a good idea to trade up anyway. Unclear. The first of two Yuan Yuans dropped in, right next to Raoul and my Bandit AHD, but out of LoF. The second walked on near my Salyut baggage bot, which couldn’t do anything except flail about in terror.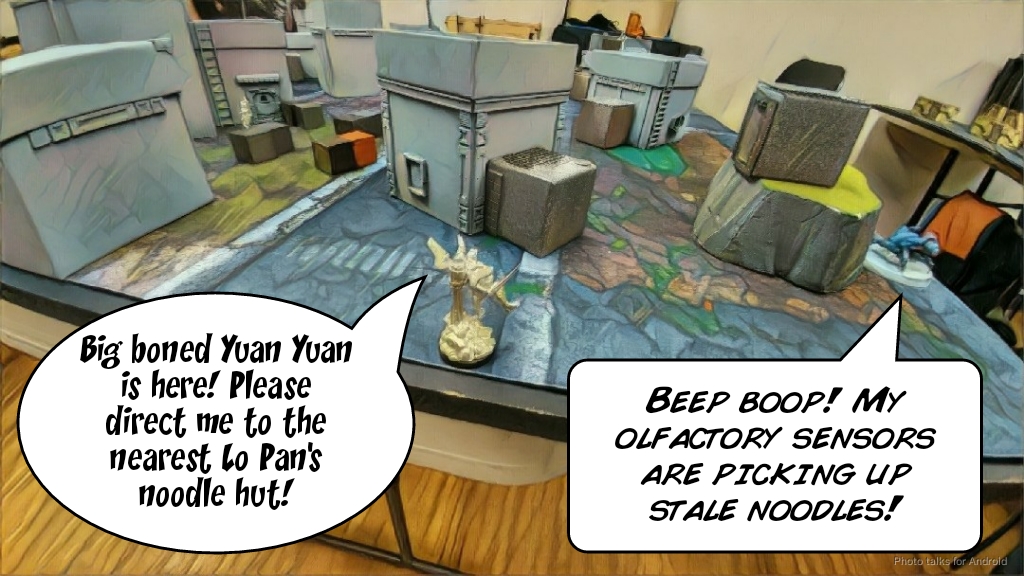 The Yuan Yuan walked over to chain rifle my Baggage Bot, who passed its ARM roll with flying colors. This also let me reveal my Bandit KHD to take a long range ADHL shot, but I missed.
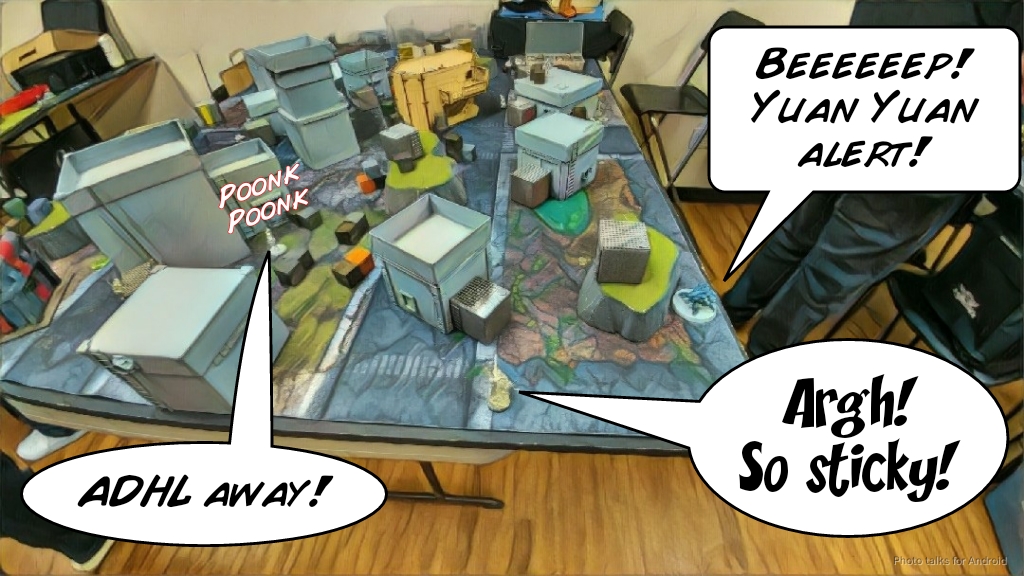 Adam set about fixing up his Wu Ming HMG, at which point we looked up whether or not I had to be engaged with an IMM-2 model. As it turns out, Null and Immobilized let you break engagement, so we rolled back to the beginning of Adam’s turn and let Raoul get a change face, but with the engineer, the Wu Ming, and the Yuan Yuan all nearby I decided not to move after all. I figured that it was better to face the Engineer and the Wu Ming link, because I could just dodge the Yuan Yuan’s shots and with my NWI probably get a shot back if he chose to go that route. Raoul did have some choice words for his viewership, so to speak, though.
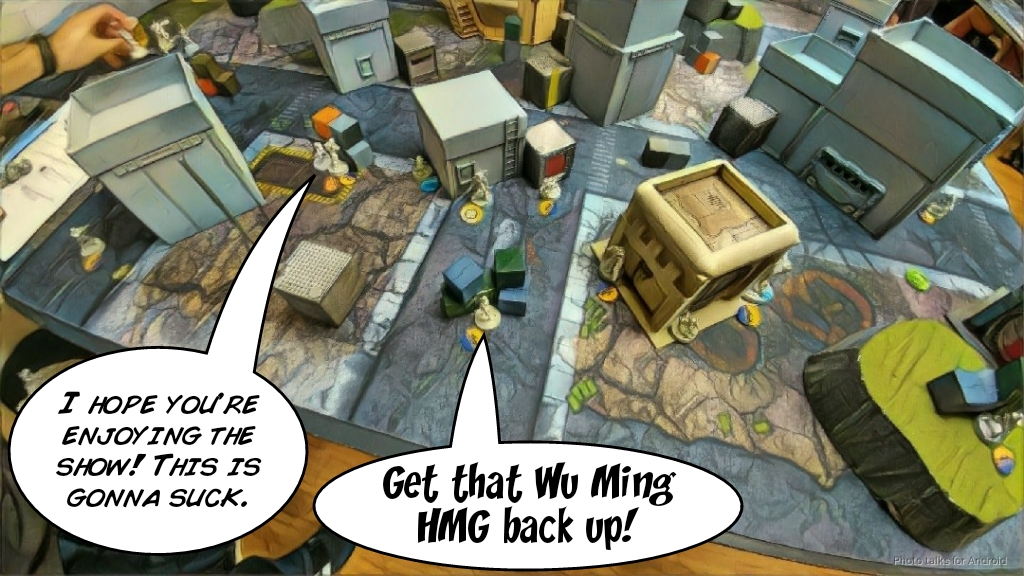 Adam needed to get rid of Raoul now, so he used the SMG to shock Raoul off the table while my Bandit AHD flubbed some more hacking rolls. With the Bandit revealed, Adam sent the Yuan Yuan after it. I dodged the chain rifle successfully, and my HRL Brawler bagged himself a space pirate, burning the Yuan Yuan off the table and creating the lovely odor of Pork Lo Mein. The HRL Wu Ming pushed its way around the corner in an attempt to get its shotgun into play to kill the Bandit. While my Bandit failed its Oblivion roll, my Transductor Zond flash pulsed the Wu Ming HRL back into cover, beating out linked rockets. The Al Fasid was next, stepping out to empty its HMG at the Bandit. I dodged into cover, forcing the Al Fasid to leave cover entirely and advance into 8″ of my Bandit. Somehow, my one die settled on an ADHL crit and I stopped the Al Fasid cold.
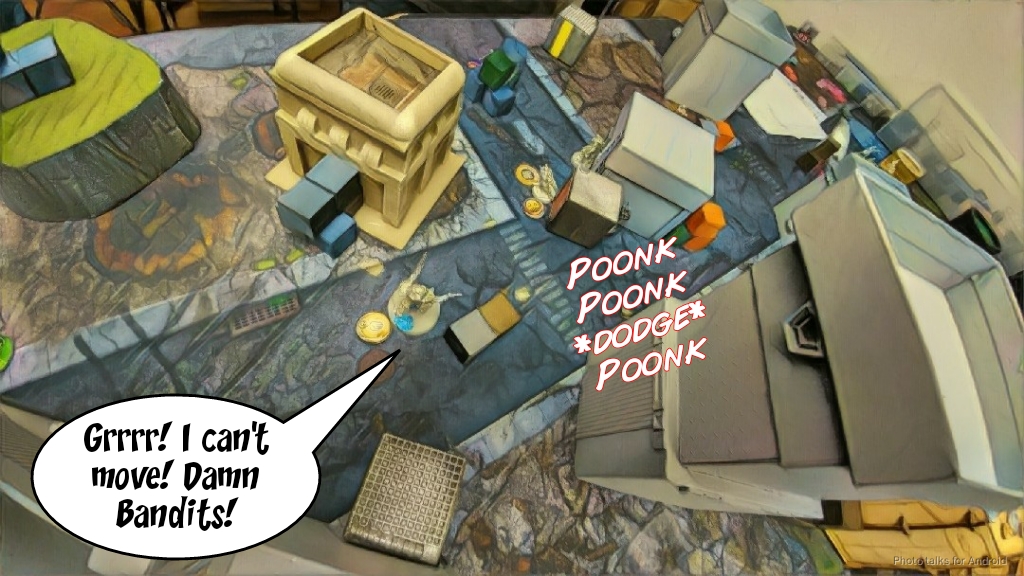 The way was mostly clear for the Engineer to advance and fix up the Wu Ming HMG, so that is exactly what he did. Adam wasn’t about to pass the turn back to me without killing at least one Bandit, so the Krakot pulled the pin on a grenade, counted to three, and then came around the corner to chuck it at my Bandit who failed her dodge.
 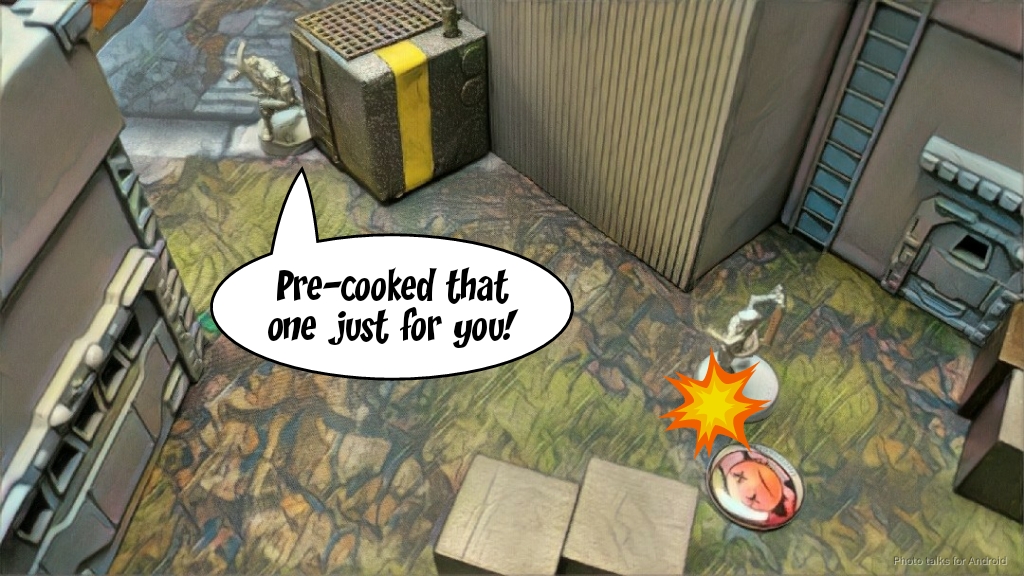 With that, Adam was out of orders. After some commiseration about how we both had rubbish first turns, it was back to me.
Turn 2
Top of Turn 2 – StarCo
I got really focused on getting Emily’s LGL into play, but I knew I’d have to deal with the Engineer first. I pushed my Bandit AHD out of cover, trying to get her around the corner to shoot the Engineer. This let me get a free shot at Oblivioning the link leader, who was the HRL, in order to break the link and remove their bonuses. Of course I got beat out by a reset again, and left my Bandit with a weird facing. The Engineer and the Wu Ming HMG were awfully close to the downed Yaozao though, so I successfully spotlighted it and charged Emily and the Algauciles upfield to try and E/M LGL the Wu Ming HMG. After getting into range, the first grenade isolated the Engineer but didn’t penetrate the Wu Ming HMG’s BTS. Adam kept spreading them out as I lobbed more grenades, eventually getting them out of range of the targeted Yaozao. My HMG was in a good spot to try and take out the engineer, but she goes down to a lucky crit from the engineer.
I still needed to kill that engineer, so I spent the orders in my second pool getting the Irmandinho up. I wanted to try and smoke the area to get the Bandit through the gap, but I ended up not having enough movement to get a smoke grenade where I needed it, so instead I settled for chain rifling the Engineer into unconsciousness. As part of doing a coordinated order to get the conscious members of the link into better positions, I was able to paramedic up the Algaucil HMG. After reforming the link, I had one more regular order left. I did something incredibly risky–I ran the HMG Alguacil out to see the Wu Ming HMG. We traded fire, but I rolled terribly and only landed one hit which the Wu Ming shrugged off with its ARM 4. I needed all my movement to get LoF so I couldn’t get back into cover, sadly. I also figured that due to the rangebands and burst, the HMG was better–truly a case of being too close for missiles.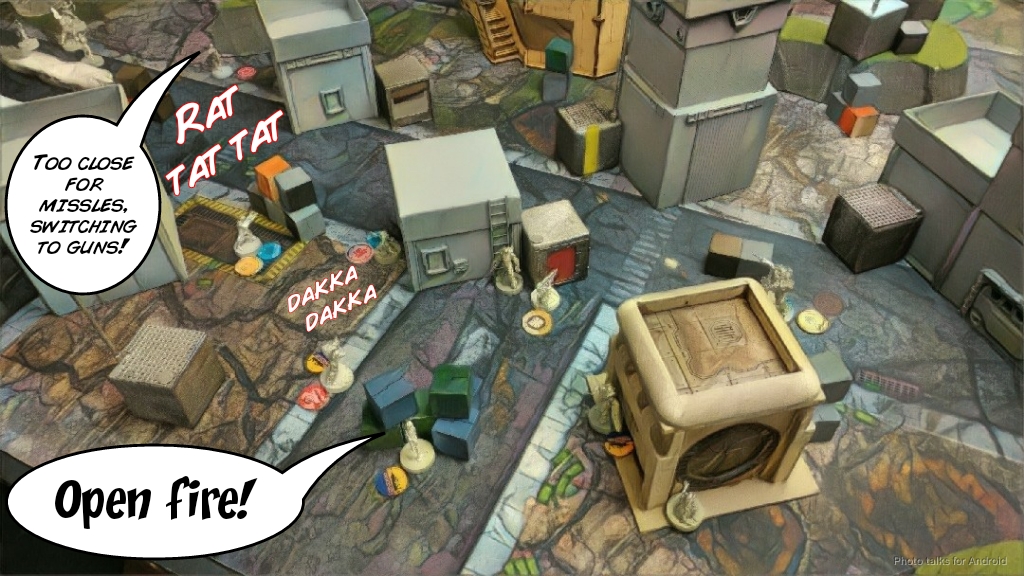 My last order of the turn was to run my Warcor over to cover the remaining Yuan Yuan. I crit on the flash pulse against an out of range pistol shot, wasting a perfectly good crit. With that, it was Adam’s turn.
Bottom of Turn 2 – Ikari
The Yuan Yuan removes one of my regular orders by chain-rifling my poor baggage bot, but I manage to flash pulse him again, ending his rampage.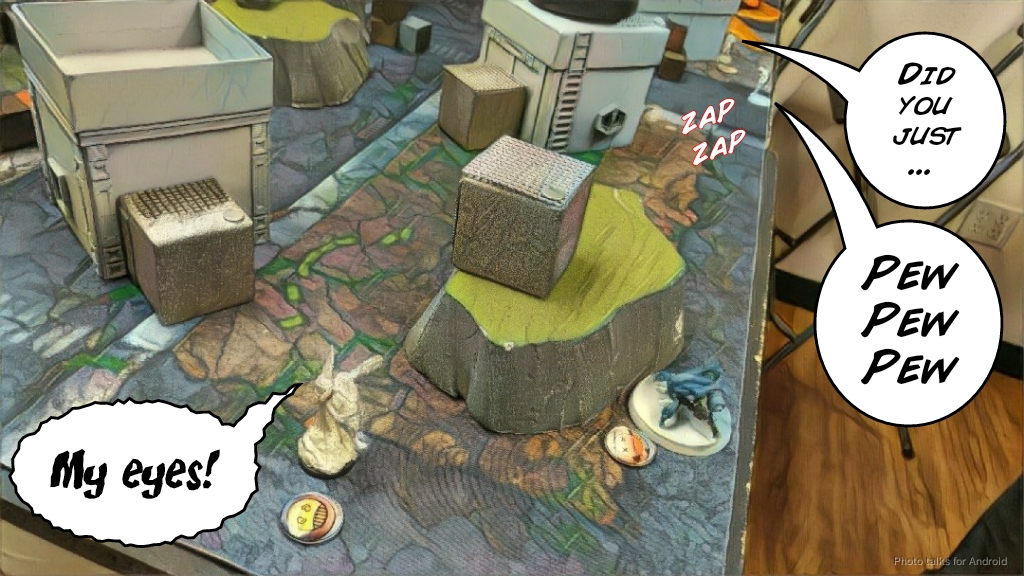 Adam the breaks my link by killing the Algaucil HMG with the Wu Ming HMG, which is exactly what I had feared. I do, however, finally isolate the Wu Ming HRL with my Bandit. Adam breaks his own link to avoid me doing this to his other Wu Ming then brings the Wu Ming HMG into position to shoot her in the back.
 I was quite disappointed in myself for the bad facing for her from my stupid order earlier. As I always say–my Bandits don’t fail me, I fail them. With the HRL Wu Ming isolated, Adam can only form the Haris, thanks to Ikari’s weird link team rules–which he already broke! Dirty cheater, haha! Let’s just ignore the fact that I didn’t have a KHD and still killed something with 1337 hacking… we’ll just say my Bandit threw a rock over the building and brained the Ninja. Yeah, that seems plausible.
With the AHD off the table, Adam was free to from a Haris of the Wu Ming HMG, Chain Rifle, and Brawler. Using the burst 5, Adam brought his HMG Wu Ming further around the corner to see my now-unlinked ML Alguacil, spending two orders to shoot it off the board entirely to prevent me from picking him back up with my paramedic. The Chain Rifle Wu Ming dragged everyone with him to go and hunt Emily, who was around the corner, killing the Irmandinho on the way. Thankfully, my flash pulse bot saved Emily, stunning the Chain Rifle guy before he could do any damage. I breathe a sigh of relief. At this point, Adam’s mostly out of orders so after shuffling some stuff around to get it into cover he passes the turn.
Turn 3
Top of Turn 3 – StarCo
I am completely out of command tokens, so I blow my entire second order pool into getting the Al’Hawwa into position to Carbonite the Chain Rifle Wu Ming and nail it. I throw two orders into the regular combi-rifle Alguacil and he heroically guns down the Chain Rifle Wu Ming over two orders, getting blasted off the table by the Wu Ming HMG as he does so. I hit twice on the first order, but ARM 7 saved one. In order to get the Wu Ming out of cover, I had to expose the Alguacil to the HMG for the second order, getting only one hit this time but Adam rolled a 1 on ARM. Thankfully, Adam failed both reset rolls. Why couldn’t he have done that earlier, when my Bandit was trying to hack him!?
Anyway, at this point Emily is free to start grenading things. I’ve got two orders to land an E/M grenade on Adam’s Brawler–I flub one roll and he passes BTS on the second roll. I’m not entirely sure why I chose E/M here, regular grenade for more points killed was definitely the right call here. Same odds, better overall result. With that, I’m out of orders.
Bottom of Turn 3 – Ikari
The Yuan Yuan and Krakot die to my HRL–I guess the that entire Haris is only good at killing impetuous troopers or something. Adam forms a new Haris (illegally, I might add, but we’re both tired, loopy, and a few beers in at this point). The HMG fails to kill my Al’Hawwa, who dodges into cover, letting the Haris run up the table. The BSG Wu Ming blasts Emily off the table, but not before I nanopulsar the HMG in response. The Al’Hawwa fails to do anything other than survive the Brawler’s LSG, which I guess is good for me in the long run? Adam tries again with his Lieutenant order, but my Al’Hawwa stands fast, and the game is over because Adam’s out of orders. Since I stupidly made Emily the Datatracker and ADHLing the Al Fasid doesn’t count for scoring, the 100-158 final score makes it a
2-8 Ikari Victory!
Even in spite of our mistakes and our general under-the-weather-ness, we still managed to finish a game in under 90 minutes. Hey, at least we both got to go home early and get some rest!
Notes
Notes for Me
- Remember what profiles you take!
- Not a terrible job at remembering to put my link in not stupid places this time around, always trying to put them in cover at the end of each order–insofar that I could as they ran up the board.
- Oblivion is really more of an ARO program… I wish it was burst two like Carbonite.
- I was pretty pleased with spotlighting the Yaozao and the E/M grenading it repeatedly to get the Wu Ming an the engineer.
- I was less pleased with my placement of the HRL Brawler Haris. I think I got too scared of Yuan Yuans sniping my Brawler Lt. The terrain on the left side of my deployment zone really did not make it easy for me to deploy a Haris over there–I’d have had to spend an order to get everything in position and I was concerned about what AROs Adam would have set up to prevent this. I suppose I could’ve deployed the Irmandinho over there to provide cover, which is what I should’ve done. I could’ve spared an order.
- It was a huge mistake moving my Algaucil link up towards the Wu Ming, who are among the best links at close range fighting. I need to remember that Emily’s X-Visor and the link and targeted bonuses make her E/M LGL stupidly good even at long ranges. I could’ve left them in my deployment zone and probably achieved the same result–which was nothing. So I’ll amend this bullet by saying that I definitely could’ve achieved nothing by leaving them in my deployment zone, haha!
- The Irmandinho doesn’t need to be in every StarCo list. Not sure I needed him here, what with nothing I’d really actually want to engineer. Probably better off taking some Jaguars as corner guards–much more dangerous than a flash pulse bot and tougher to get through as well. I think the double Bandit list doesn’t work quite as well out of StarCo as it does in Corregidor–I don’t have a monster like the Intruder HMG to anchor the second group. Raoul is good, but he’s not a direct replacement. Also, losing out on the excellent board coverage of double Moran hurts a lot too. I think I’ll revisit the archetype with a different overall plan in mind.
- I think I should’ve brought Raoul on in view of the Engineer. He can’t kill me in the first shot, and I can definitely be in boarding shotgun good range. That probably would’ve been better. Bring in Raoul, eat a shot to the face, maybe go into NWI, kill the Engineer. Spotlight the yaozao, drop E/M grenade on Wu Ming. Then come around with the bandit and use the IMM-2 Wu Ming as a meat shield to just blast things behind it with a LSG until everything’s dead. Hindsight is always 20-20.
Notes for Adam
- So much link team cheatery! Ikari are pretty damn confusing. I’m glad we got a chance to sort it all out in a friendly game before it mattered though.
- Very smart taking the Haris profile. I mean, you’re gonna do it for the cost and the kit anyway, also it’s an available sculpt. But it’s Ikari, you’re already highly likely to have a Brawler Lt on the table, and even though you have to have a Clipper in addition, you get a little more resilience out of your Wu Ming link. I like it.
- Good job with deployment, it made it a pain in the ass to bring in Raoul. I found a spot though. There’s always a spot.
- I might’ve brought the Krakot out to face my Bandit FO with its impetuous order. I probably don’t reveal, and then even if I do you trade up, and you have a Doctor on the table. If I don’t reveal, then you bring in the Yuan Yuan and then I’m stuck in a bad position of whether or not I reveal with you in CC range.